How to push array for table row values?
As we automate tasks and processes to save time and reduce errors, handling data seamlessly becomes a top priority. This is where the "Array" package steps in, offering a way to effortlessly manage and manipulate arrays within your RPA workflows.
In this blog post, we'll dive into a specific use case: pushing array values to table row entries. This task may sound complex, but with the right package and nodes, it becomes a running process that enhances your automation projects.
The "Array" package provides a wealth of functionalities that empower RPA developers to work with arrays in an intuitive way. One of the standout operations is the "Push" operation, which proves invaluable when it comes to appending data to table rows.
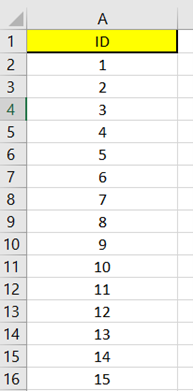
Imagine you have a dataset that you want to efficiently incorporate into your automation workflow. To make this happen, you'll first need to structure your data. One of the most versatile ways to organize data is by using an Excel spreadsheet. Excel not only allows you to input and arrange information neatly but also serves as an excellent source for RPA data manipulation.
So, the first step is to create an Excel spreadsheet that houses the data you want to work with. This could range from customer information to product details or any other dataset relevant to your specific RPA use case. The key is to organize your data into columns, making it easier to push these values into table rows later on.
Visual Snapshot
How to Setup?
To begin, Log in to your Robomotion workspace. If you haven't registered yet, you can create your workspace from the provided link.
First, ensure that the OpenAI package is installed for this flow. Once the package is installed, you can proceed with the flow by utilizing its functionalities for your tasks.
About the Array Package
This package offers a collection of 12 nodes, each tailored to perform specific array operations effortlessly. From creating and accessing arrays to advanced tasks like filtering, mapping, and aggregation, these nodes enable you to efficiently manage and transform array data.
Building Blocks for Flow Success
This flow utilizes the Core Excel package. If you attempt the identical operations using the MS Excel Package, the flow will result in an error. The success of this flow hinges on the Array package, which must be installed before you execute the flow.
How to install a package?
- Click the cube icon to access the packages page
- Right-click on a package and then select "Install."
Flow Steps
-
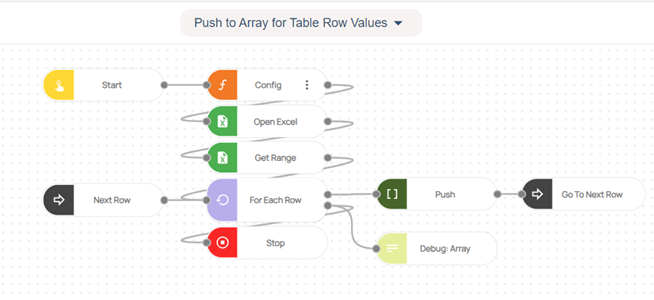
‘Inject’ node is used to initialize the flow.
-
Function node named “Config” includes some javascript code to define variables.
Function Node Named “Config” Code-Block:
//Excel Path of Data Table
msg.excel_path = "YourDataTableExcelPath";
//Defining Array
msg.array = [];
return msg;
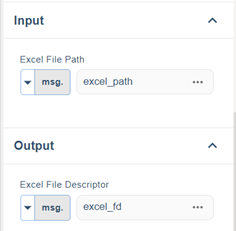
- The "Open Excel" node is used to initiate the opening process for the provided Excel file path. It requires a file path with the ".xlsx" extension as input and produces an output termed as the "Excel File Descriptor."
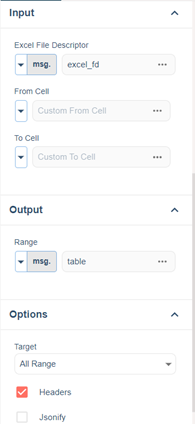
- The "Get Range" node is utilized for data retrieval. It requires an Excel File Descriptor as input, and in this case, we're using the default msg.excel_fd variable. The output is an object that encompasses arrays of rows and columns. In the options tab, we've selected "All Range" as the target and opted to include "Headers" for column identification.
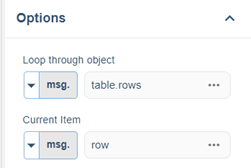
- The "For Each Row" For Each node is employed to iterate through and process each row of data. It requires an array variable as input. In this flow, we are processing each row within the msg.table.rows array.
- The "Array Push" node is used to append a value to a row within an array.
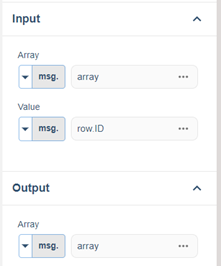
- The "Go To Next Row" Go To node is used to navigate to a specific label. In this scenario, it is used to transition to the next row.
-
The "Next Row" label node serves as a reference point for navigation within the process.
-
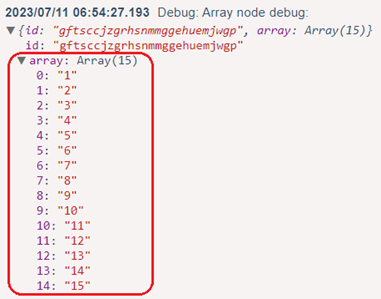
The "Debug: Array" node is utilized for displaying variable values within the flow. If a particular variable is provided, the node will exhibit only the value of the specified variable. In this instance, we utilize the msg.array variable to showcase the values of the array.
- “The Stop" node is used to stop the flow.
Here you can access the complete flow by clicking on the following link: https://casestudies.robomotion.io/designer/shared/NkJQd64Nxtd4jvsEhCbZRV
