Video Dubber Part 1: How to customize and run the flow

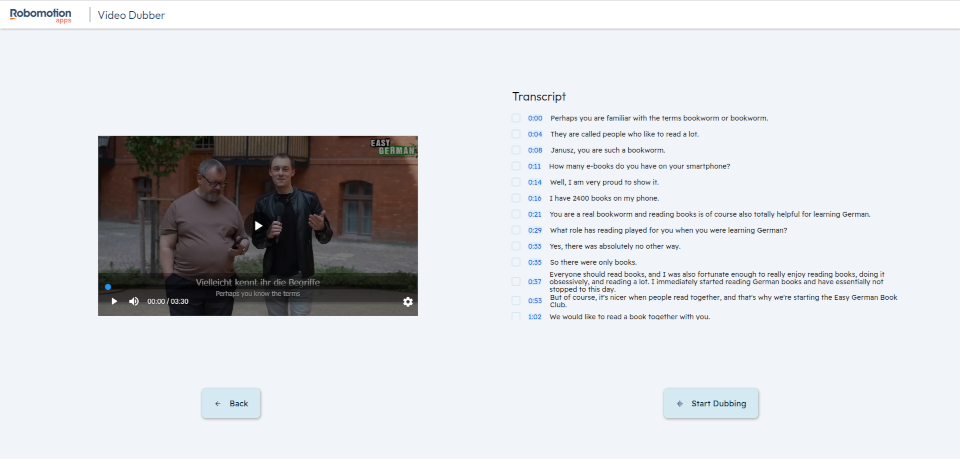
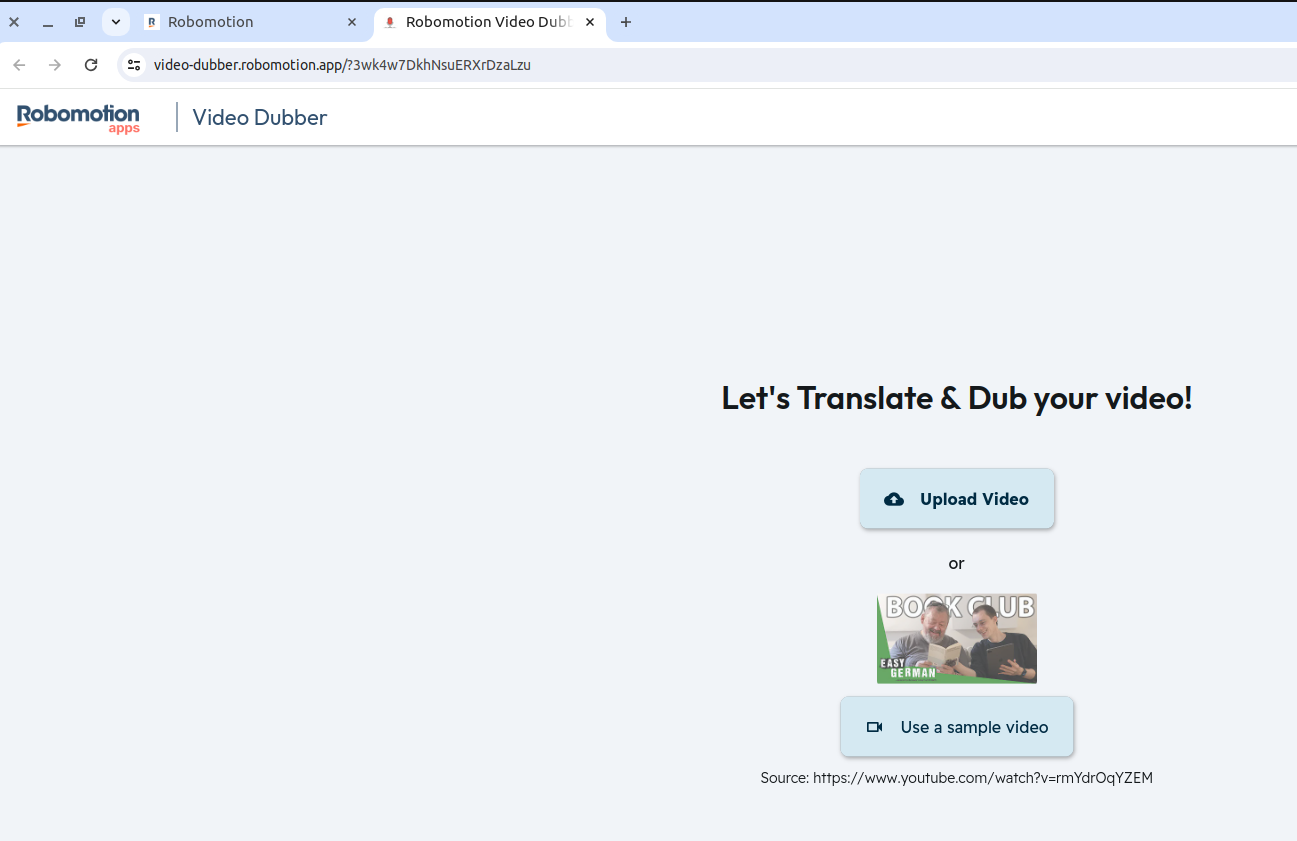
Before we begin, you can get a firsthand feel for our Robomotion Video Dubber application by exploring our interactive live demo.
This is the Part 1 of the Video Dubber blog posts. You can access Part 2 from here.
Introduction
Video Dubber is an application designed to assist in video dubbing and language translation. It utilizes a combination of technologies: Robomotion RPA for automation, Replicate for transcribing audio into text, and OpenAI for translating that text into various languages. The app allows users to edit these transcriptions and convert them back into speech using OpenAI's text-to-speech technology, which is then used to create the final dubbed video.
Key features include:
- Backend Automation: Powered by Robomotion RPA, it automates the process of transcription and translation.
- Transcription and Translation: Uses Replicate for accurate transcription and OpenAI for translating text into different languages.
- Customizable Text-to-Speech: Offers the ability to edit transcriptions and utilize OpenAI's text-to-speech to produce the dubbed audio.
- Flexibility in Tools: Users can replace OpenAI's text-to-speech with alternatives like ElevenLabs AI, and modify workflows in the Flow Designer.
- User-Friendly Frontend: Developed with FlutterFlow, the frontend is designed for ease of use, and the code is shared for further customization.
Video Dubber is suitable for users who need a straightforward solution for dubbing videos into different languages, whether for personal projects, educational content, or professional video production. It offers a degree of customization and flexibility, making it adaptable to various requirements.
Before we get into the nitty-gritty of setting up and tailoring Video Dubber to your needs, let's watch our introductory video. This quick video will show you exactly what Video Dubber is all about, showcasing its main features and how it can help your video projects.
Running it from Robomotion App Store
If you're looking just to run the app, you can easily do this through our App Store. Robomotion can operate this app on both your Desktop and in the Cloud. The app leverages various AI platforms such as Replicate and Open AI. You can use Robomotion AI Credits, eliminating the need to register separately on these platforms. Alternatively, you can use your own API keys which require subscriptions on all AI platforms.
The minimum requirements to directly run this app from the Robomotion App Store are as follows:
- Application Robot ( Required - Our Personal Plan includes 3 Application Robots)
- Cloud Run Minutes ( Optional - You have the option to connect a robot on your Desktop to run this app. You can buy Cloud Run Minutes from Admin Console's Subscriptions page.)
- Robomotion AI Credits ( Optional - You can run the app using your own API keys by modifying the flow in Flow Designer as detailed below. You can buy AI Credits from Admin Console's Subscriptions page.)
Creating a 25-minute video with Cloud Run minutes and Robomotion AI credits is 5 to 10 times more affordable than comparable AI SaaS dubbing software found online. You can further reduce costs by modifying the flow to use your own API keys and running the flow on your desktop.
Additionally, you are not constrained by minute limitations or obligated to subscribe to higher plans for longer durations as is often the case with online SaaS dubbing software pricing models.
Running it from Robomotion Flow Designer
Moving forward, we will show you how to import and modify the Video Dubber flow. If your goal is simply to use the Video Dubber application, you don't need to read further; you can run the flow directly from our App Store as mentioned earlier.
This part of the process requires a certain level of skill in Robomotion development, which may take some time to learn. The resources in our getting started guide and the tutorials section, as well as our YouTube videos, will be incredibly helpful. We also invite you to join our Discord community, where our team is always ready to assist you with any challenges you face in your learning and development journey.
Setup
First, log in to your Robomotion workspace. If you don't have an account yet, you can create your workspace here.
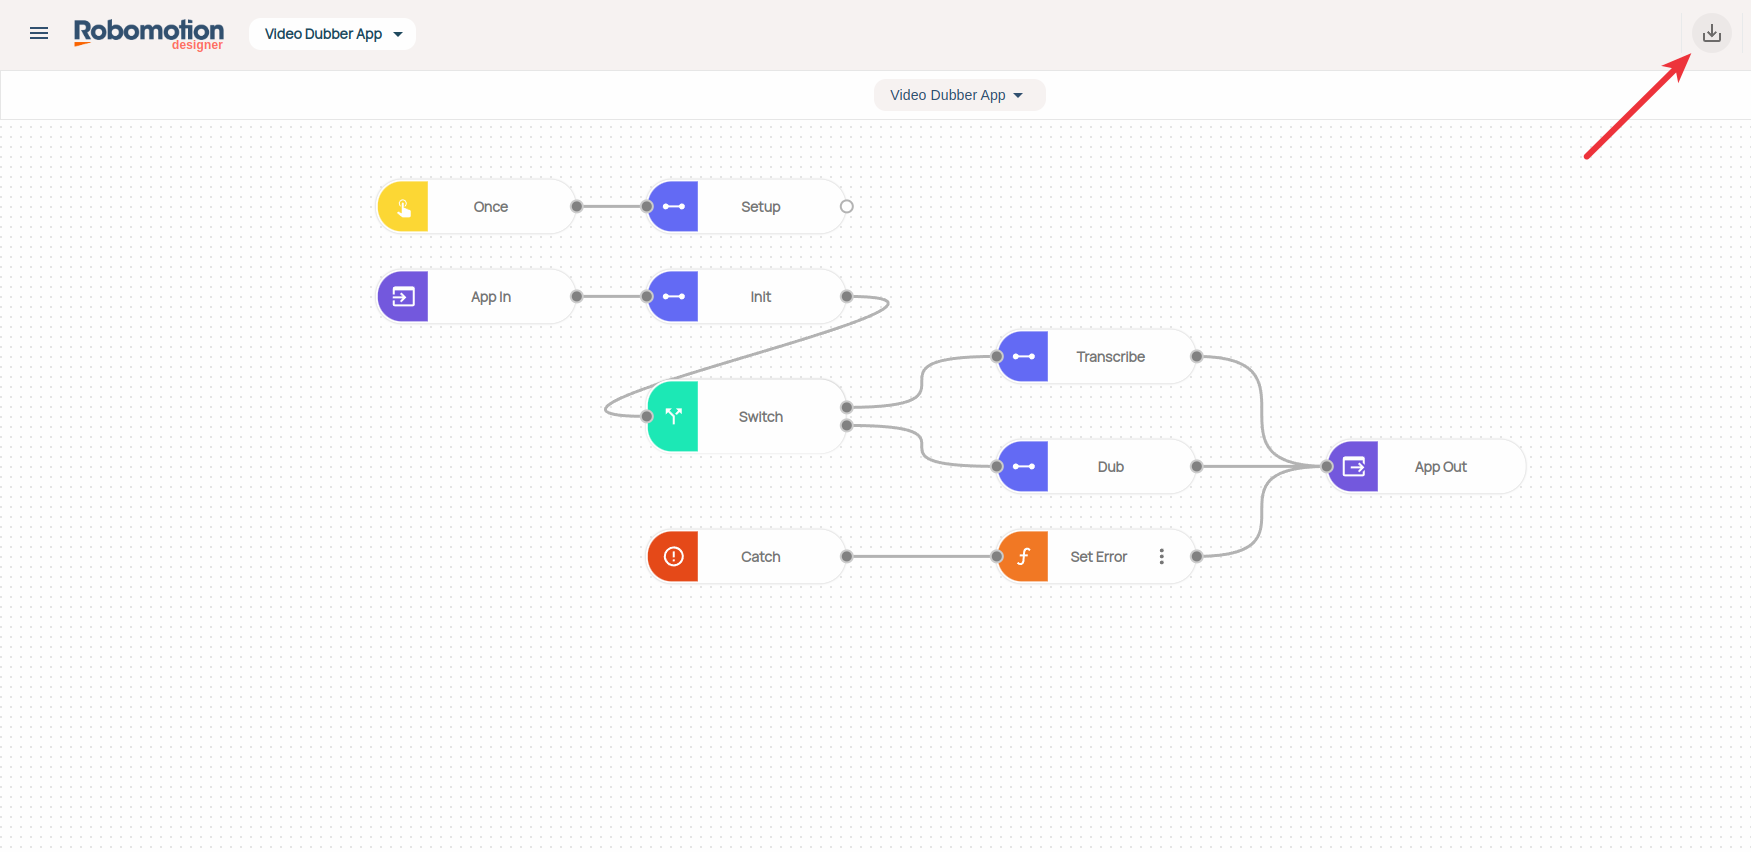
Let's begin by importing the Video Dubber flow from this link. Click on the 'Import' button as shown below.
Credentials (Optional)
This section is optional and only necessary if you prefer to use your own API keys. The flow uses Replicate and Open AI. If you're not already registered on these platforms, you'll need to do so. You can skip this section if you are using Robomotion AI Credits.
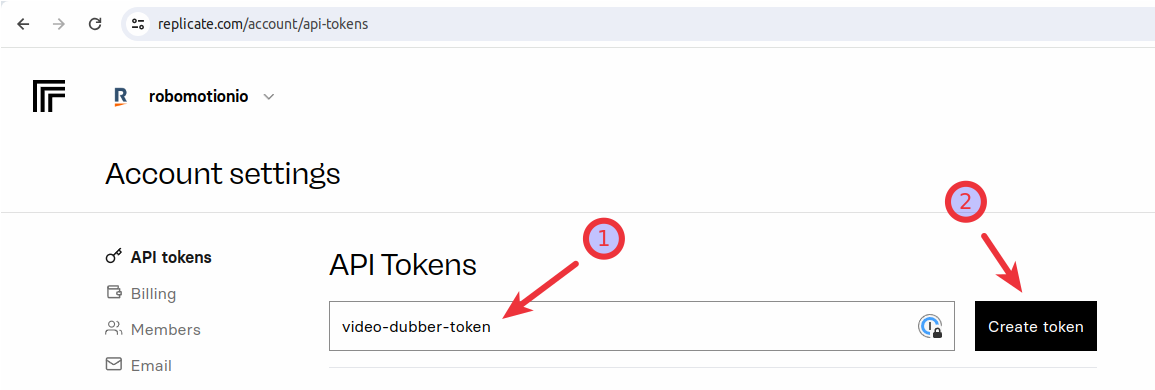
- Sign up for Replicate and navigate to their API Tokens page to create an API token. Name your token for easy identification and save it securely.
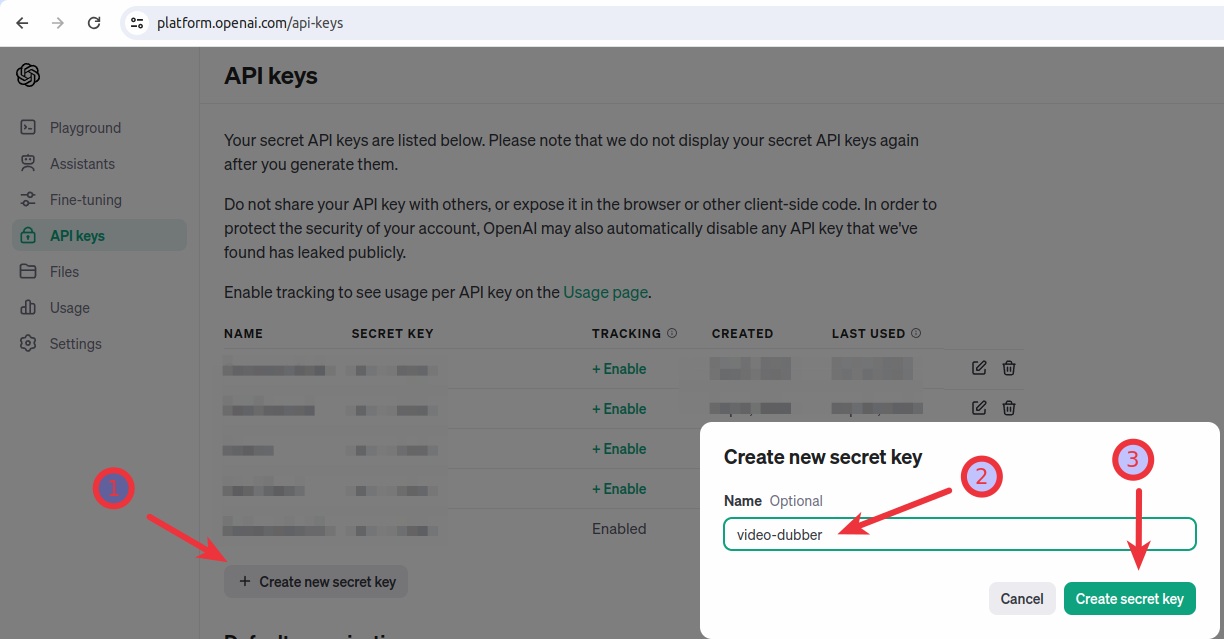
- Similarly, sign up for OpenAI, go to their API keys page, and create an API token. Remember to name your token and keep it saved in a secure location.
- Next, we'll set up a Vault for securely storing your API key credentials using Client-Managed Encryption Keys (CMEK).
Click on the Vaults icon.
![]()
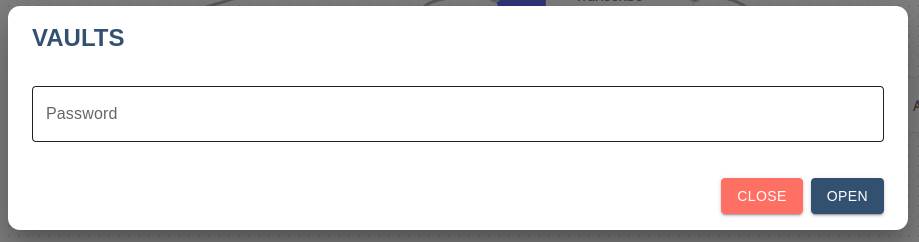
- Enter your workspace password to access your vaults. Note that vaults are secured with your workspace password and vault secret keys.
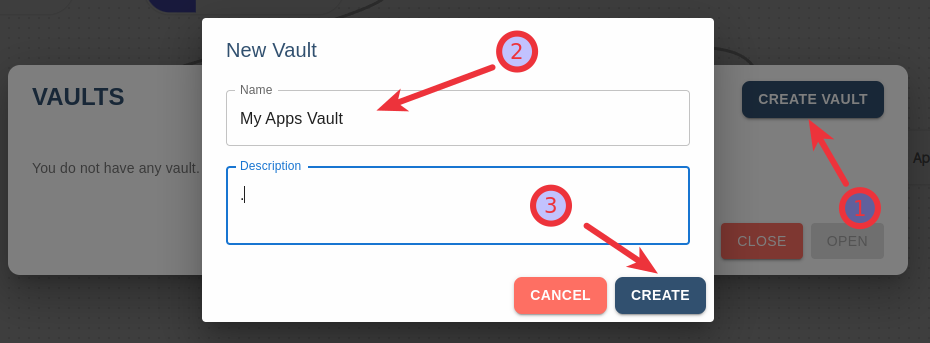
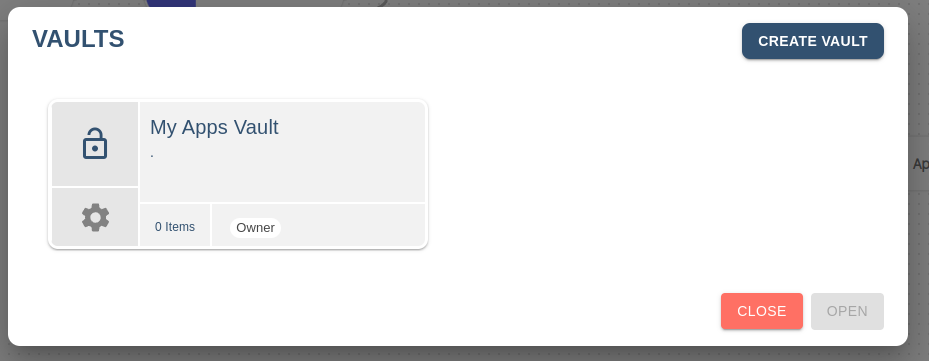
- Click on the 'Create Vault' button, give your vault a name, and then click 'Create'.
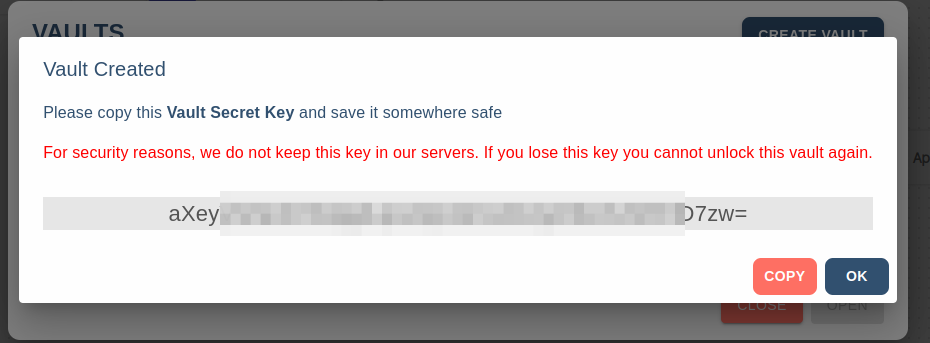
- Carefully copy and save your Vault Secret Key in a safe place. It's important not to lose this key; without it, you won't be able to access your vault and will need to create a new one. This secret key will later be used to inject into your Application Robot running on your machine or a VPS server.
- Click on your newly created Vault.
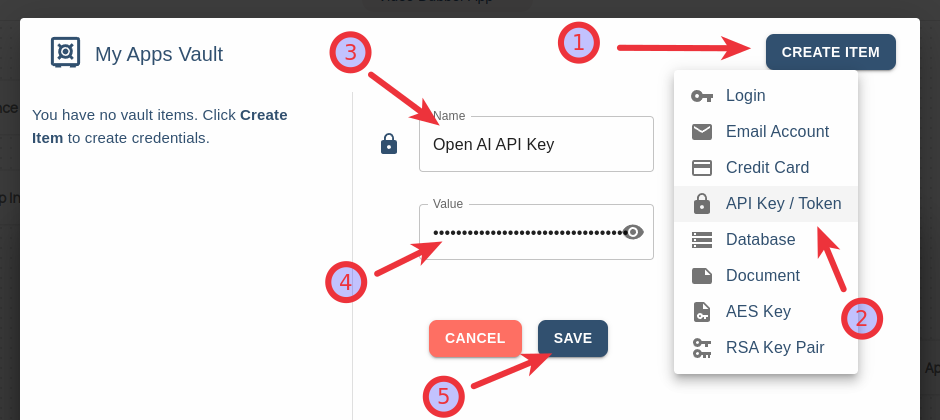
- Add your Replicate and Open AI keys to this vault.
- After adding the keys, close your vault and click on the Setup node in the flow.

- Click on the black 'Connect' node with the Replicate icon, deselect 'Robomotion AI Credits', and under Credentials, select your vault and the Replicate API key name you just entered.
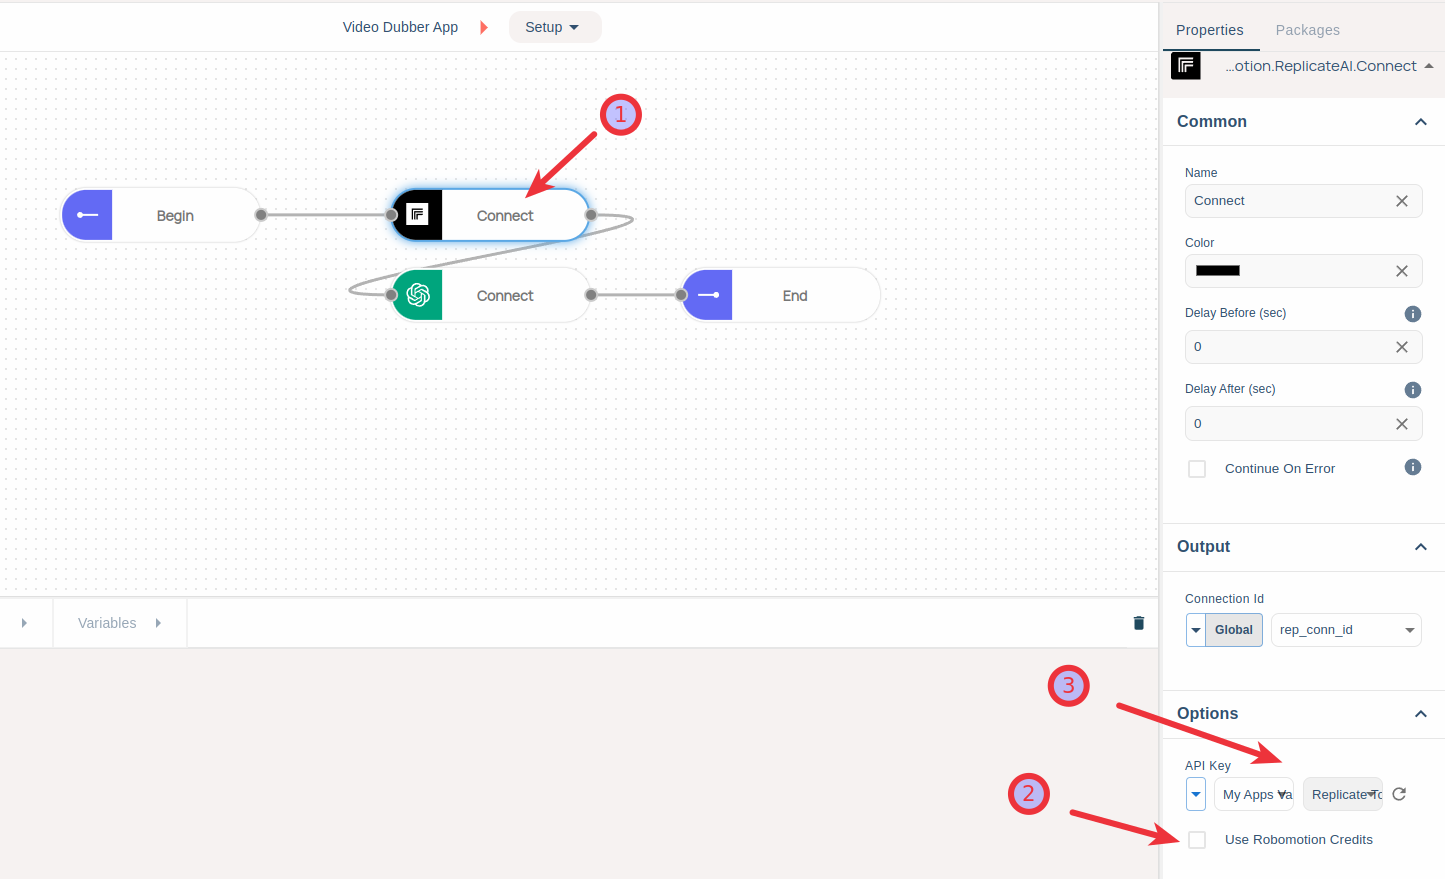
-
Repeat the previous step for the green 'Connect' node with the Open AI icon, deselecting 'Robomotion AI Credits' and choosing your vault and Open AI API key name.
-
Finally, save the flow.

Publish the Flow
To use our flow as an Application, we first need to version and publish our flow.
-
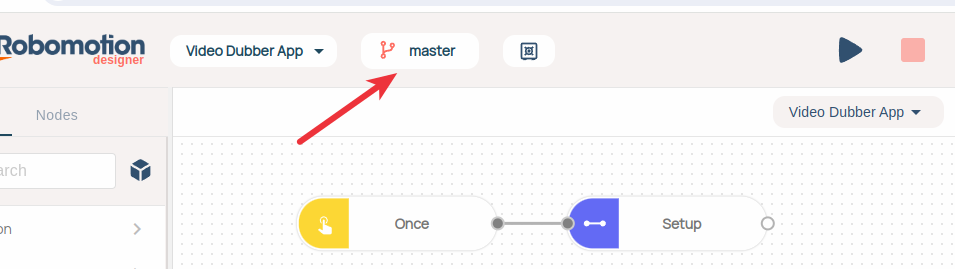
Click on the "master" button.
-
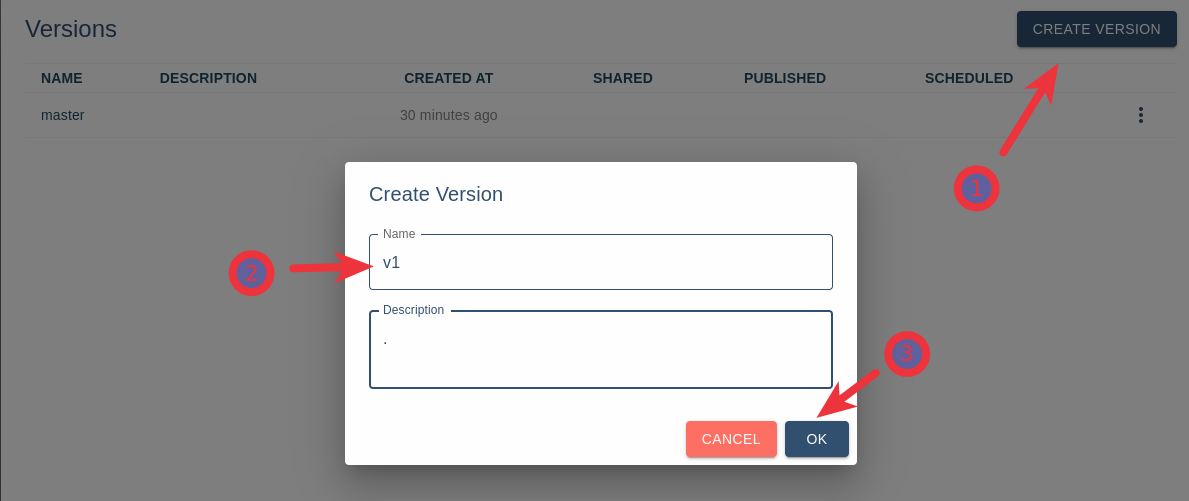
After clicking the "Create Version" button, create a new version. Fill in the Name and Description fields, then press "Ok".
-
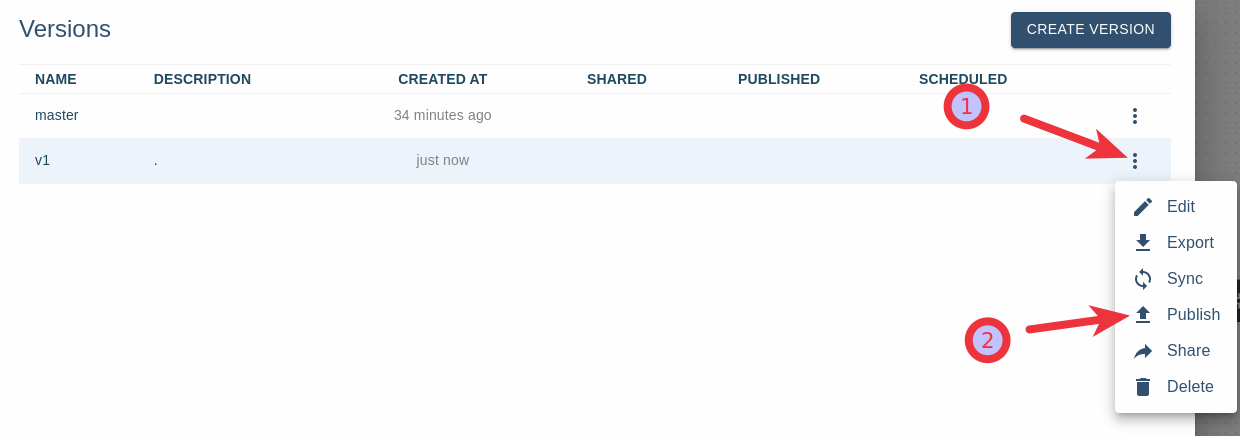
Finally, publish the created flow version. This step is necessary for the Admin Console.
Create Application
Now, let's open the Admin Console to transform our flow into an Application.
-
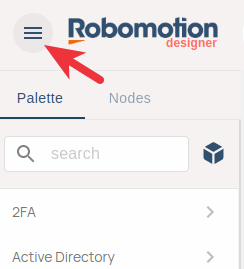
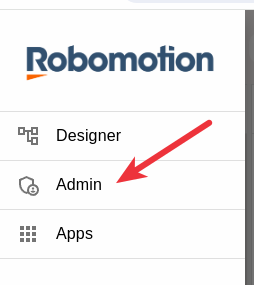
Click the hamburger menu at the top left corner and then select the Admin link.
-
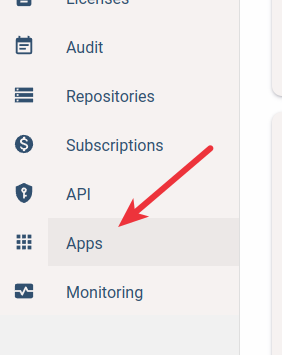
In the Admin Console, click the Apps link.
-
Press the "Create App" button and fill in the details as follows:

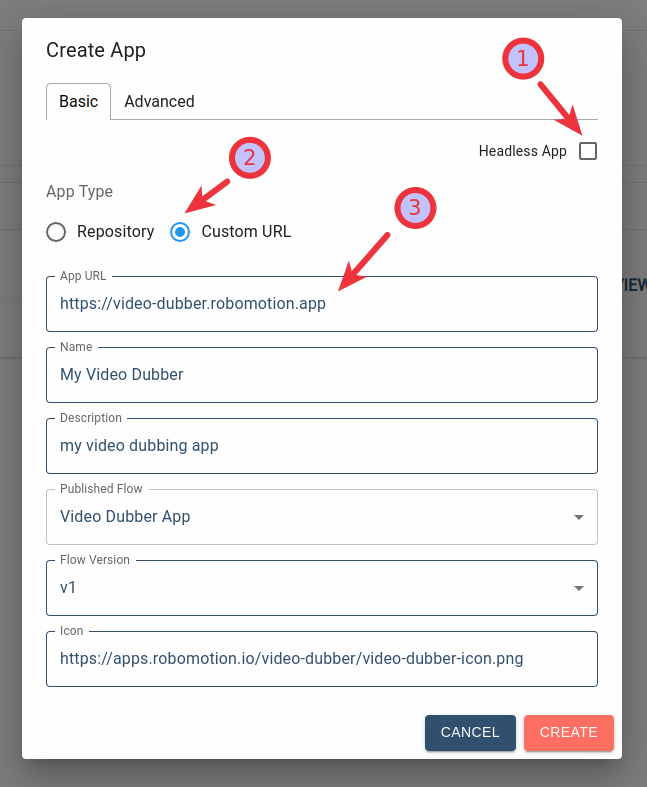
- Uncheck Headless App (this option is for applications that do not have a UI, like headless automations).
- Click on the Custom URL option.
- App URL: https://video-dubber.robomotion.app
- Name: My Video Dubber
- Description: Dubbing application
- Published Flow: Video Dubber (this is the name of the flow you previously published)
- Flow Version: v1 (this is the version name you published)
- Icon: https://apps.robomotion.io/video-dubber/video-dubber-icon.png
-
Click the Advanced tab in the "Create App" dialog, select "2 vCPU 4 GB Memory", then click the Create button. This automation requires a minimum of two vCPUs to run, especially if you want to run it in the Cloud.
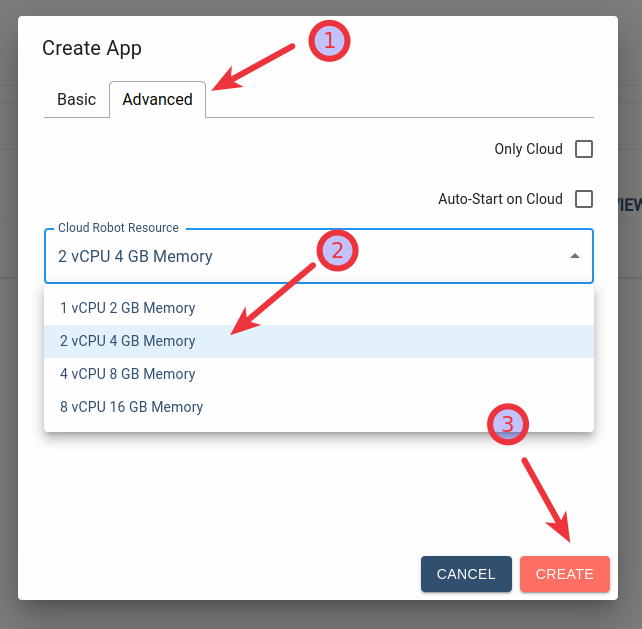
You will see a App created successfully message upon completion.

Create Application Instance
After creating an application in the Admin Console and connecting it with the Video Dubber UI Application that we provided for you, along with the imported flow, follow these steps to generate an Application Instance in the Robomotion Apps dashboard.
This is for creating an Application Robot for the flow to run. You can then run this app on your Desktop with this Application Robot, or in the Cloud without any installation.
-
Click the hamburger menu at the top left corner of the Admin Console application and select the Apps item.

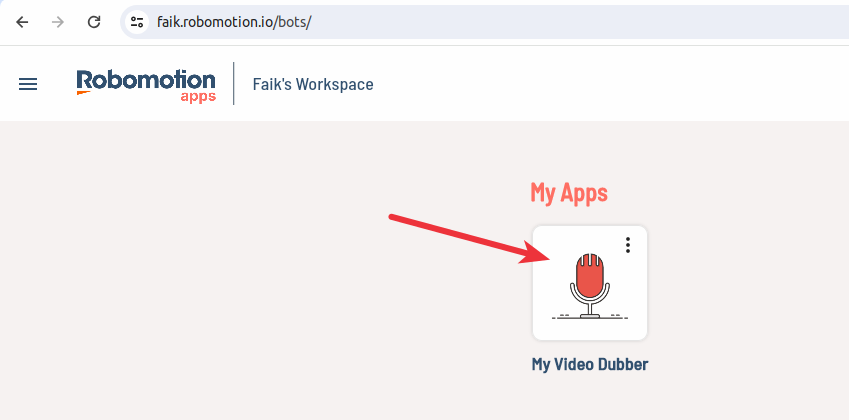
-
In Robomotion Apps, you will see your generated app. Click on the "My Video Dubber" icon.
-
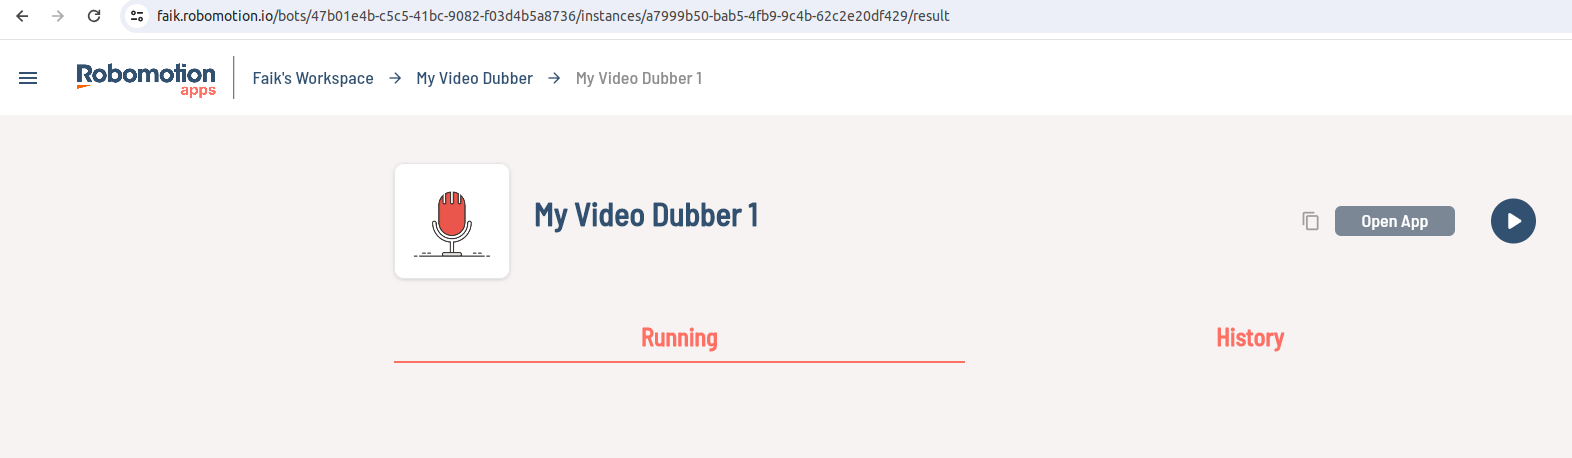
Click on the "Create Instance" icon, then click on the created instance item.
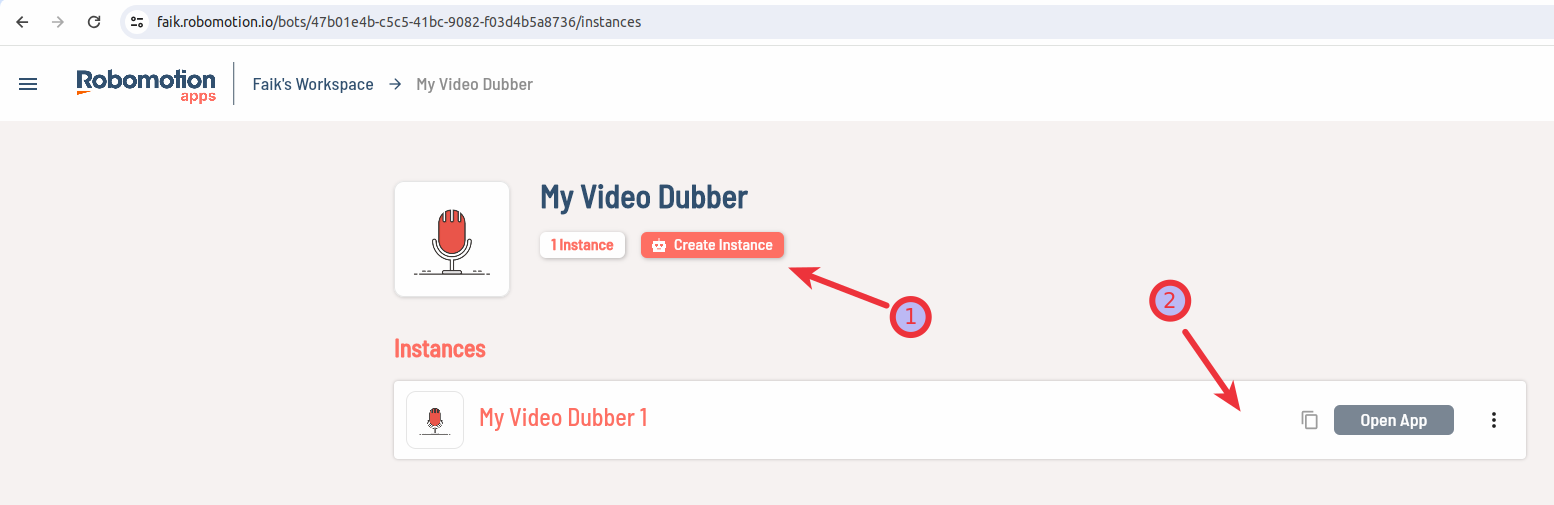
-
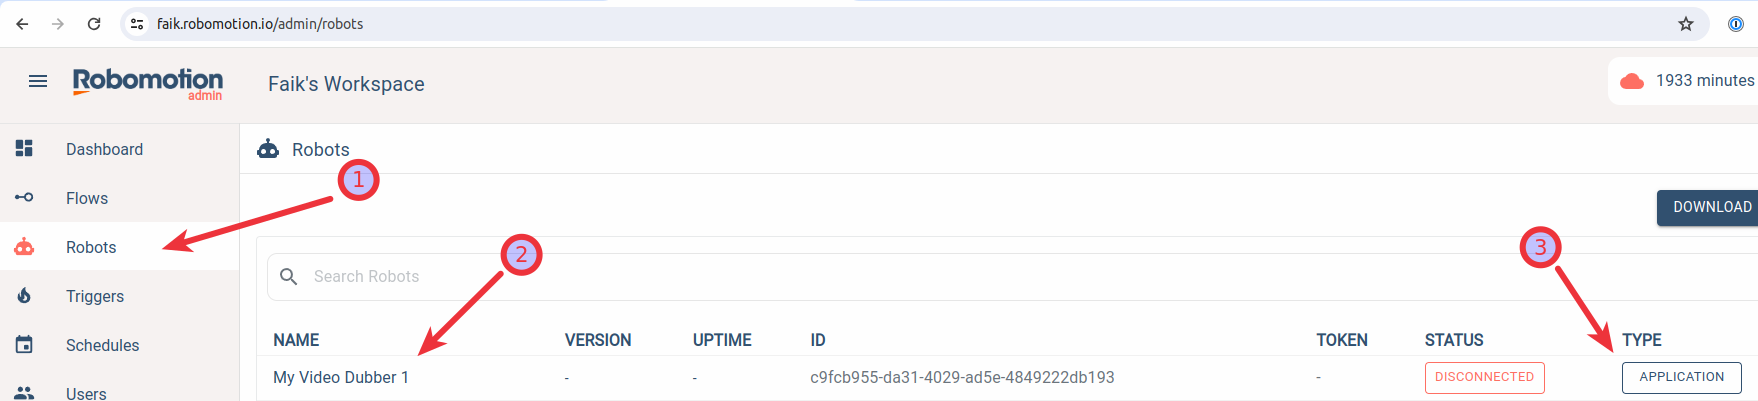
As a side note: If you check the Admin Console - Robots screen now, you'll see a new robot created with the same name as the instance and type Application Robot. You can rename it if you wish. This is how instances are linked to an Application Robot. You can only run the App flow on this robot.
-
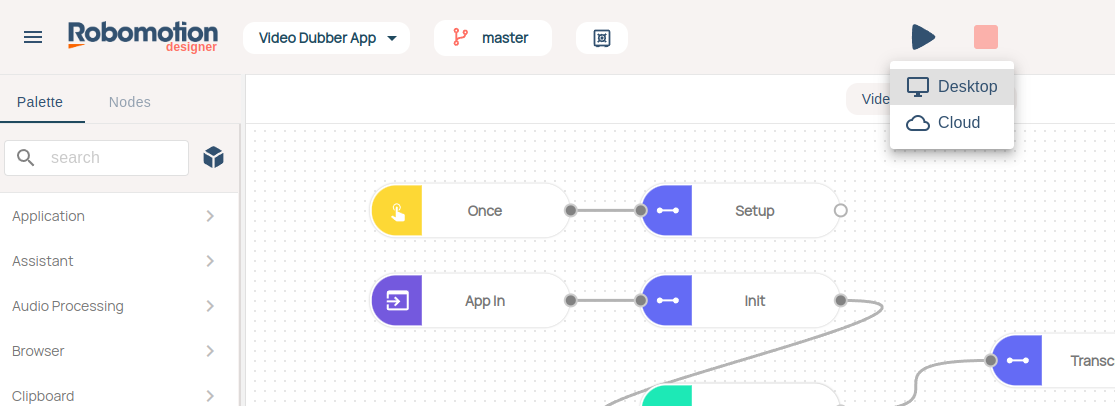
Return to the instance page you created in Robomotion Apps. In the top-right corner, you'll notice that 1 Application Robot slot has been allocated for this instance. When you click the Play button, two options will be available: Cloud (if you have Cloud Run minutes) and Desktop (if your robot is connected from your Desktop).
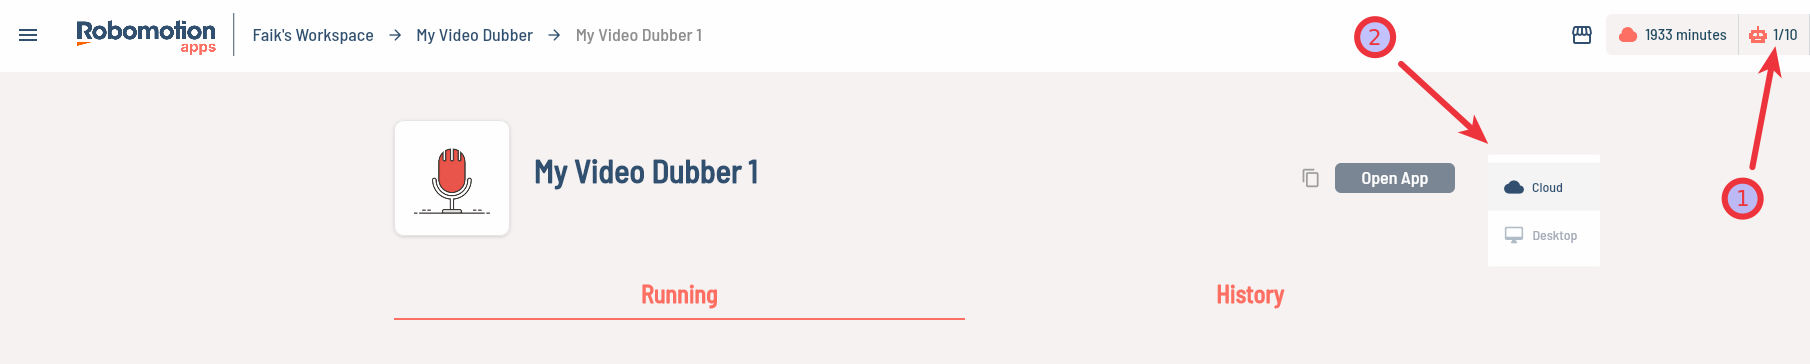
-
To connect your "My Video Dubber 1" robot from your Desktop , you can follow this guide.
-
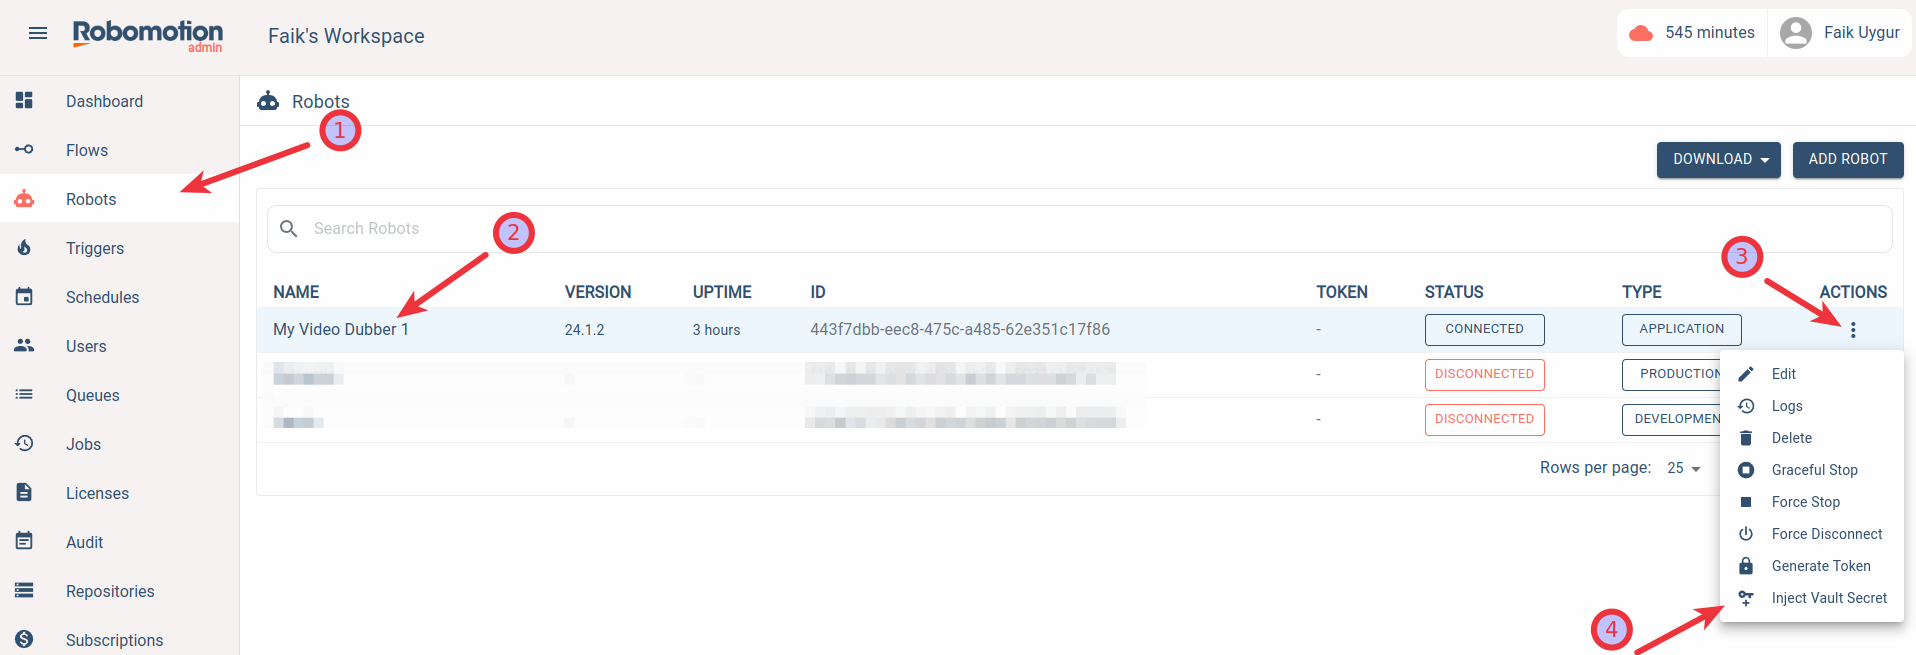
Remember the Vault Secret Key we created earlier? Now, you need to inject it into your newly connected robot from your desktop. This process only needs to be done once for each robot. Navigate to the Admin Console -> Robots screen. Your robot should appear as "Connected." In the Action menu on the right, select Inject Vault Secret. When prompted, enter your workspace password, then choose the Vault and input your Vault Secret Key. The key will be encrypted with your robot's public key and securely transferred to your robot. Whether your robot is running on your machine or a VPS, it can now use your encrypted credentials in your vault. For detailed instructions, refer to this guide.
Once you return to the Application Instance and click the Play button, the Desktop option should be highlighted, allowing you to run the application. (If it's not highlighted, try refreshing the page.)
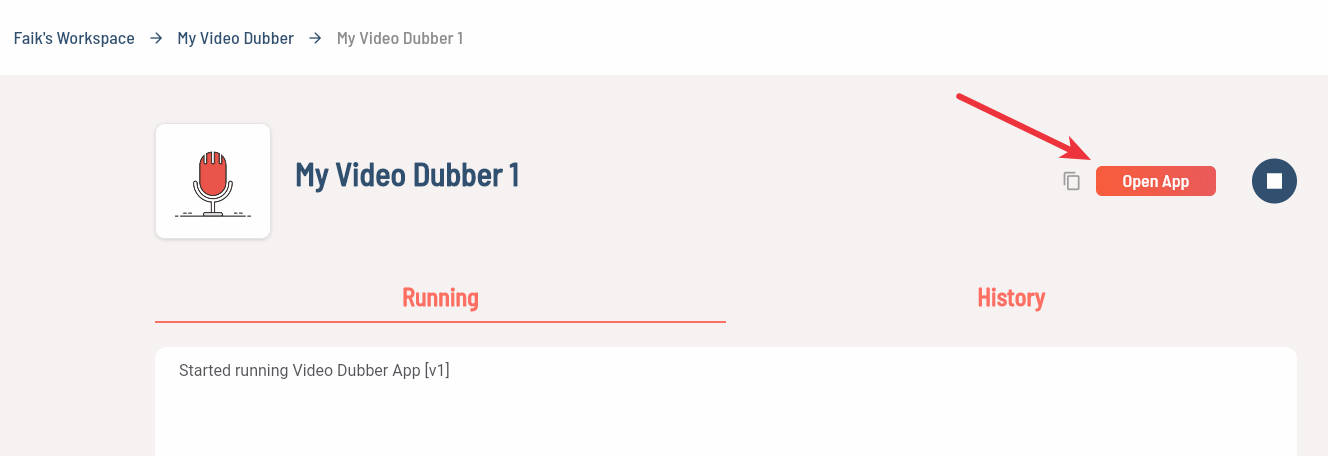
If you click the enabled Open App button, it will launch the UI application which is now connected to your Application Robot running on your Desktop.
This application is connected to the v1 version of the flow you have published. To run the flow from Flow Designer, stop the instance in Robomotion Apps, return to the flow project, and run the flow on your newly connected robot.
We went through the previous steps to create an Application Robot for this Application by creating an instance. Now, you can select the Application Robot to run this flow.

This way, you can develop and run the flow on the Application Robot from the Flow Designer without creating and publishing new versions every time you make an update.
When your development is complete, create a new version, publish it, and update your app version from the Admin Console -> Apps screen. We will explore how to do this in the next section when we update the flow to replace OpenAI text-to-speech with ElevenLabs.
ElevenLabs AI
ElevenLabs AI offers a natural text-to-speech and AI voice generator service, enabling users to generate high-quality spoken audio with realistic voices, styles, and languages. The AI model used by ElevenLabs renders human intonation and inflections, adjusting delivery based on context for unparalleled fidelity.
The tool finds applications in various areas, including content creation, storytelling, gaming, audiobooks, AI chatbots, and more. With the capability to generate lifelike speech in 29 languages and 120 voices, it stands out for its versatility and natural voice generation, making it a compelling choice for digital creators, game developers, authors, and those seeking engaging AI-generated interactions.
Now, let's explore a modification to the existing flow by replacing the OpenAI text-to-speech functionality with a more realistic voice AI technology, ElevenLabs AI.
Set Up ElevenLabs Connect Node
-
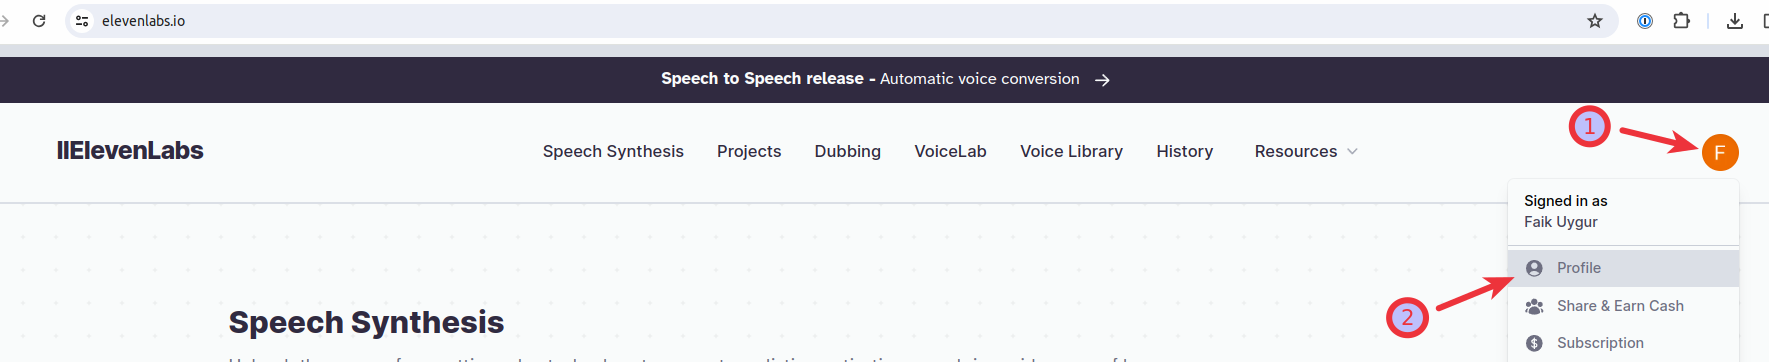
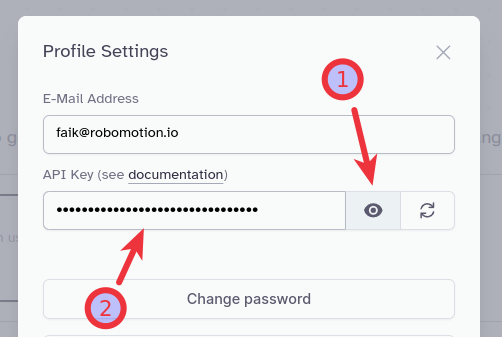
Begin by signing up for ElevenLabs and navigating to your profile.
-
Click the eye icon to reveal the API Key and copy it.
-
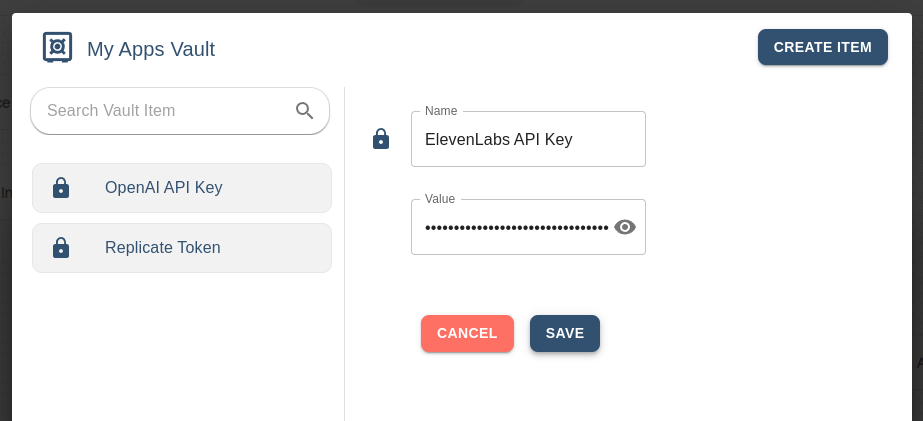
In the Flow Designer, access the Vault by clicking the Vault Icon. Enter your vault and create a new Vault Item for your ElevenLabs API Key, following the instructions from previous sections.
-
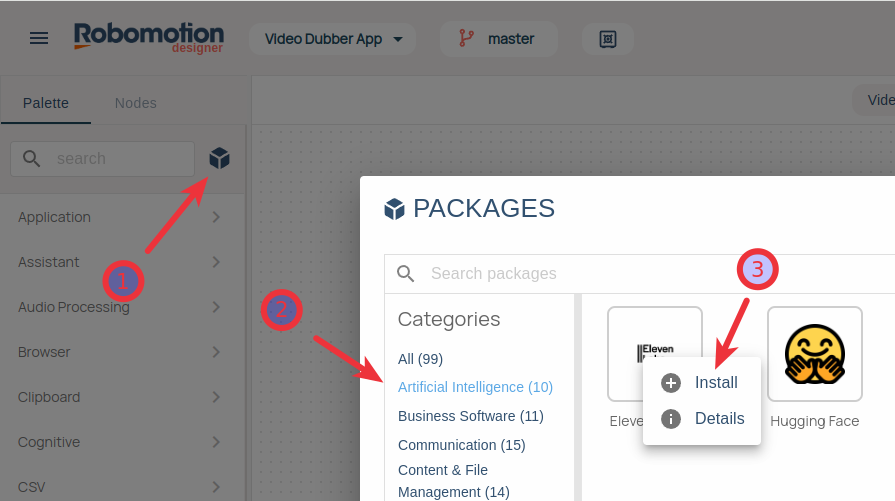
Install the ElevenLabs package in the Flow Designer. Click the package icon, select the Artificial Intelligence category, and right-click on the ElevenLabs package. Then, click install.
-
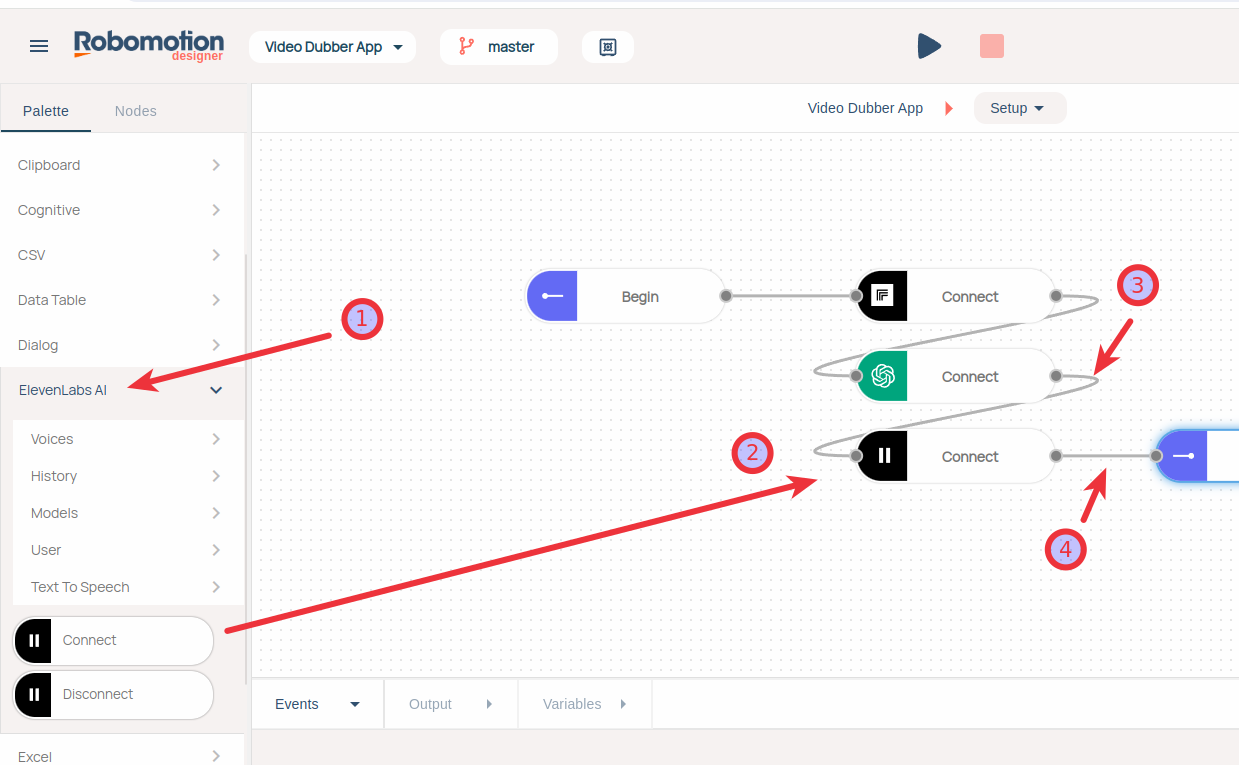
Locate and click on the ElevenLabs package, drag and drop the Connect node, and connect it with the previous and next nodes as shown below.
-
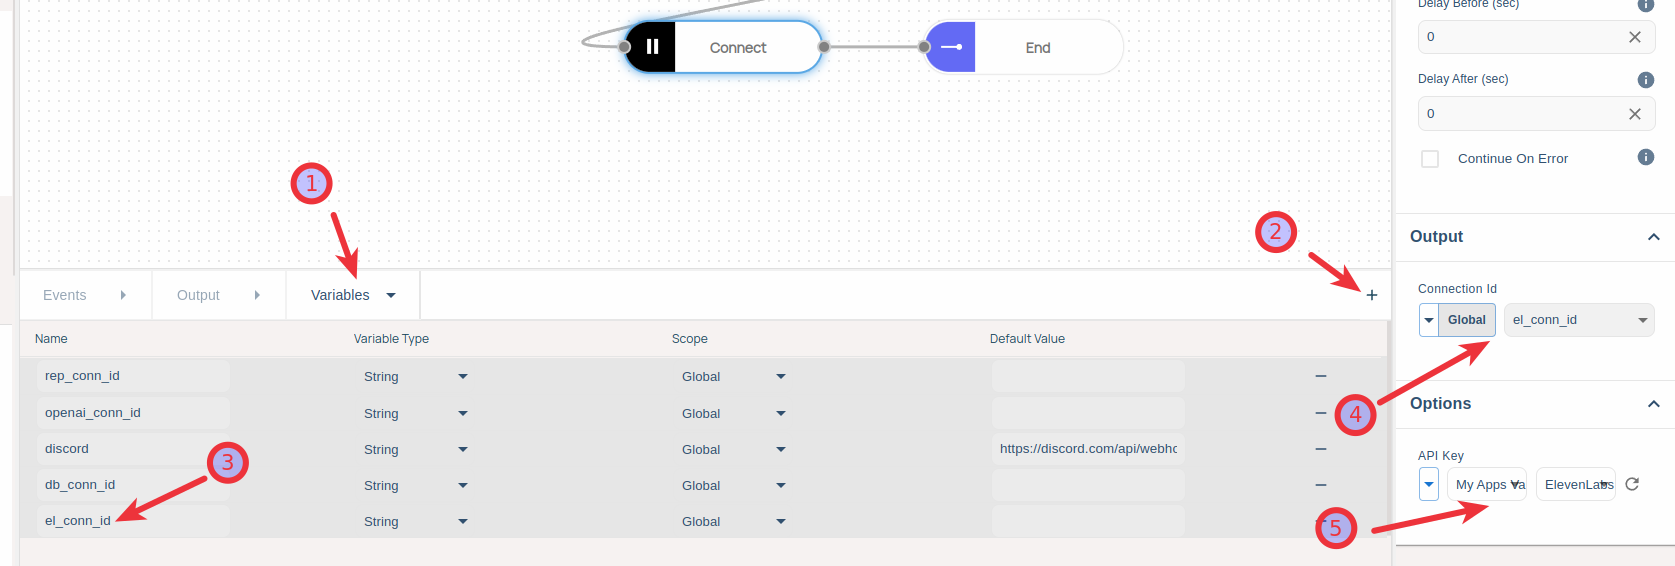
Click the ElevenLabs Connect node. Navigate to the Variables tab and add a new Global String Variable named el_conn_id. Then, in the Connect node's Output property, select the Global Scope and choose the newly created el_conn_id global variable. Finally, go to the API Key section and select the previously added ElevenLabs API Key item. If the Vault is empty, click the refresh button to fetch the Vault and Items.
Replace OpenAI Text-to-Speech
Now, let's replace the OpenAI Text-to-Speech with the ElevenLabs Text-to-Speech node.
-
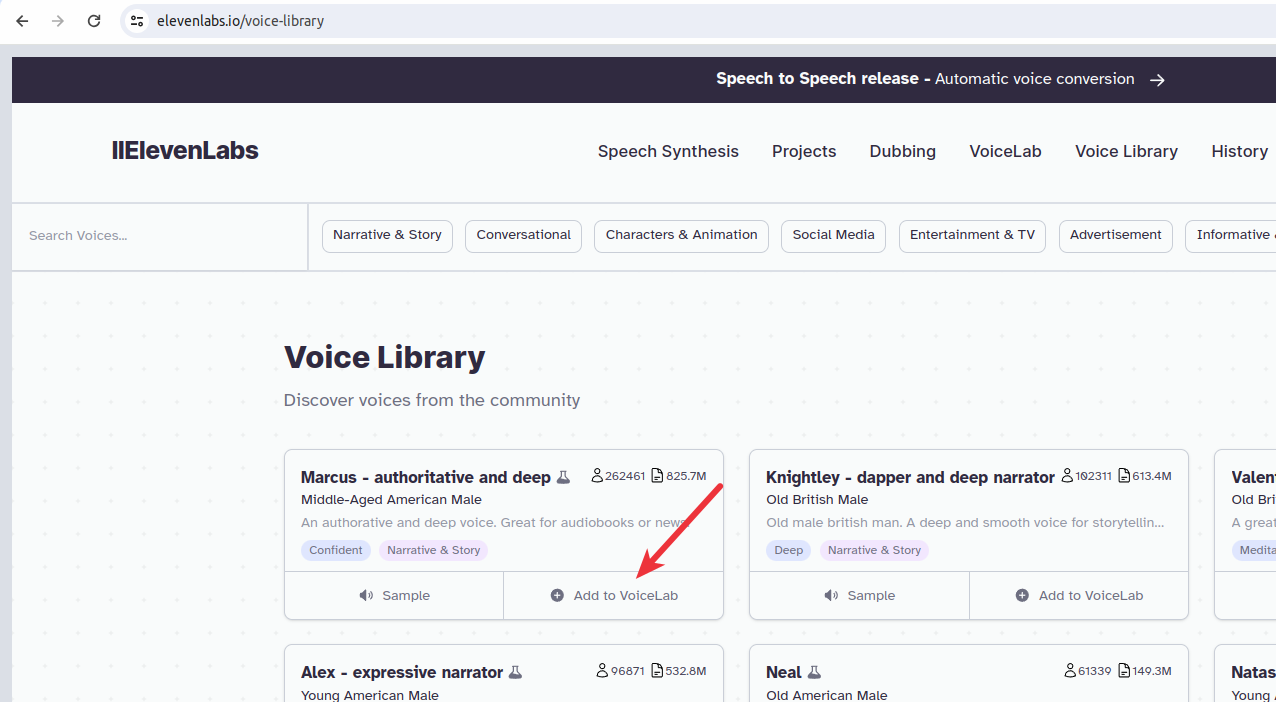
Obtain a Voice ID from ElevenLabs by visiting the Voice Library and clicking the Add to VoiceLab button for the chosen voice.
-
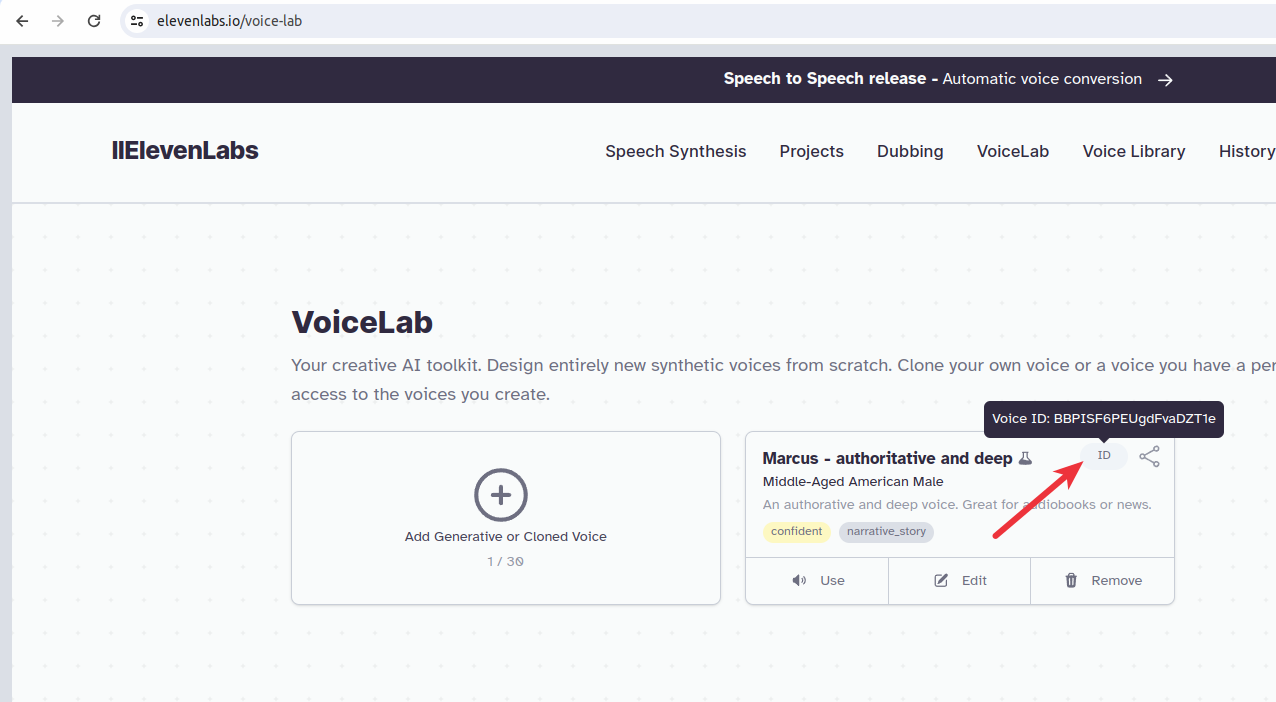
Visit the VoiceLab page and click the ID tag of the desired voice. Copy the Voice ID for use in the next steps.
-
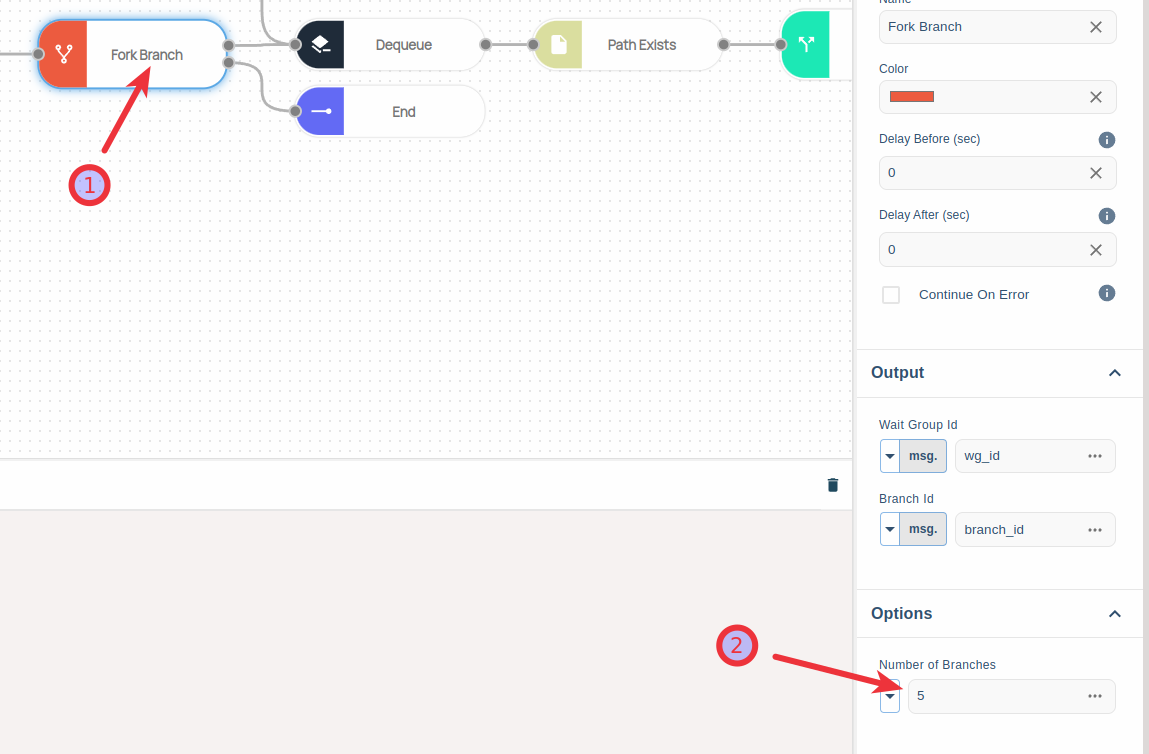
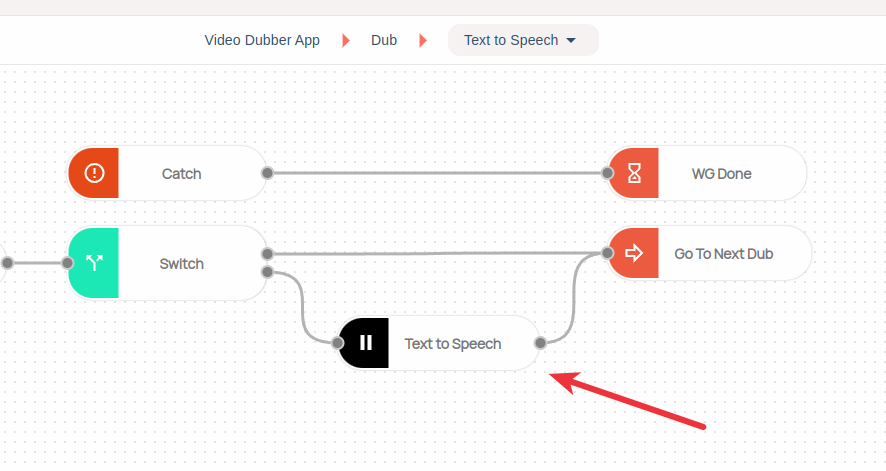
Return to the Video Dubber flow, navigate to the Video Dubber App -> Dub -> Text to Speech subflow, and click the Fork Branch node. Decrease the Number of Branches from 10 to 5, considering that the paid account of ElevenLabs allows no more than 5 concurrency. This adjustment prevents errors from the Text to Speech node when exceeding the concurrency limit.
-
Replace the green Open AI Text to Speech node with the ElevenLabs Text to Speech node.
-
Click the ElevenLabs Text to Speech node and set the node properties as shown below. Ensure to select the msg. scope.
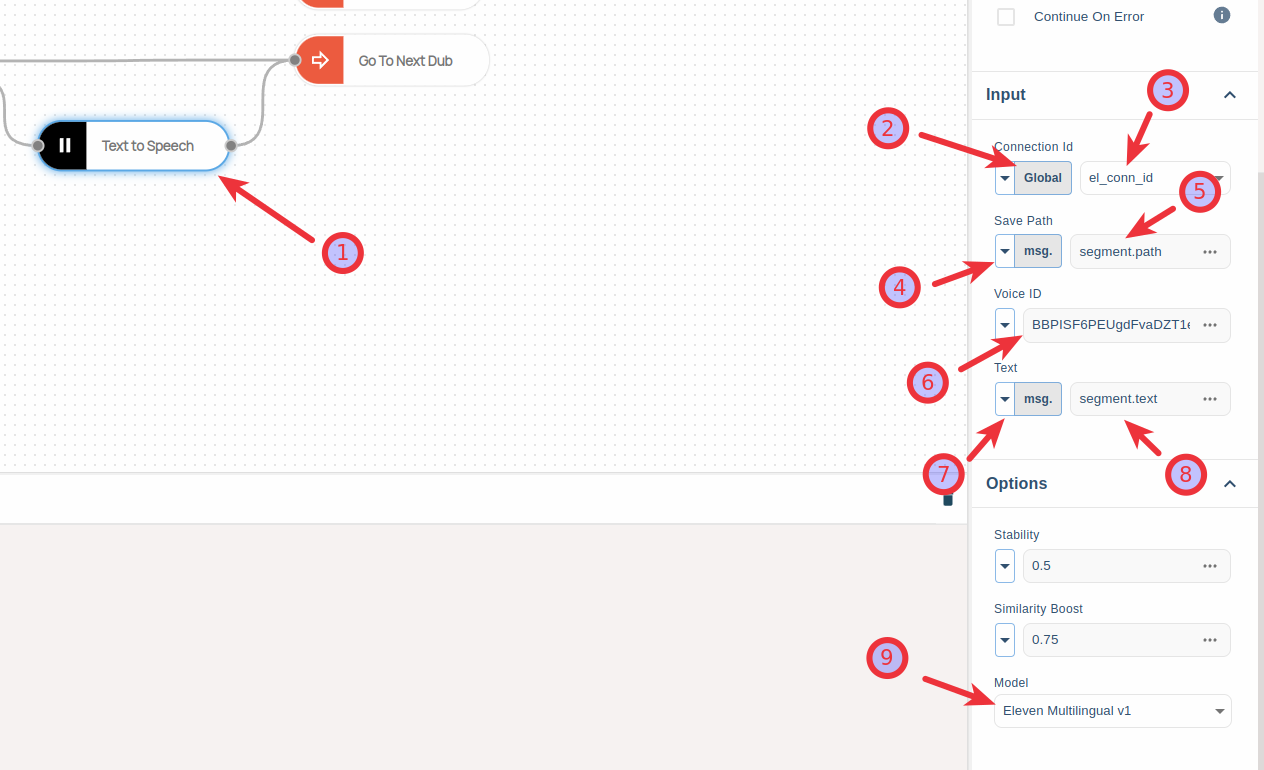
- Connection Id: Global.el_conn_id
- Save Path: msg.segment.path
- Voice ID: Use the Voice ID copied from ElevenLabs.
- Text: msg.segment.text
- Model: Eleven Multilingual v1
-
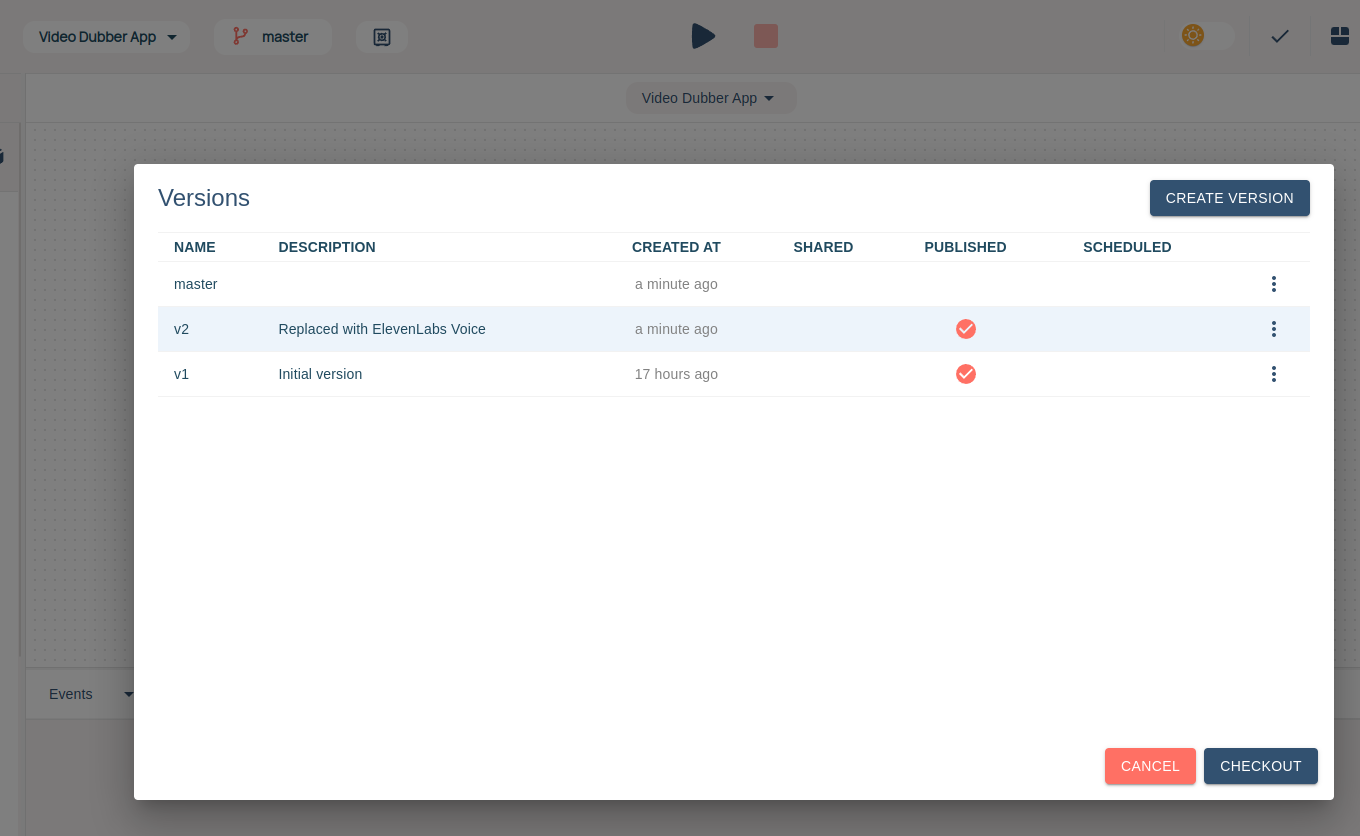
Save the flow, create another version named v2, and then publish this version.
-
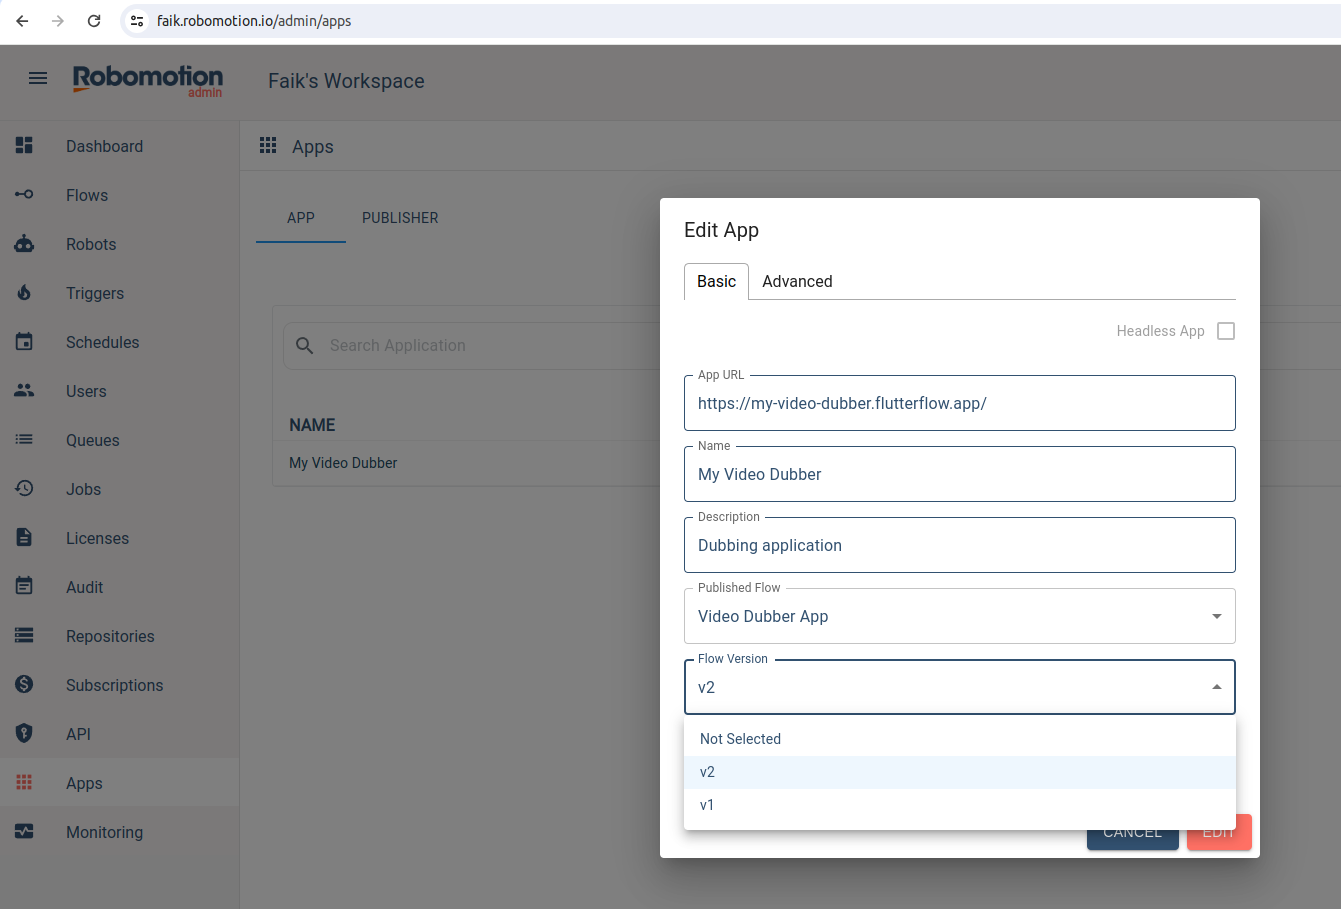
Go to the Admin Console -> Apps screen, Edit the My Video Dubber App, and select the v2 version of the flow. Save the changes.
-
Now, go to the Robomotion Apps instance, stop and start the flow again. This time, it will initiate the v2 version of the flow, utilizing the ElevenLabs Text to Speech instead of Open AI Text to Speech.
Enjoy your enhanced experience with Video Dubber!
General Problems
If you have trouble setting up this flow, please Join our Discord Community. You can ask questions in our #video-dubber channel.