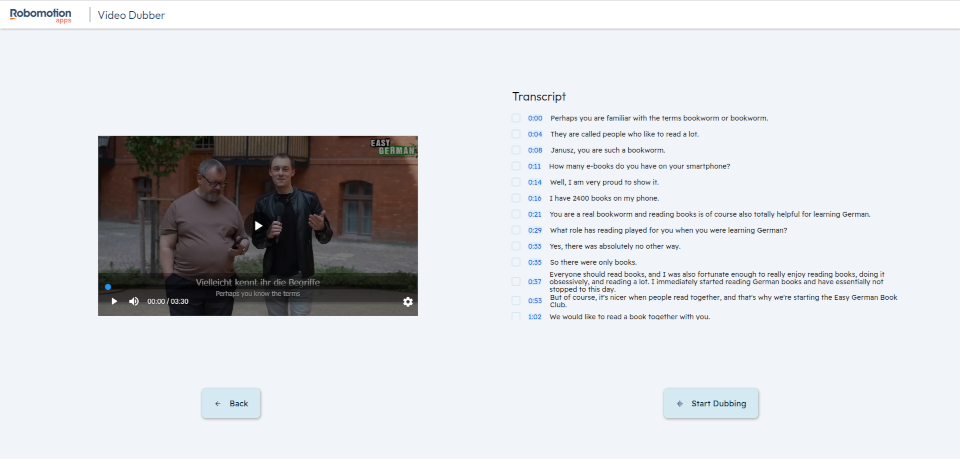
Video Dubber is an application designed to assist in video dubbing and language translation. It utilizes FlutterFlow.
Previously, we shared a post demonstrating how to modify the Robomotion flow. In this post, we will explore how to modify the FlutterFlow UI application.
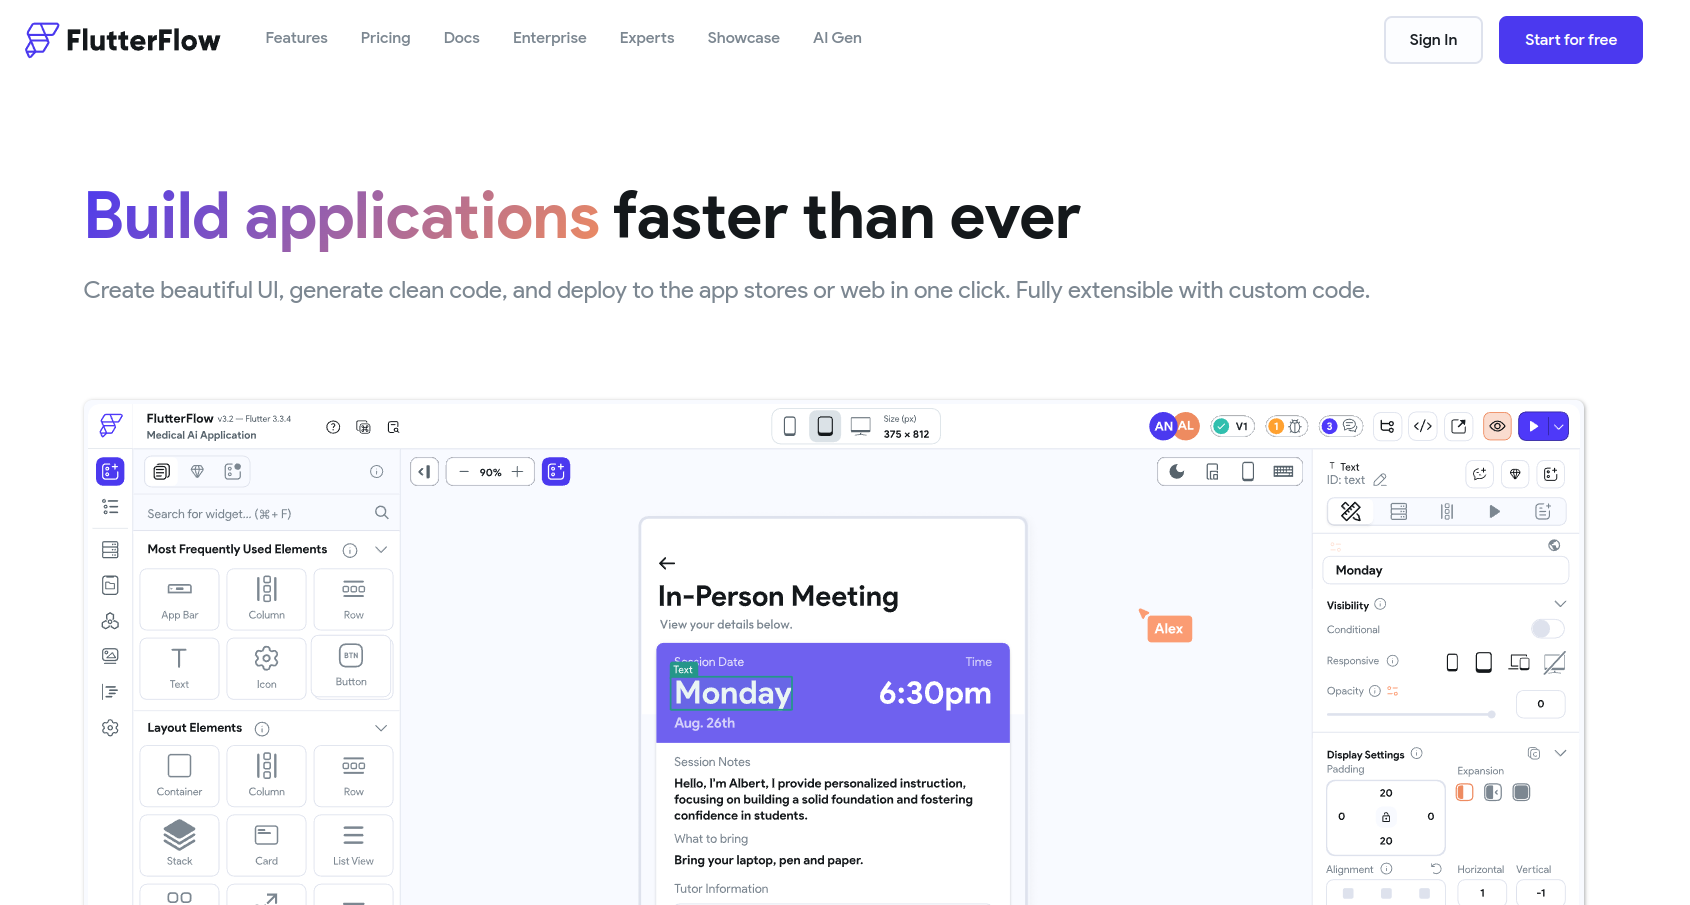
First and foremost, you need to have a FlutterFlow account. FlutterFlow is an online platform that enables users to design and build mobile and web applications effortlessly, utilizing a drag-and-drop interface. It simplifies app development, making it accessible even to those without extensive coding knowledge. It is a low-code platform built on Flutter that facilitates the creation of high-quality, natively compiled applications for both iOS and Android from a single codebase. Additionally, Flutter supports the development of web applications, a feature we take advantage of.
The Robomotion Application Robots act as the backend, while FlutterFlow is utilized for the front end of our applications. This combination ensures seamless integration of intricate backend operations with intuitive frontend designs, enabling the development of robust and efficient applications that are both functional and aesthetically pleasing.
Moving forward, we will guide you through the process of importing and modifying the Video Dubber FlutterFlow Application. If your goal is simply to use the Video Dubber application, you don't need to read further; you can run the flow directly from our App Store as mentioned in this post.
First, log in to your FlutterFlow account. If you don't have an account yet, you can create one here.
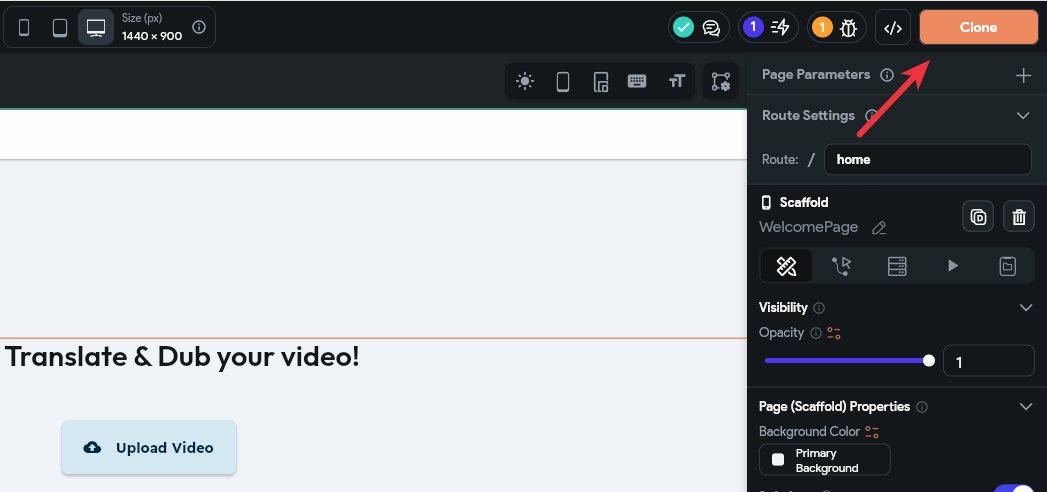
Let's begin by cloning the Video Dubber FlutterFlow app from this link. Click on the 'Clone' button as shown below.
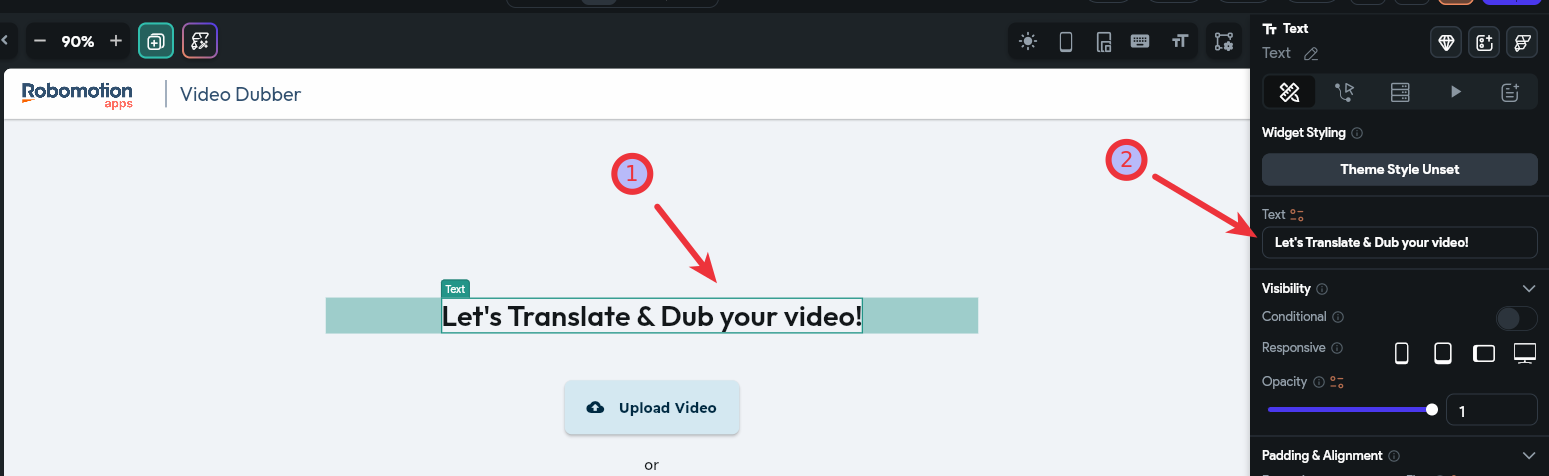
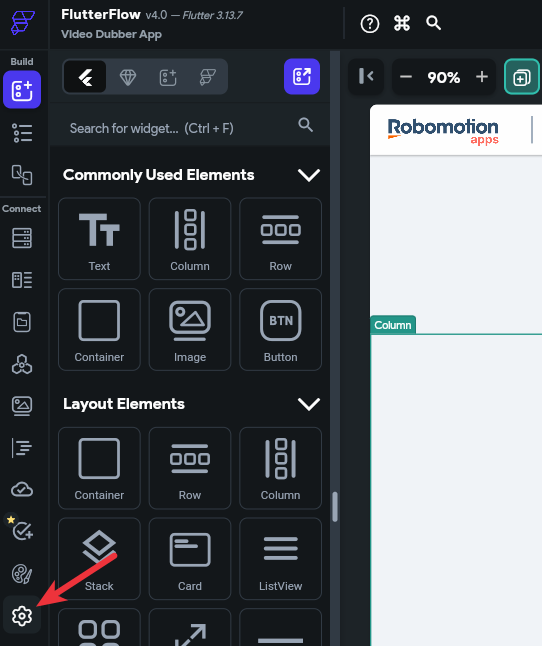
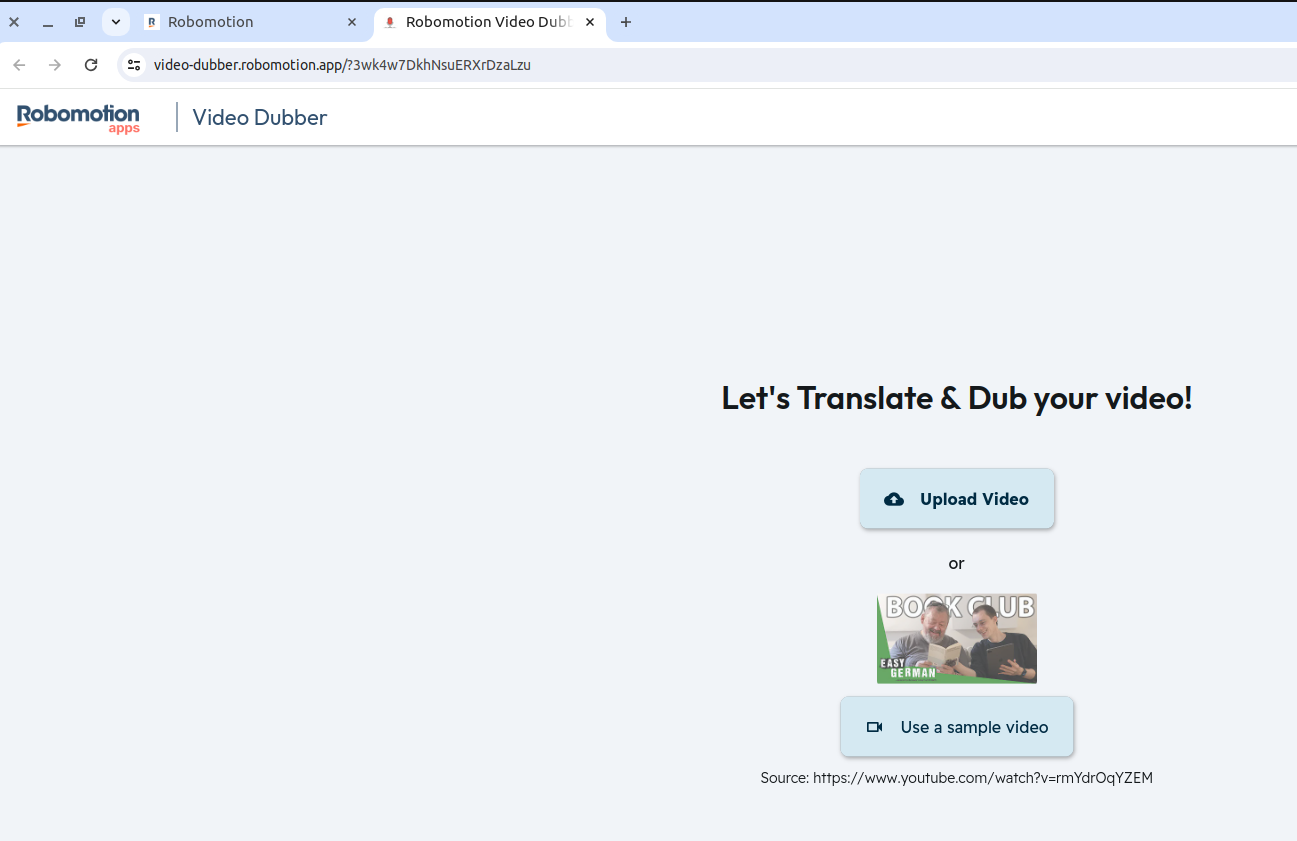
For a quick test change, let's modify the title. Change "Let's Translate & Dub your video!" to something like "Welcome to Video Dubber!"
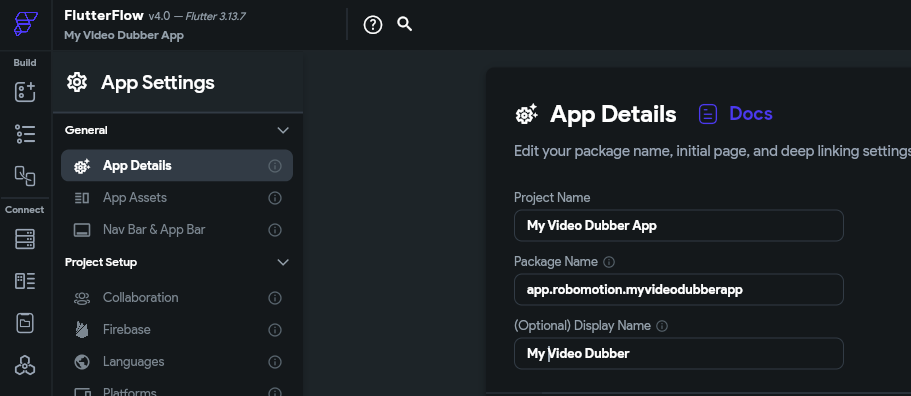
Click the FlutterFlow settings icon.
Update the App Details.
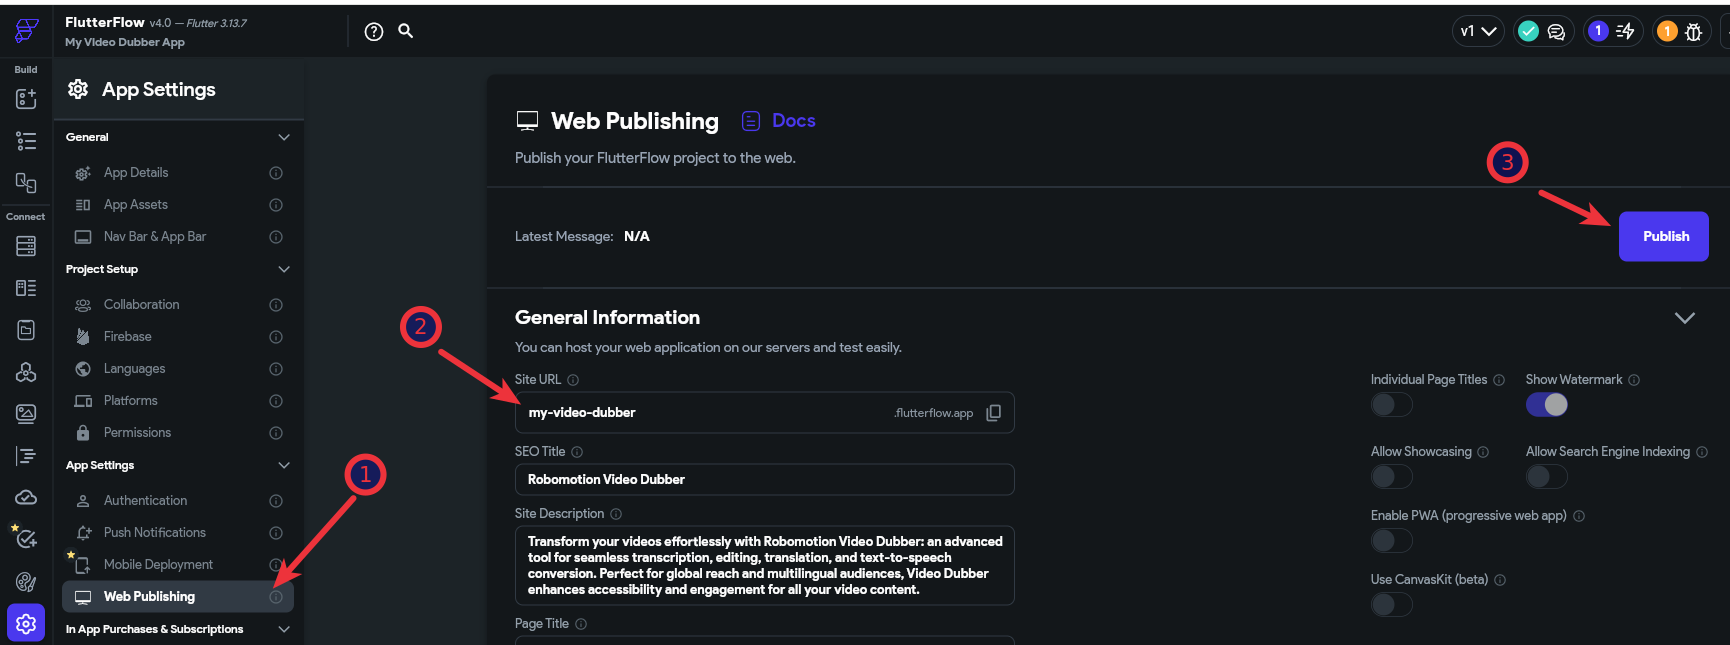
Click the Web Publishing link, select a unique subdomain for your application, and then click Publish.
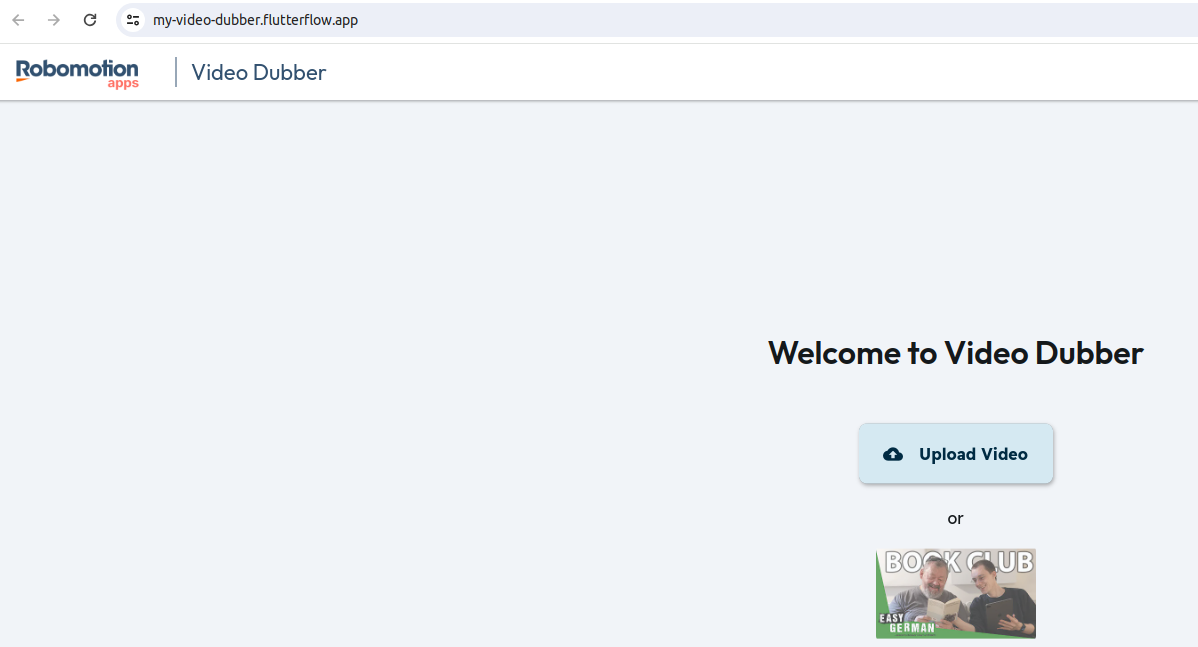
After the publishing is successful, you will see a screen like the one below.
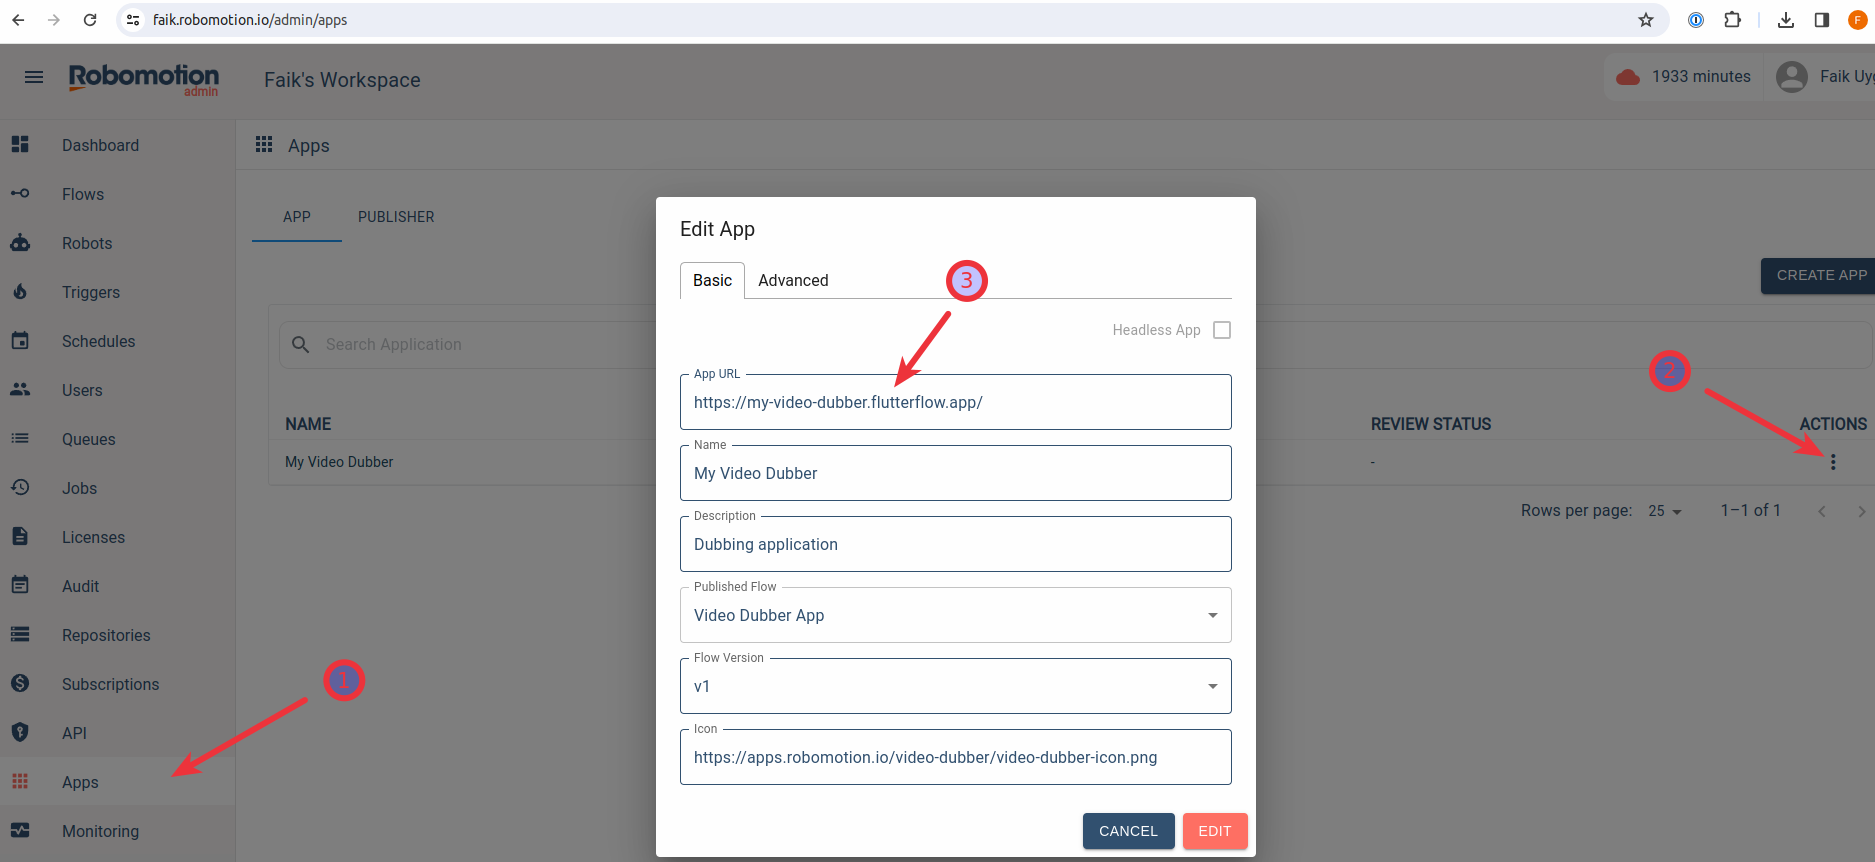
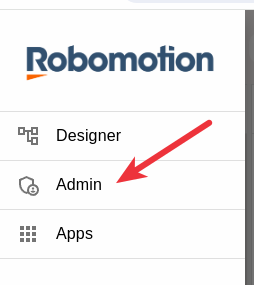
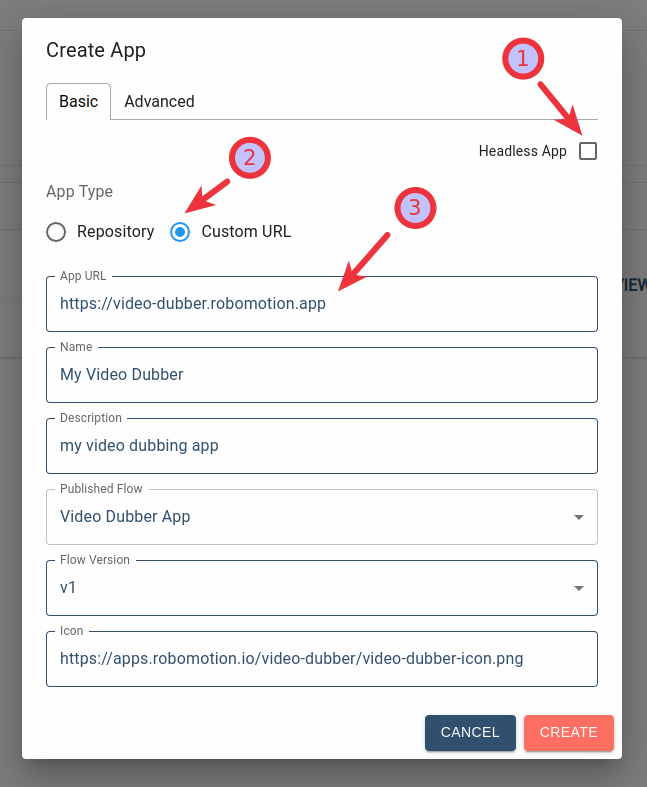
In the previous post, we demonstrated how to create an application using the official Video Dubber published web link. Now, go to the Admin Console -> Apps page and update that App URL with your custom App URL.
If you return to your App instance in Robomotion Apps, the "Open App" button will now open your custom application.
Every instance associated with your FlutterFlow app runs on a different Application Robot. These are connected to the UI with the instance ID query parameter shown below.
You can also copy this link and the instance ID from the icon left to the "Open App" button.
The Instance ID is used to link the robot with your frontend. So if you go to the URL directly without the query param, the app won't work.
However, you can set it as a default instance within your Custom FlutterFlow App. Go to the Custom Code section and click the Custom Action named connect. In that code, you can uncomment the instanceID parameter of the robomotion.connect function and replace the instanceID with your instanceID.
This way, when you go to the URL directly, it will use this default instanceID without a query parameter. This is also required when you are using Test Mode and Run Mode while developing your FlutterFlow application.
FlutterFlow has its own extensive documentation, which goes beyond the scope of this blog post. To explore further, you can visit their documentation and delve into a wealth of additional resources. For a more interactive learning experience, consider watching the informative tutorials available in the FlutterFlow University playlist on their YouTube channel. This playlist provides valuable insights and step-by-step guides to maximize your proficiency with FlutterFlow.
Furthermore, if you have questions or want to engage with the FlutterFlow community, you can join their Forum at this link. The forum serves as a platform for discussions, sharing insights, and seeking assistance from other FlutterFlow enthusiasts.
Video Dubber is an application designed to assist in video dubbing and language translation. It utilizes a combination of technologies: Robomotion RPA for automation, Replicate for transcribing audio into text, and OpenAI for translating that text into various languages. The app allows users to edit these transcriptions and convert them back into speech using OpenAI's text-to-speech technology, which is then used to create the final dubbed video.
Key features include:
Backend Automation: Powered by Robomotion RPA, it automates the process of transcription and translation.
Transcription and Translation: Uses Replicate for accurate transcription and OpenAI for translating text into different languages.
Customizable Text-to-Speech: Offers the ability to edit transcriptions and utilize OpenAI's text-to-speech to produce the dubbed audio.
Flexibility in Tools: Users can replace OpenAI's text-to-speech with alternatives like ElevenLabs AI, and modify workflows in the Flow Designer.
User-Friendly Frontend: Developed with FlutterFlow, the frontend is designed for ease of use, and the code is shared for further customization.
Video Dubber is suitable for users who need a straightforward solution for dubbing videos into different languages, whether for personal projects, educational content, or professional video production. It offers a degree of customization and flexibility, making it adaptable to various requirements.
Before we get into the nitty-gritty of setting up and tailoring Video Dubber to your needs, let's watch our introductory video. This quick video will show you exactly what Video Dubber is all about, showcasing its main features and how it can help your video projects.
If you're looking just to run the app, you can easily do this through our App Store. Robomotion can operate this app on both your Desktop and in the Cloud. The app leverages various AI platforms such as Replicate and Open AI. You can use Robomotion AI Credits, eliminating the need to register separately on these platforms. Alternatively, you can use your own API keys which require subscriptions on all AI platforms.
The minimum requirements to directly run this app from the Robomotion App Store are as follows:
Cloud Run Minutes ( Optional - You have the option to connect a robot on your Desktop to run this app. You can buy Cloud Run Minutes from Admin Console's Subscriptions page.)
Robomotion AI Credits ( Optional - You can run the app using your own API keys by modifying the flow in Flow Designer as detailed below. You can buy AI Credits from Admin Console's Subscriptions page.)
Creating a 25-minute video with Cloud Run minutes and Robomotion AI credits is 5 to 10 times more affordable than comparable AI SaaS dubbing software found online. You can further reduce costs by modifying the flow to use your own API keys and running the flow on your desktop.
Additionally, you are not constrained by minute limitations or obligated to subscribe to higher plans for longer durations as is often the case with online SaaS dubbing software pricing models.
Moving forward, we will show you how to import and modify the Video Dubber flow. If your goal is simply to use the Video Dubber application, you don't need to read further; you can run the flow directly from our App Store as mentioned earlier.
This part of the process requires a certain level of skill in Robomotion development, which may take some time to learn. The resources in our getting started guide and the tutorials section, as well as our YouTube videos, will be incredibly helpful. We also invite you to join our Discord community, where our team is always ready to assist you with any challenges you face in your learning and development journey.
This section is optional and only necessary if you prefer to use your own API keys. The flow uses Replicate and Open AI. If you're not already registered on these platforms, you'll need to do so. You can skip this section if you are using Robomotion AI Credits.
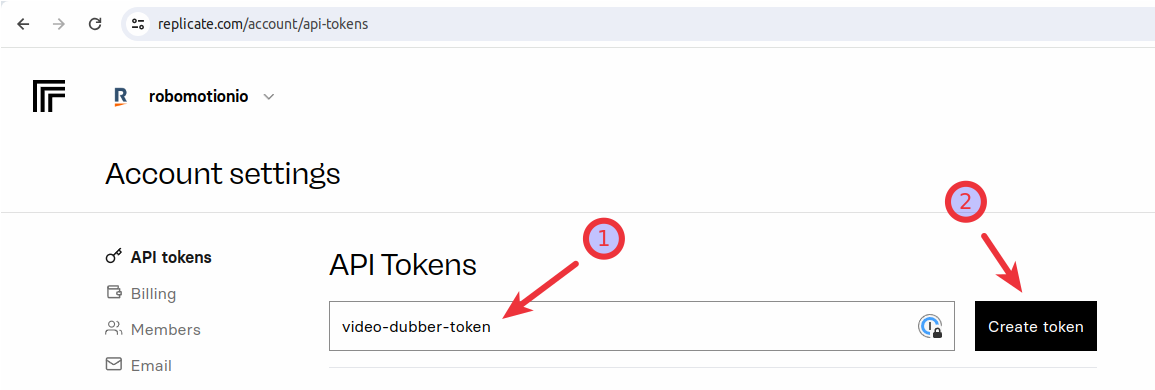
Sign up for Replicate and navigate to their API Tokens page to create an API token. Name your token for easy identification and save it securely.
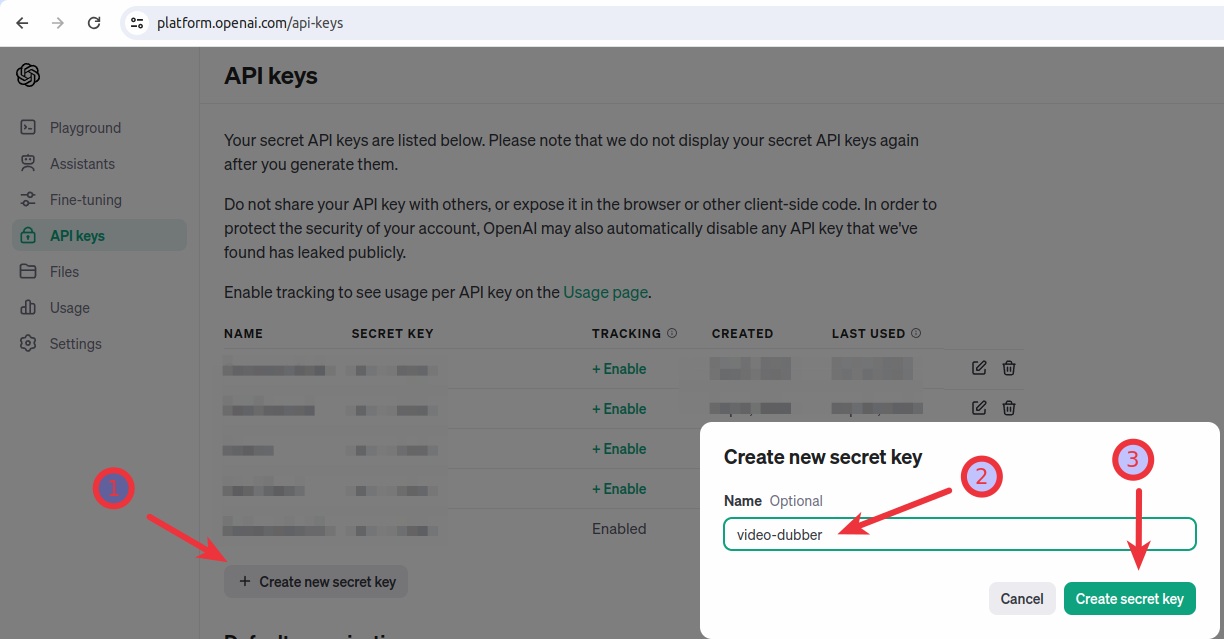
Similarly, sign up for OpenAI, go to their API keys page, and create an API token. Remember to name your token and keep it saved in a secure location.
Next, we'll set up a Vault for securely storing your API key credentials using Client-Managed Encryption Keys (CMEK).
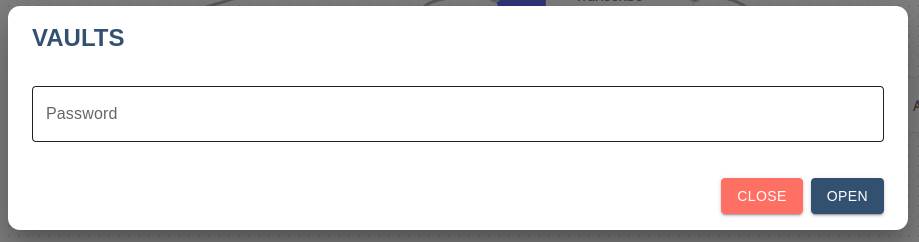
Click on the Vaults icon.
Enter your workspace password to access your vaults. Note that vaults are secured with your workspace password and vault secret keys.
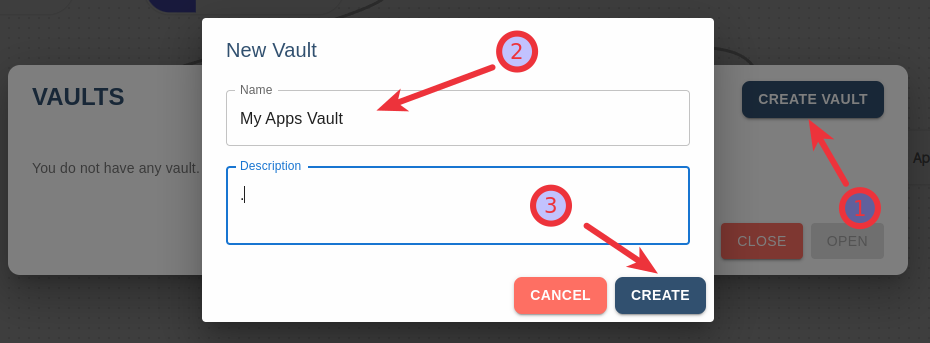
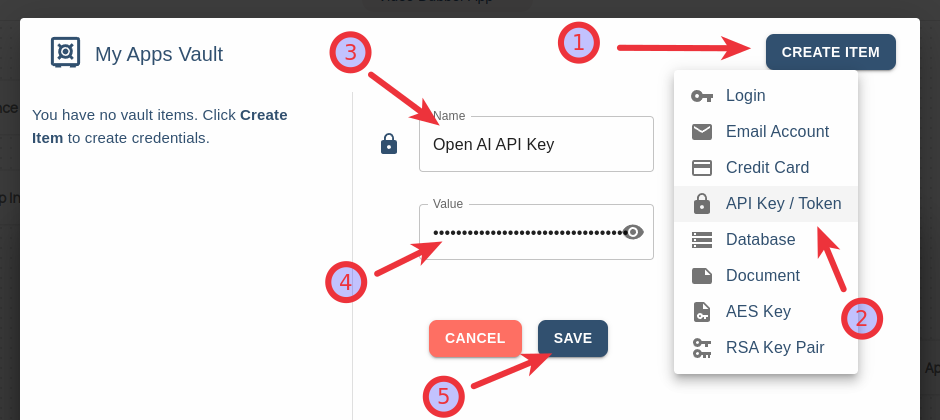
Click on the 'Create Vault' button, give your vault a name, and then click 'Create'.
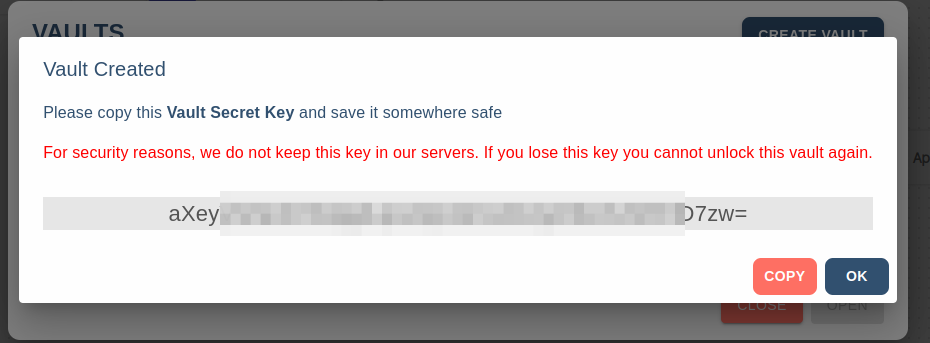
Carefully copy and save your Vault Secret Key in a safe place. It's important not to lose this key; without it, you won't be able to access your vault and will need to create a new one. This secret key will later be used to inject into your Application Robot running on your machine or a VPS server.
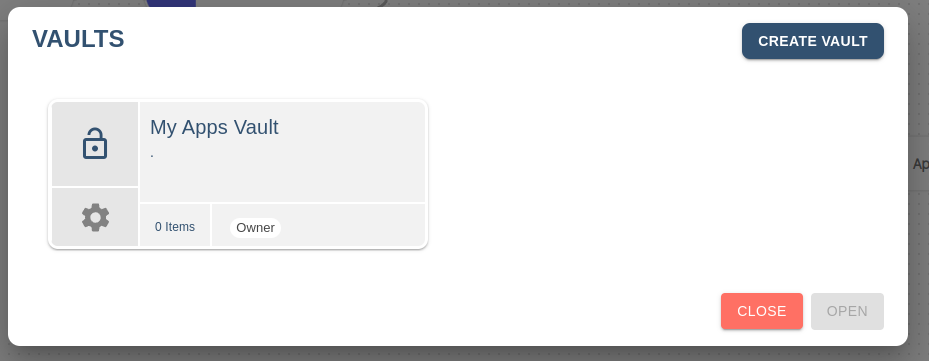
Click on your newly created Vault.
Add your Replicate and Open AI keys to this vault.
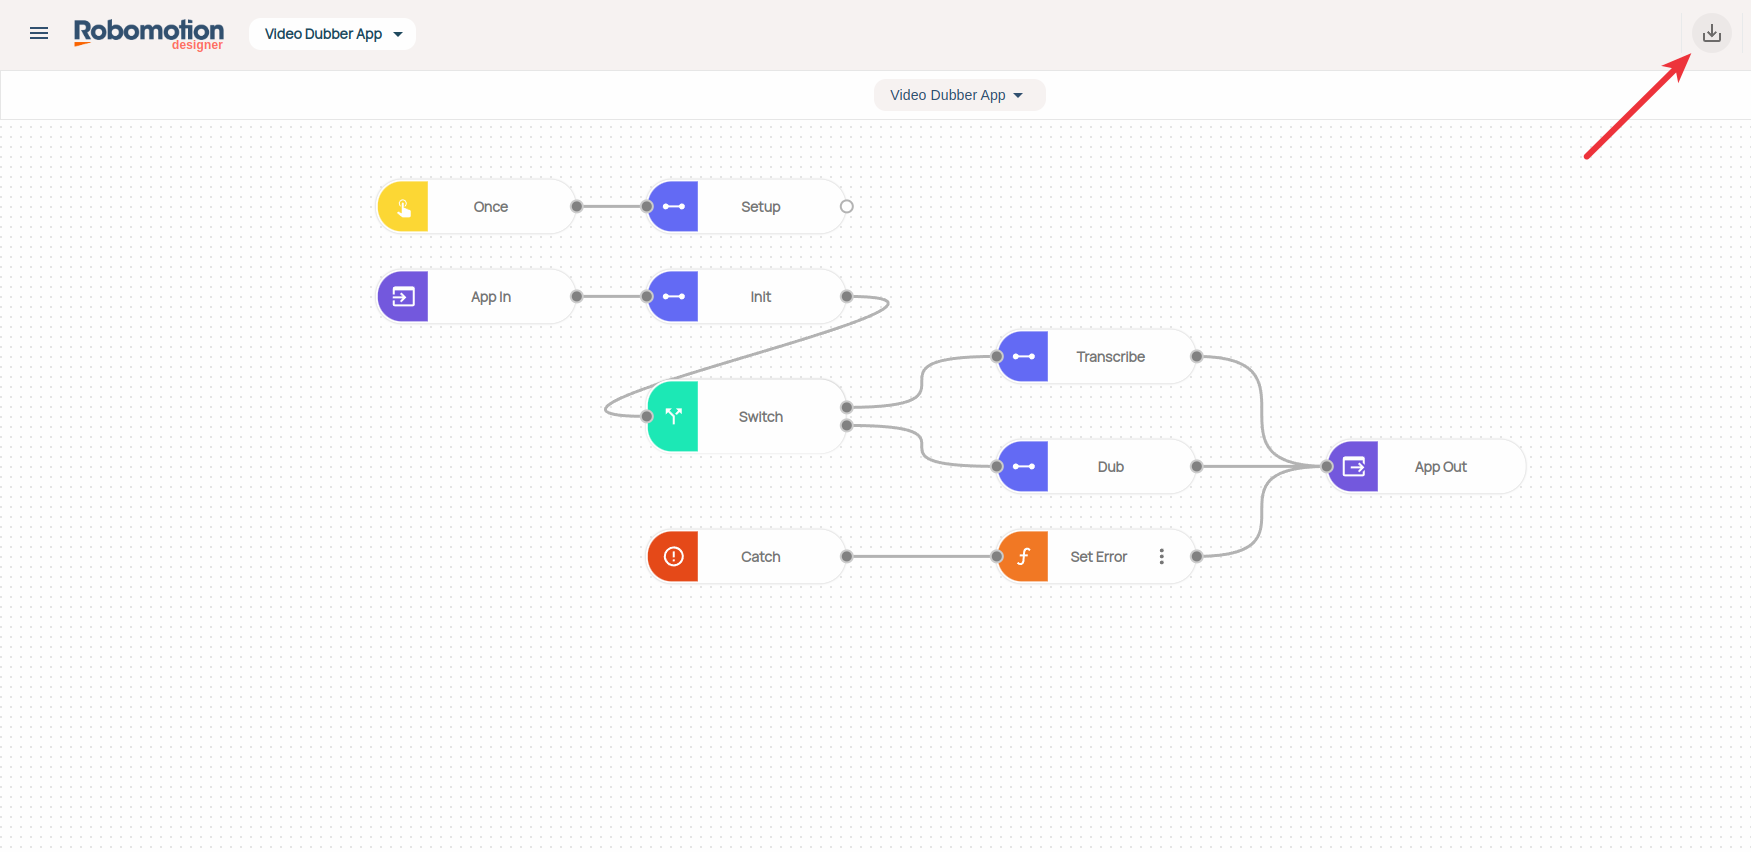
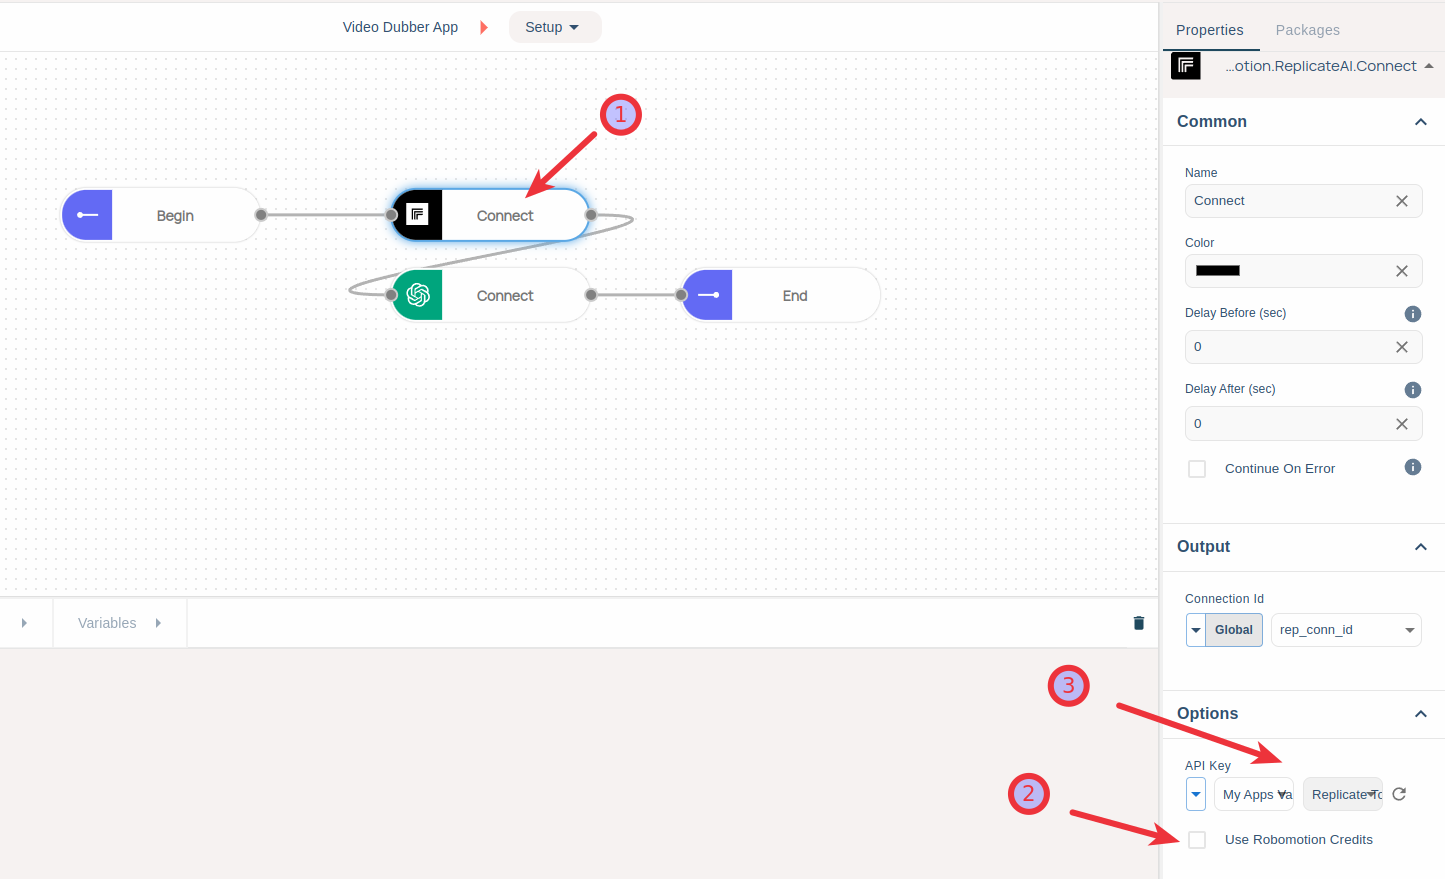
After adding the keys, close your vault and click on the Setup node in the flow.
Click on the black 'Connect' node with the Replicate icon, deselect 'Robomotion AI Credits', and under Credentials, select your vault and the Replicate API key name you just entered.
Repeat the previous step for the green 'Connect' node with the Open AI icon, deselecting 'Robomotion AI Credits' and choosing your vault and Open AI API key name.
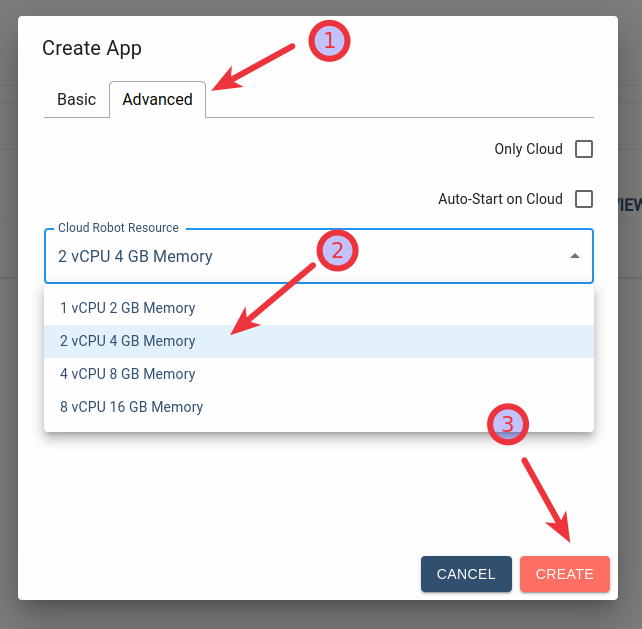
Click the Advanced tab in the "Create App" dialog, select "2 vCPU 4 GB Memory", then click the Create button. This automation requires a minimum of two vCPUs to run, especially if you want to run it in the Cloud.
You will see a App created successfully message upon completion.
After creating an application in the Admin Console and connecting it with the Video Dubber UI Application that we provided for you, along with the imported flow, follow these steps to generate an Application Instance in the Robomotion Apps dashboard.
This is for creating an Application Robot for the flow to run. You can then run this app on your Desktop with this Application Robot, or in the Cloud without any installation.
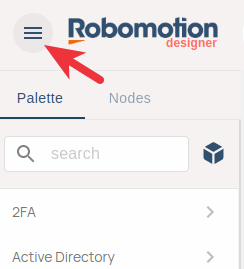
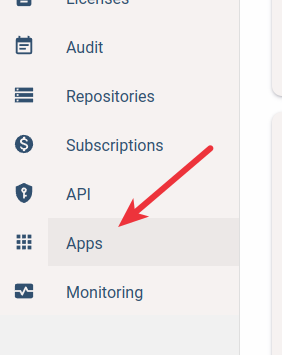
Click the hamburger menu at the top left corner of the Admin Console application and select the Apps item.
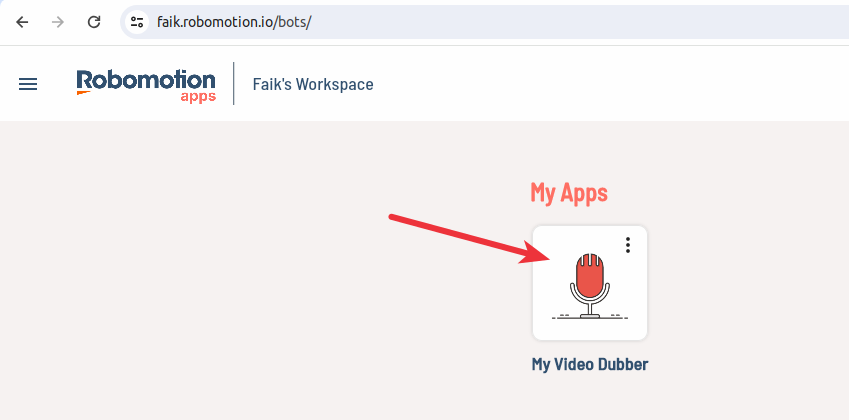
In Robomotion Apps, you will see your generated app. Click on the "My Video Dubber" icon.
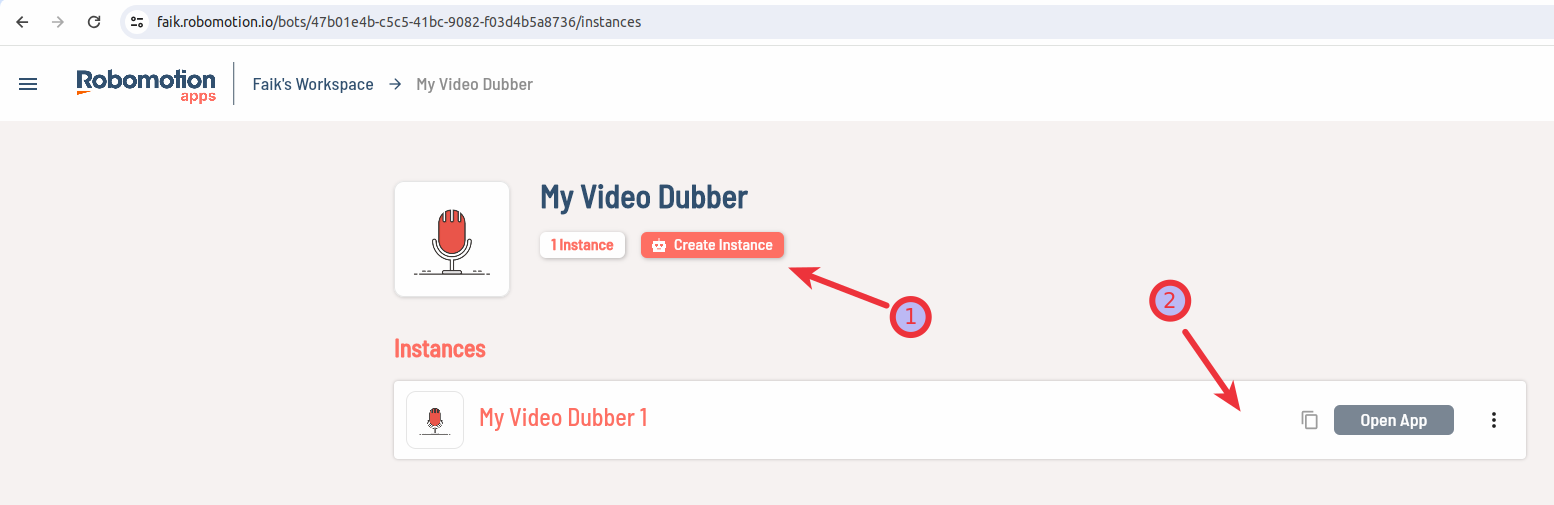
Click on the "Create Instance" icon, then click on the created instance item.
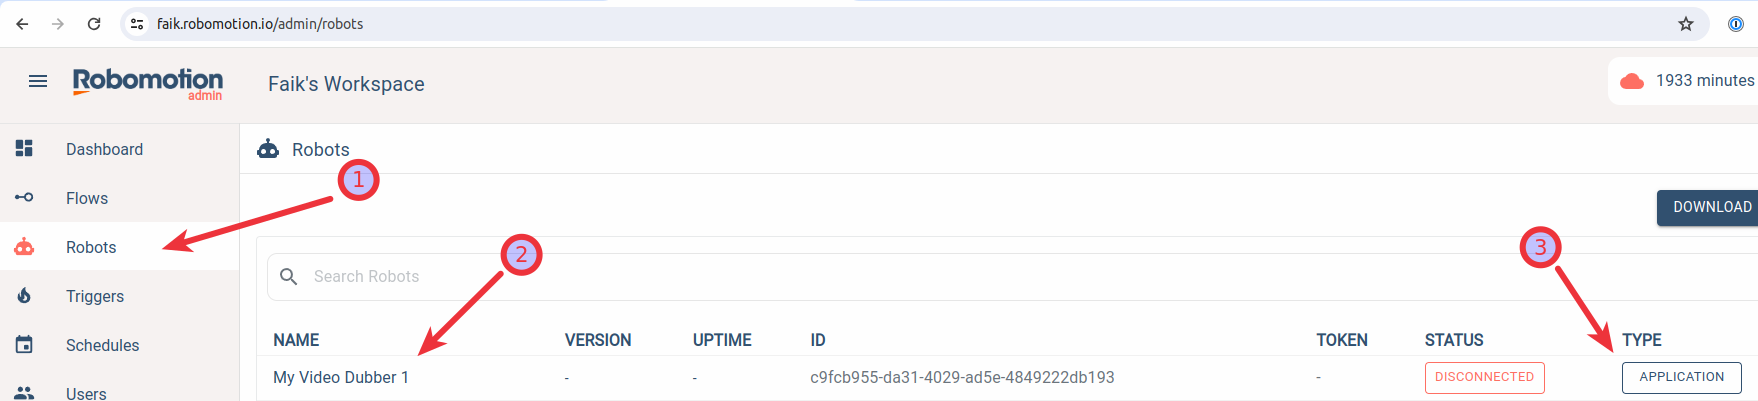
As a side note: If you check the Admin Console - Robots screen now, you'll see a new robot created with the same name as the instance and type Application Robot. You can rename it if you wish. This is how instances are linked to an Application Robot. You can only run the App flow on this robot.
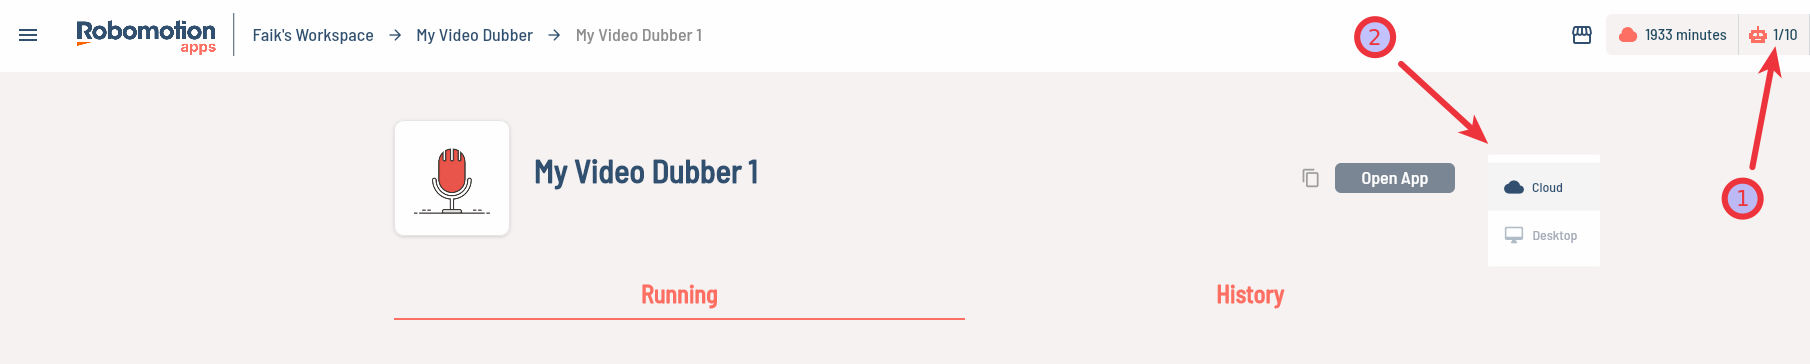
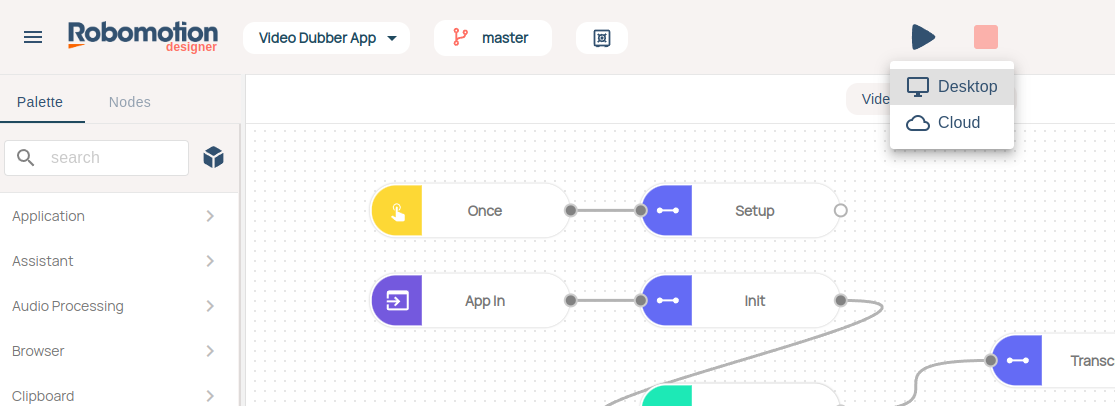
Return to the instance page you created in Robomotion Apps. In the top-right corner, you'll notice that 1 Application Robot slot has been allocated for this instance. When you click the Play button, two options will be available: Cloud (if you have Cloud Run minutes) and Desktop (if your robot is connected from your Desktop).
To connect your "My Video Dubber 1" robot from your Desktop , you can follow this guide.
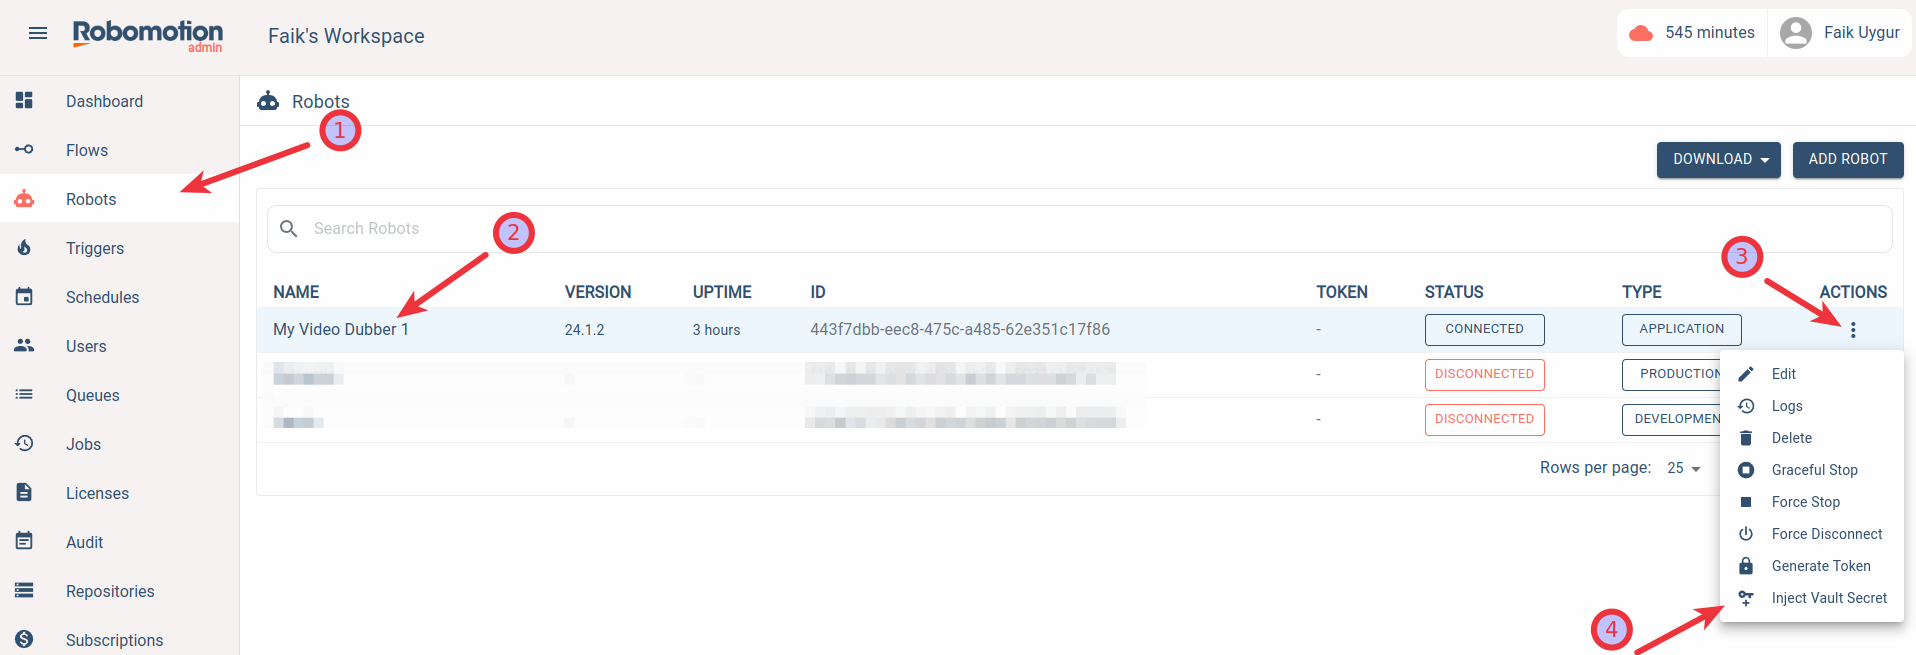
Remember the Vault Secret Key we created earlier? Now, you need to inject it into your newly connected robot from your desktop. This process only needs to be done once for each robot. Navigate to the Admin Console -> Robots screen. Your robot should appear as "Connected." In the Action menu on the right, select Inject Vault Secret. When prompted, enter your workspace password, then choose the Vault and input your Vault Secret Key. The key will be encrypted with your robot's public key and securely transferred to your robot. Whether your robot is running on your machine or a VPS, it can now use your encrypted credentials in your vault. For detailed instructions, refer to this guide.
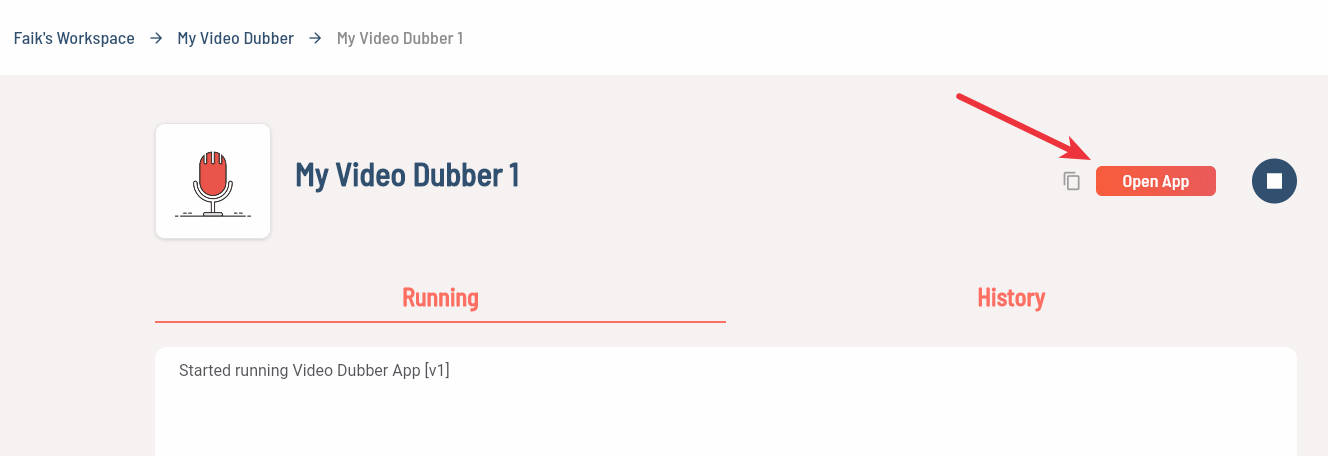
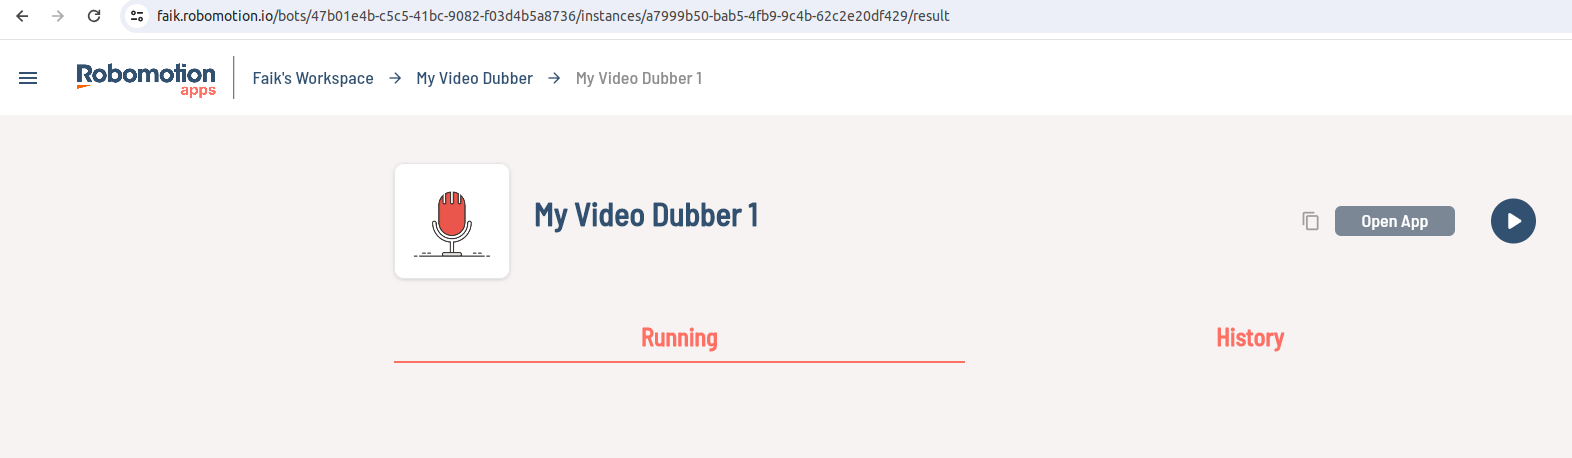
Once you return to the Application Instance and click the Play button, the Desktop option should be highlighted, allowing you to run the application. (If it's not highlighted, try refreshing the page.)
If you click the enabled Open App button, it will launch the UI application which is now connected to your Application Robot running on your Desktop.
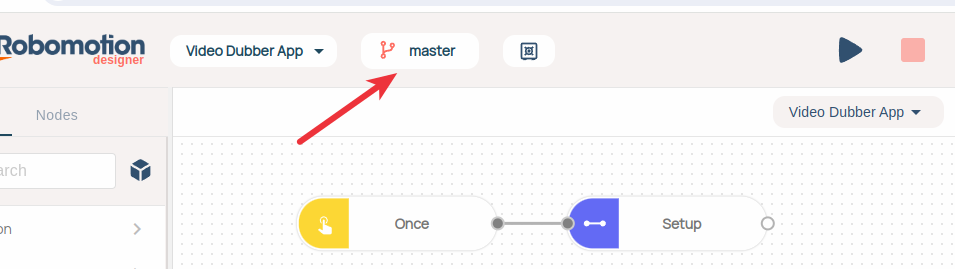
info
This application is connected to the v1 version of the flow you have published. To run the flow from Flow Designer, stop the instance in Robomotion Apps, return to the flow project, and run the flow on your newly connected robot.
info
We went through the previous steps to create an Application Robot for this Application by creating an instance. Now, you can select the Application Robot to run this flow.
This way, you can develop and run the flow on the Application Robot from the Flow Designer without creating and publishing new versions every time you make an update.
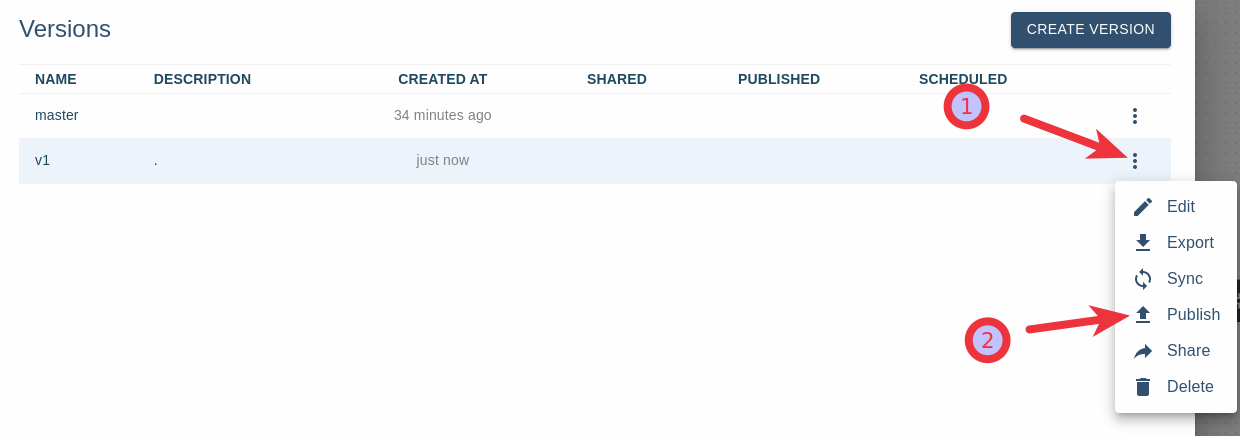
When your development is complete, create a new version, publish it, and update your app version from the Admin Console -> Apps screen. We will explore how to do this in the next section when we update the flow to replace OpenAI text-to-speech with ElevenLabs.
ElevenLabs AI offers a natural text-to-speech and AI voice generator service, enabling users to generate high-quality spoken audio with realistic voices, styles, and languages. The AI model used by ElevenLabs renders human intonation and inflections, adjusting delivery based on context for unparalleled fidelity.
The tool finds applications in various areas, including content creation, storytelling, gaming, audiobooks, AI chatbots, and more. With the capability to generate lifelike speech in 29 languages and 120 voices, it stands out for its versatility and natural voice generation, making it a compelling choice for digital creators, game developers, authors, and those seeking engaging AI-generated interactions.
Now, let's explore a modification to the existing flow by replacing the OpenAI text-to-speech functionality with a more realistic voice AI technology, ElevenLabs AI.
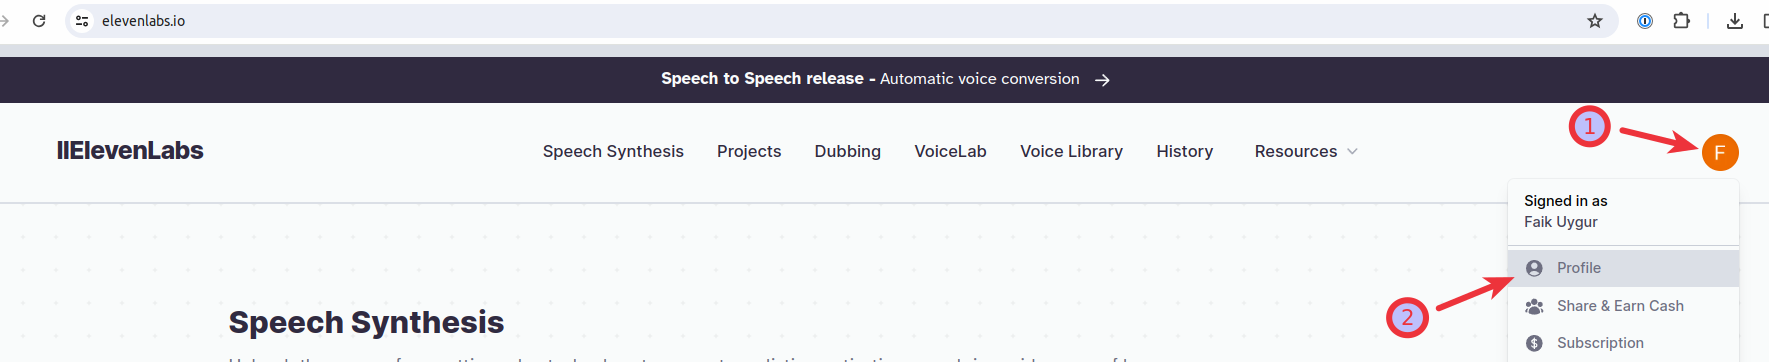
Begin by signing up for ElevenLabs and navigating to your profile.
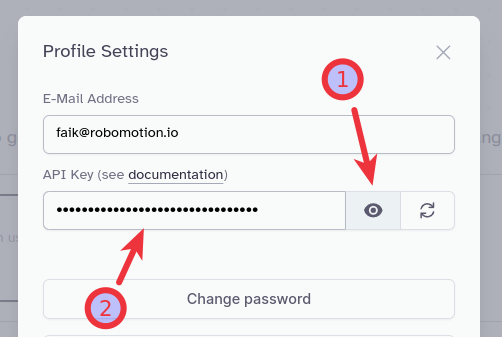
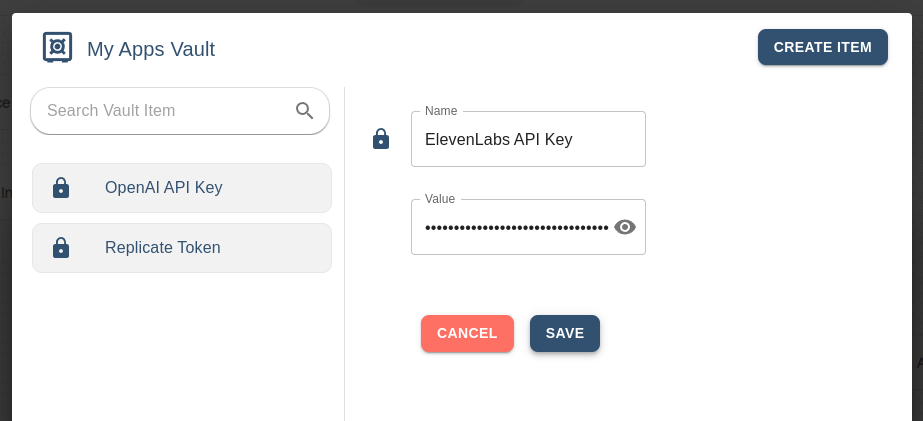
Click the eye icon to reveal the API Key and copy it.
In the Flow Designer, access the Vault by clicking the Vault Icon. Enter your vault and create a new Vault Item for your ElevenLabs API Key, following the instructions from previous sections.
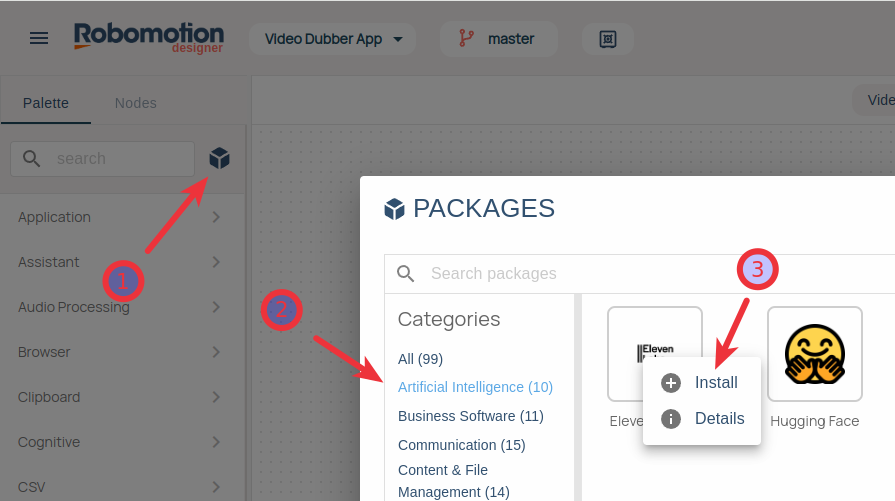
Install the ElevenLabs package in the Flow Designer. Click the package icon, select the Artificial Intelligence category, and right-click on the ElevenLabs package. Then, click install.
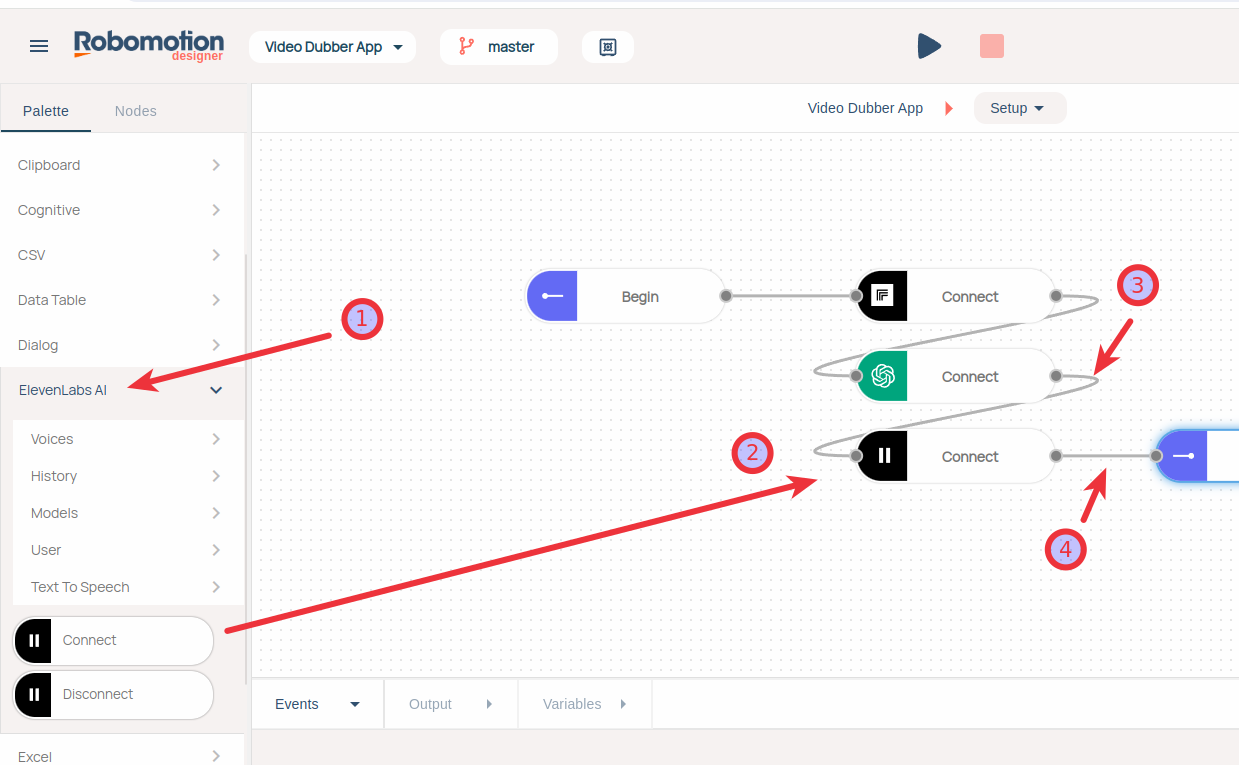
Locate and click on the ElevenLabs package, drag and drop the Connect node, and connect it with the previous and next nodes as shown below.
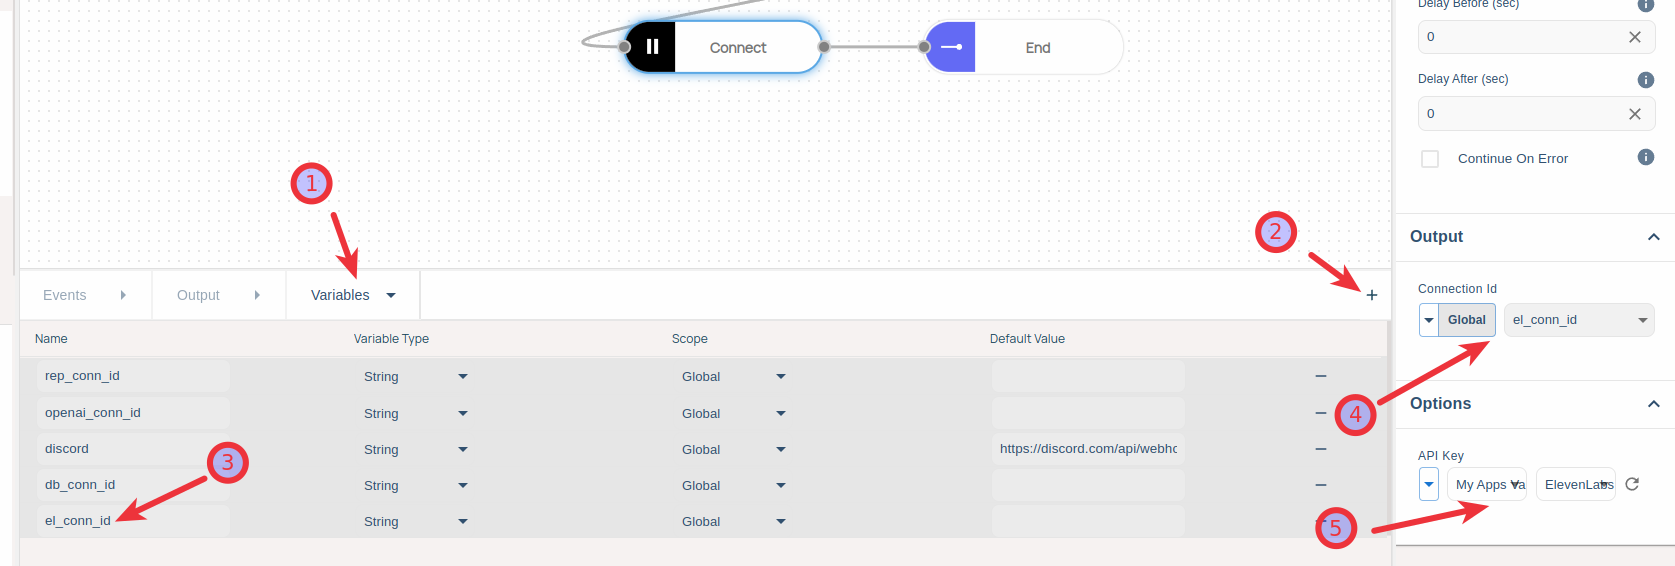
Click the ElevenLabs Connect node. Navigate to the Variables tab and add a new Global String Variable named el_conn_id. Then, in the Connect node's Output property, select the Global Scope and choose the newly created el_conn_id global variable. Finally, go to the API Key section and select the previously added ElevenLabs API Key item. If the Vault is empty, click the refresh button to fetch the Vault and Items.
Now, let's replace the OpenAI Text-to-Speech with the ElevenLabs Text-to-Speech node.
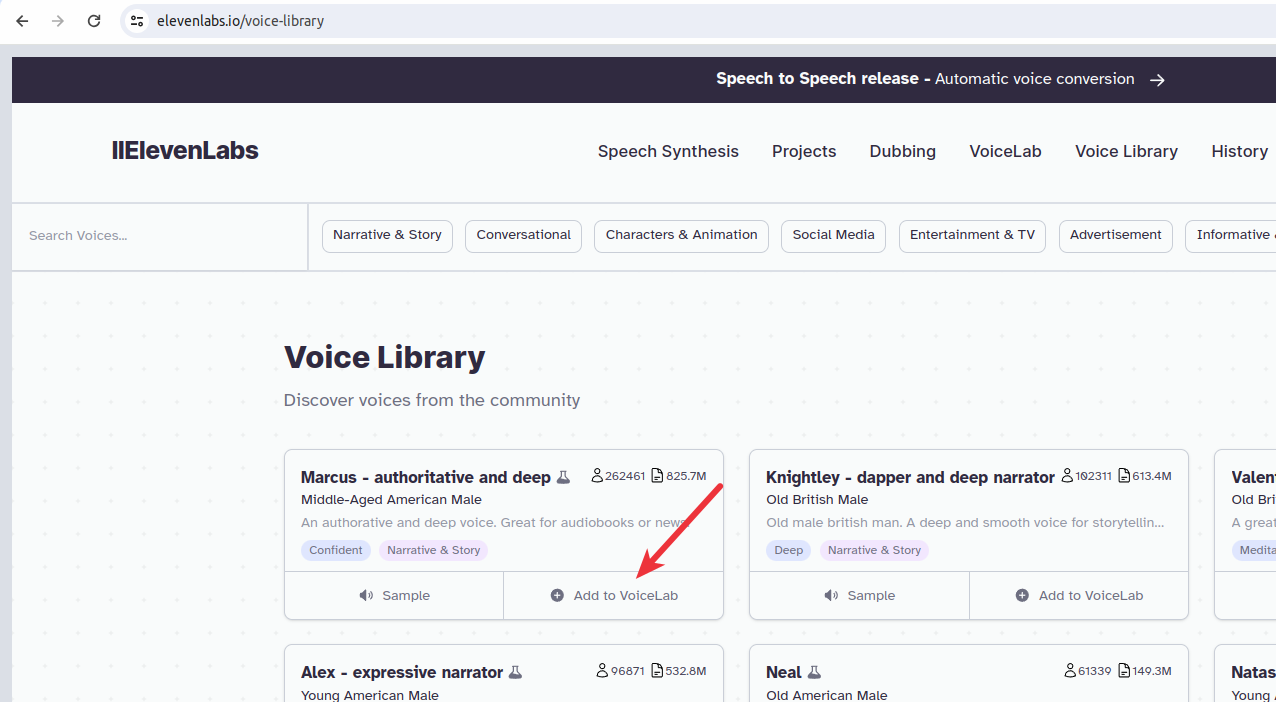
Obtain a Voice ID from ElevenLabs by visiting the Voice Library and clicking the Add to VoiceLab button for the chosen voice.
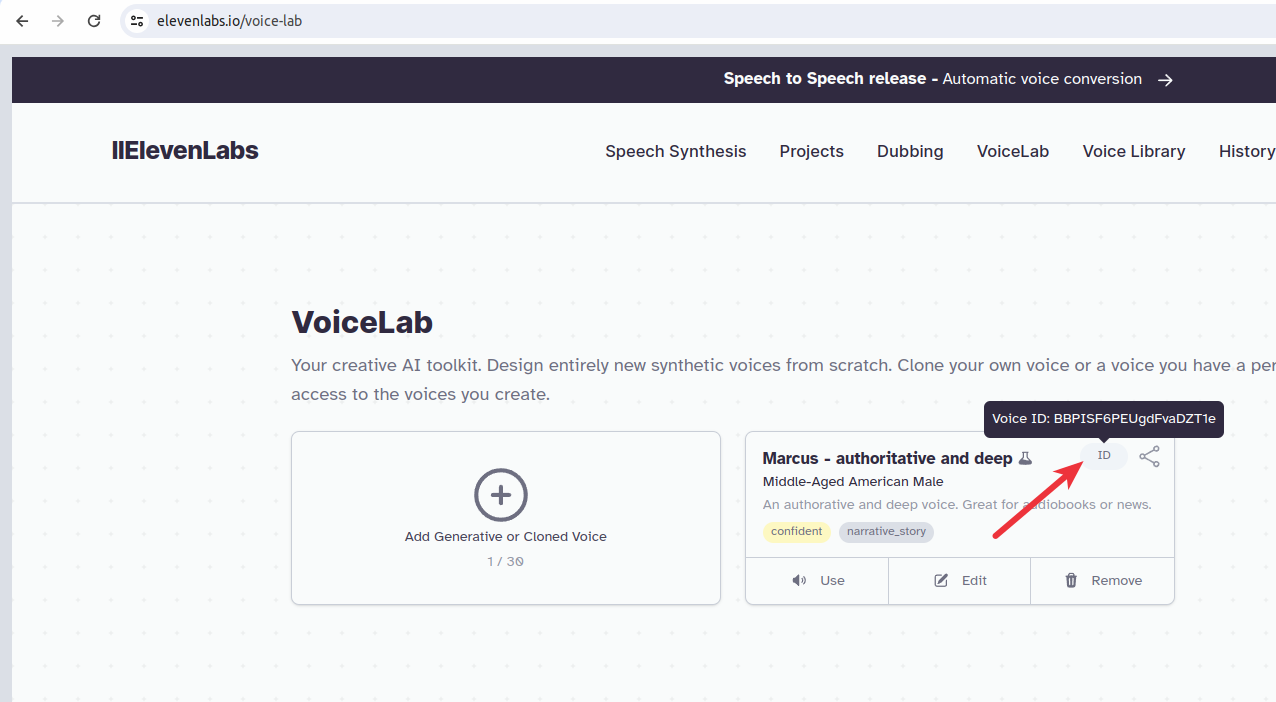
Visit the VoiceLab page and click the ID tag of the desired voice. Copy the Voice ID for use in the next steps.
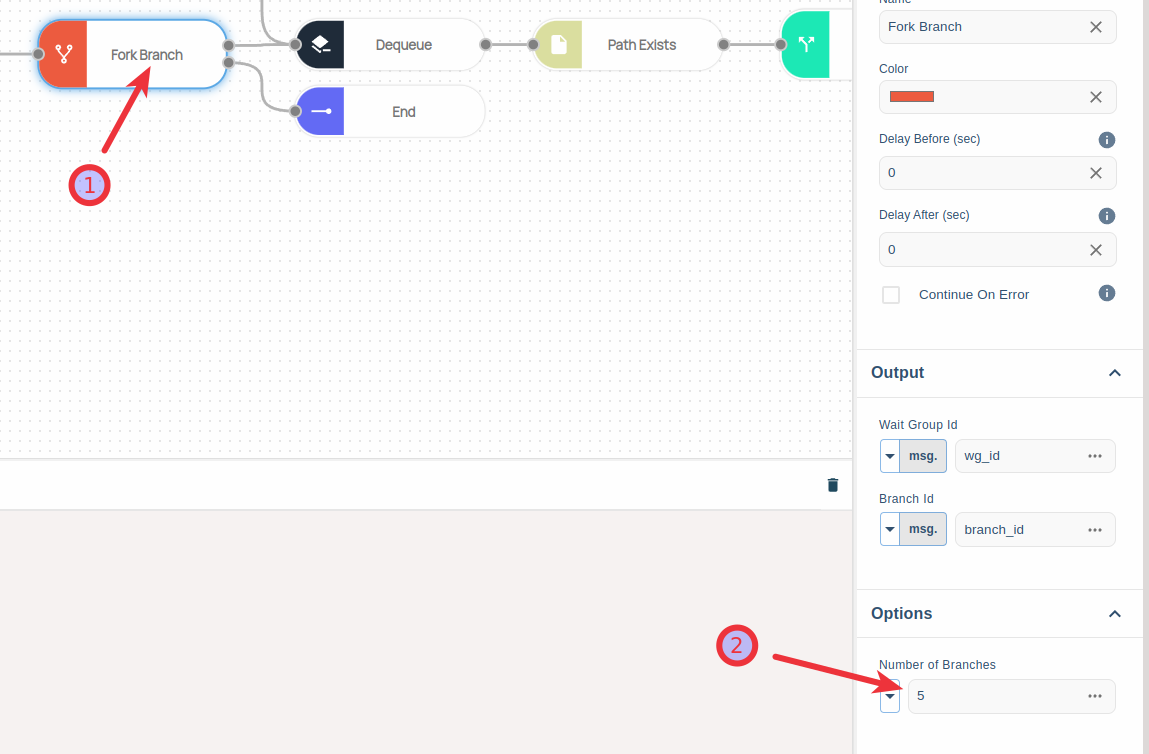
Return to the Video Dubber flow, navigate to the Video Dubber App -> Dub -> Text to Speech subflow, and click the Fork Branch node. Decrease the Number of Branches from 10 to 5, considering that the paid account of ElevenLabs allows no more than 5 concurrency. This adjustment prevents errors from the Text to Speech node when exceeding the concurrency limit.
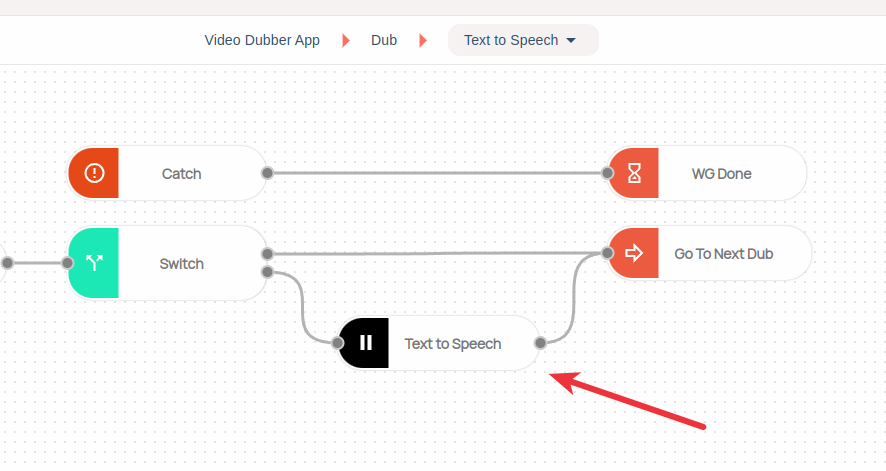
Replace the green Open AI Text to Speech node with the ElevenLabs Text to Speech node.
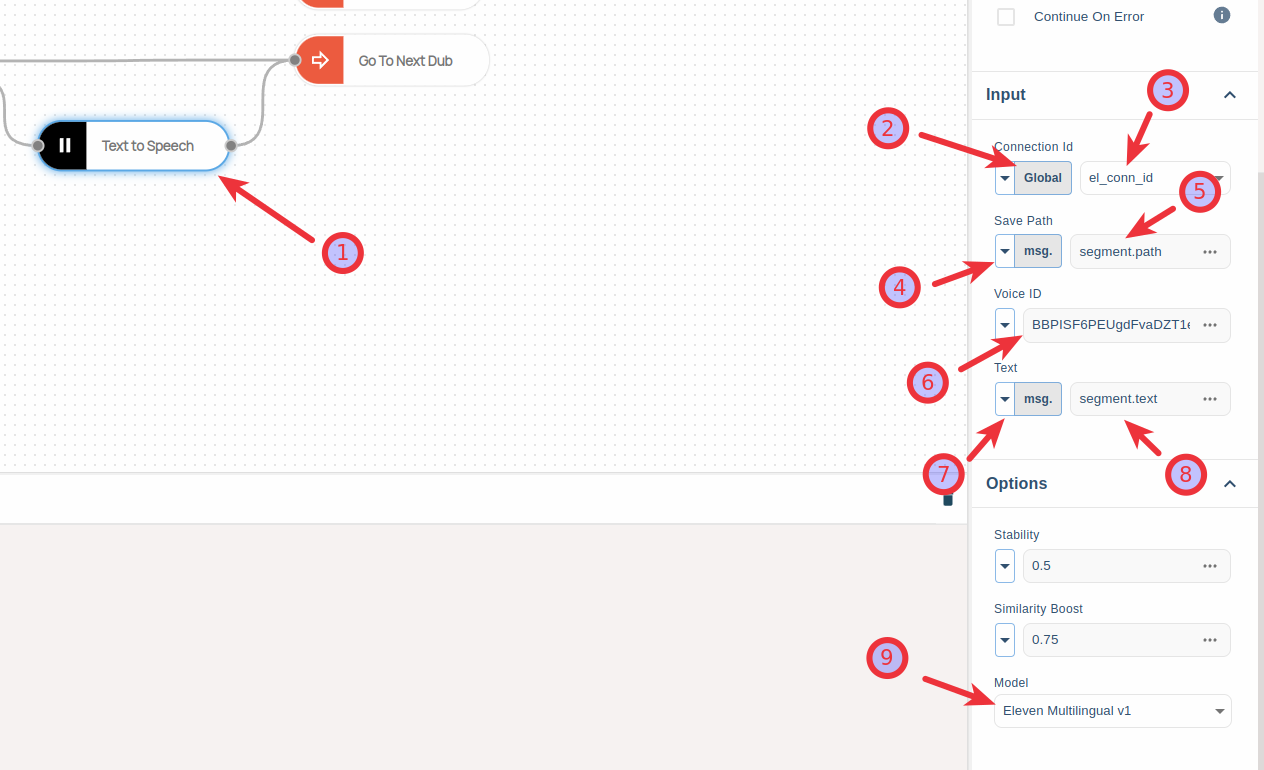
Click the ElevenLabs Text to Speech node and set the node properties as shown below. Ensure to select the msg. scope.
Connection Id: Global.el_conn_id
Save Path: msg.segment.path
Voice ID: Use the Voice ID copied from ElevenLabs.
Text: msg.segment.text
Model: Eleven Multilingual v1
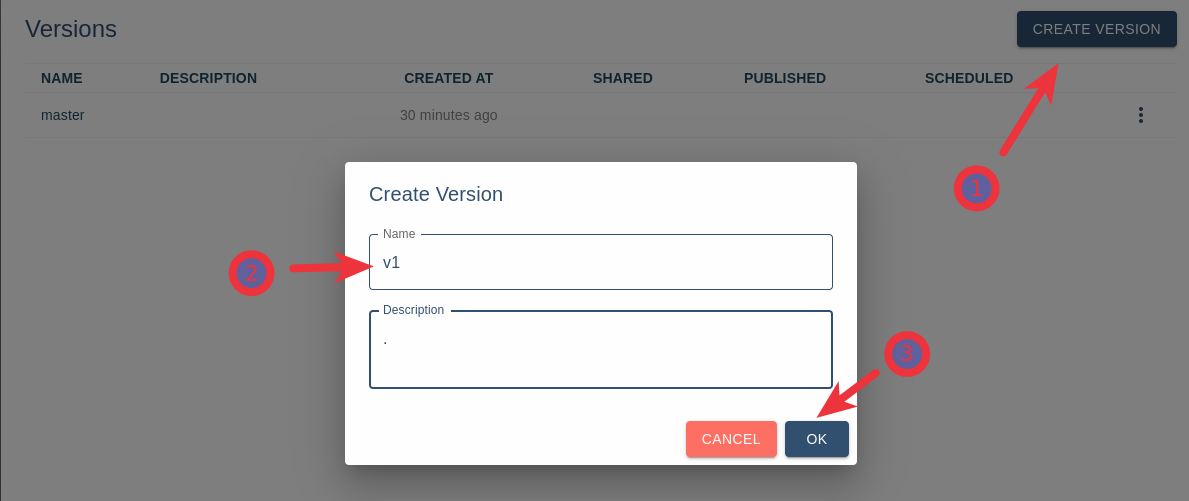
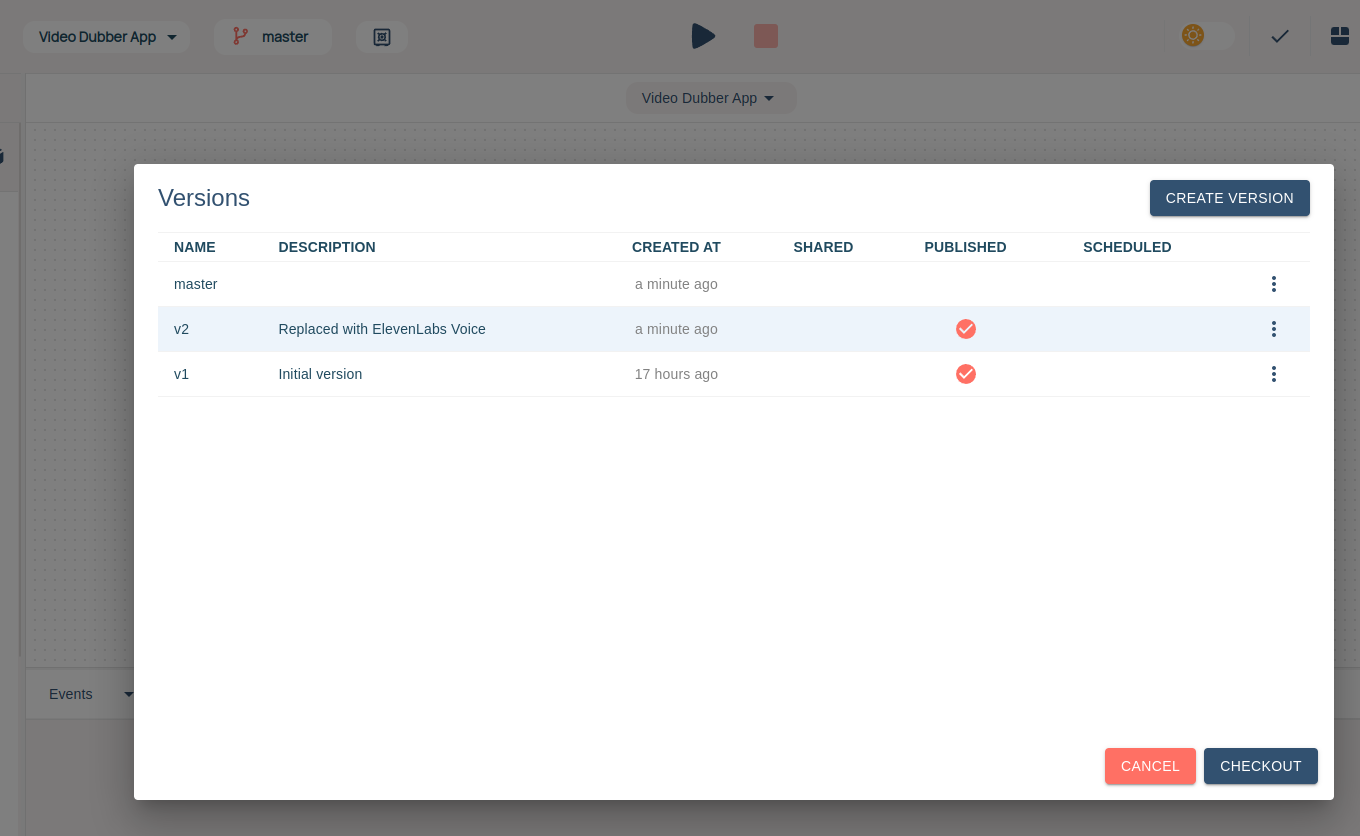
Save the flow, create another version named v2, and then publish this version.
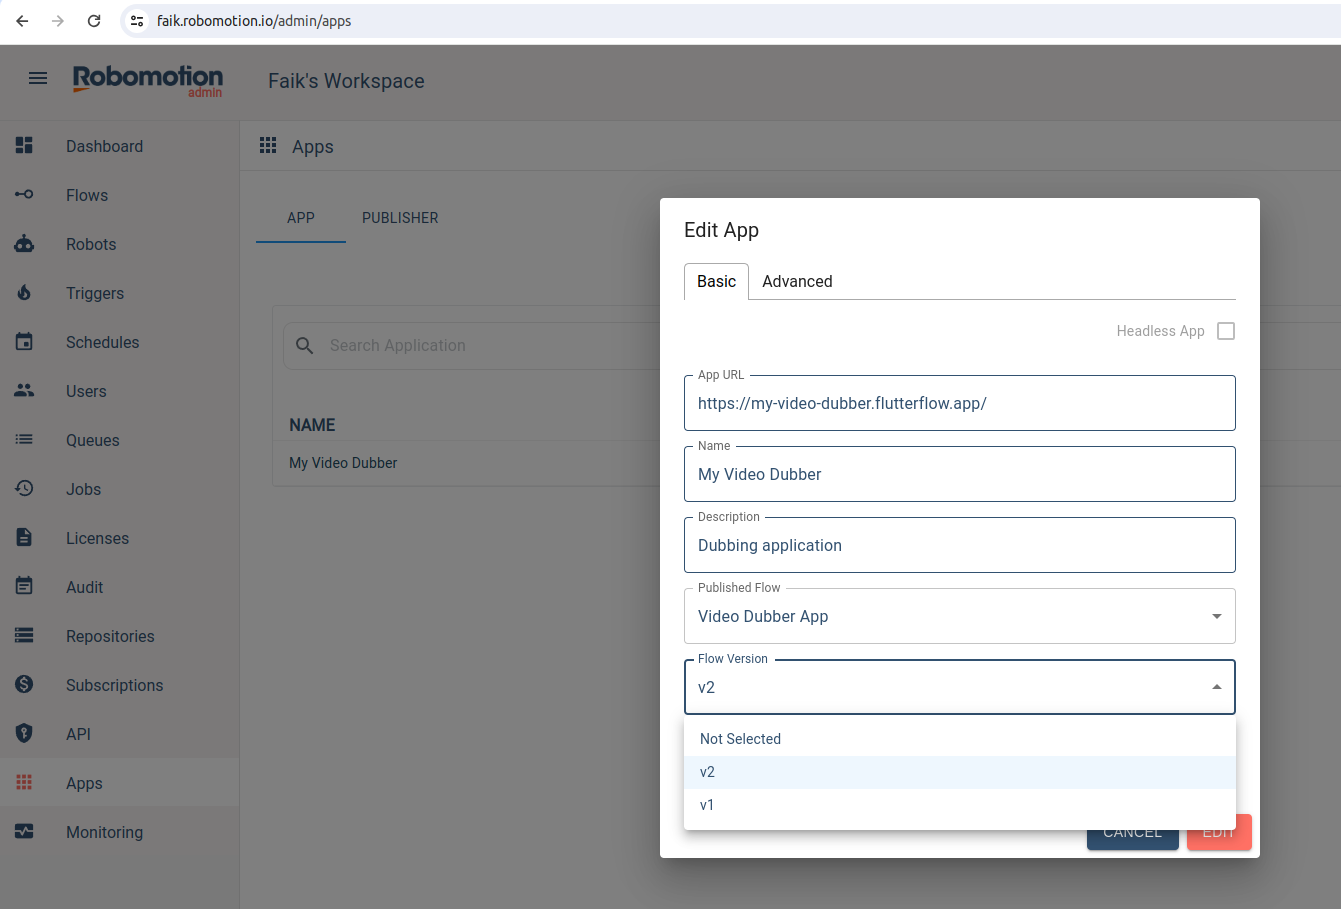
Go to the Admin Console -> Apps screen, Edit the My Video Dubber App, and select the v2 version of the flow. Save the changes.
Now, go to the Robomotion Apps instance, stop and start the flow again. This time, it will initiate the v2 version of the flow, utilizing the ElevenLabs Text to Speech instead of Open AI Text to Speech.
In this blog post, we will examine a practical example demonstrating the use of the Hugging Face package in Robomotion. By the end of this guide, you will have a clear understanding of how to use the capabilities of this node to optimize communication workflows and increase productivity within your team.
How to Setup?
To begin, Login to your Robomotion workspace. If you haven't registered yet, you can create your workspace from the provided link.
First, ensure that the "Hugging Face" package is installed for this workflow. Once the package is installed, you can proceed with the workflow, leveraging its functionalities for your tasks.
About the Hugging Face Package
The Hugging Face Package provides a simple interface for accessing the Hugging Face API, enabling you to integrate cutting-edge natural language processing technology into your workflows. In addition, you can perform image classification, object detection, sentiment analysis, and many other operations using the Hugging Face Package.
Exploring Hugging Face Package: Navigating Package, Installing, and Understanding Flow Steps:
Go to your workspace.
Click on the cube icon to access the packages page.
Enter "Hugging Face" in the search field and install the package by right-clicking on it.
The “Inject” node is used to initialize the flow.
The " Config " function node includes JavaScript code to define variables.
Function node named “Config” Code-Block:
msg.text = "I have a 3pm meeting with Melissa today at Paris."; //[Required] Type the text you want to classify.

return msg;
Click on the links in the specified order to establish a secure environment.
By following these procedures, you can select the required vault from the options section of the "Connect" node.
When you run the flow, you will see your result in the "Output" section. In this example, the person's name and location have been detected for the "text" given.
Here you can access the complete flow by clicking on the following link:
In this case, we will examine a practical example demonstrating the use of DOM Parser package in Robomotion. By the end of this guide, you will have a clear understanding of how to use the capabilities of this node to optimize communication workflows and increase productivity within your team.
How to Setup?
To begin, Login to your Robomotion workspace. If you haven't registered yet, you can create your workspace from the provided link.
First, ensure that the "DOM Parser" package is installed for this workflow. Once the package is installed, you can proceed with the workflow, leveraging its functionalities for your tasks.
About the DOM Parser Package
You can parse XML or HTML source code from a string into a DOM Document using the DOM Parser package. The DOM Parser package includes nodes such as Find Element, Find All Elements, Get Value, Extract Text, and many more.
Exploring DOM Parser Package: Navigating Package, Installing, and Understanding Flow Steps:
Go to your workspace.
Click on the cube icon to access the packages page.
Enter "DOM Parser" in the search field and install the package by right-clicking on it.
The “Inject” node is used to initialize the flow.
The function node named "Config" includes JavaScript code to define variables.
Function node named “Config” Code-Block:
msg.link = "https://docs.robomotion.io/tutorials/"; //[Required] Type the link you want to go to.
msg.css_selector = "[class='theme-doc-sidebar-item-link theme-doc-sidebar-item-link-level-2 menu__list-item']"; //[Required] Write Css Selector for the section you want to take on the page.
msg.tag = "a"; //[Required] Write the tag of the selector you get.

return msg;
When you run the flow, you will see your result in the "Output" section. In this example, the categories are listed.
A queue is a container that enables you to hold an unlimited number of items. Queue items can store multiple types of data. A queue is usually considered a list of pending jobs executed by priority or other criteria related to the underlying order in which several jobs are executed.
In this case, we will explore how to use the 'queue' package and its nodes in the flow.
How to Setup?
To begin, Login to your Robomotion workspace. If you haven't registered yet, you can create your workspace from the provided link.
About Queue Package
The Queue package consists of six node options that enable you to easily manage your files within your workflow.
How can a new queue be created by accessing queues through the Admin Console?
To begin, login in to your Robomotion workspace.
Click on "Queues" in the Admin Console.
Click on "Create Queue."
Enter the Name and description for the queue you are creating.
Click "OK." The queue has been created.
Let's create a stream to add data to the queue we've created.
What is the 'Add Item' node?
You can add items to the queues you've created using the 'Add Item' node. Enter the data you want to add in the input field of the node. You can choose the priority for the items. The options for priority in the node are Low, Normal, and High.
To use this node, credentials must be selected. To set up credentials, follow the steps below:
Click on 'Vaults'.
Click on 'Create Vault'.
Enter the name and description for the vault.
Click on 'Create'.
Copy the generated secret key.
Click on 'Create Item'.
Select 'RSA Key Pair'.
Click 'Save' and then 'Close'.
Inject the created vault into the robot.
Now, you can add items to the queues with the 'Add Item' node, and the credentials are set up for node usage.
Flow Steps
The "Inject" node is used to initialize the flow.
Add a function node to define the objects you want to add to the queue.
Boolean nodes offer a dynamic approach to decision-making within your Robomotion workspace. A boolean is a data type that represents a binary condition, typically denoted as true or false. In Robomotion, boolean variables and expressions play a crucial role in controlling the flow of a process by determining which actions to take based on whether a condition is true or false. These nodes enable you to create logic-driven processes, running your tasks and improving the precision of your automation.
For example, you might use boolean variables in Robomotion to control loops, make decisions in If statements, or set conditions for the execution of specific activities.
In this blog post, we will explore the ins and outs of using Boolean nodes to perform conditional operations in your flow.
How to Setup?
To begin, Login to your Robomotion workspace. If you haven't registered yet, you can create your workspace from the provided link. Once you have access to your workspace, you can create a new flow or open an existing one where you intend to utilize Boolean nodes. Make sure you have the 'Boolean' package installed in your workspace.
About Boolean Package
The Boolean package consists of 3 nodes: the 'Assign' node, the 'Operation' node, and the 'To String' node.
About the ‘To String’ node?
If you have a variable of the number type in your workflow and need to convert it to a string, the 'To String' node from the 'Number' package comes to the rescue. This handy node allows you to effortlessly perform the conversion, transforming your numerical data into a string representation.
How to use the ‘ Assign’ node and ‘Operation’ node?
To use the 'Assign' node and 'Operation' node, you need to download the 'Boolean' package.
Download the 'Boolean' package under the 'Packages' menu.
About 'Assign' Node Inputs
The value must be entered in the Value data box.
The output of the 'Assign' node is a variable of string type.
About 'Operation' Node Inputs
The output value of the 'Assign' node must be entered in the 'Values data' boxes.
The output of the 'Operation' node is a variable of boolean type.
Flow Steps
The 'Inject' node initializes the flow.
The 'Assign' node is utilized for assigning values.
The 'Operation' node is employed to compare string values.
When dealing with an object containing an array property or a simple array and the need arises to iterate through each element for individual processing, you can use the 'For Each' node to run your operations.
How to Setup?
To begin, Login to your Robomotion workspace. If you haven't registered yet, you can create your workspace from the provided link.
Configuring 'For Each Node: Input Specifications
The name of the object property or array name must be entered in the 'Loop through object' field.
Access each item in the array using the 'Current Item' property.
The 'Open Browser' node is used to open alternative browsers. Use the 'Open Browser' node before the 'For Each' node because you should not open a new browser for each array element.
The 'For Each' node is used to go through each element in the array using 'Go To' and 'Label' nodes.
The 'Open Link' node is used to open the defined link from 'Input-URL'.
Map the 'Go To' node to the 'Label' node. When the 'Go To' node's turn comes, the flow continues with the 'Label' node.
The 'Close Browser' node is used to shut down the browsers.
Stop the flow by using the 'Stop' node.
Here you can access the complete flow by clicking on the following link:
Efficiently managing datetime data is pivotal for many applications, from recording transaction timestamps to tracking events over time. Incorporating this information into an SQLite database not only ensures accurate data representation but also facilitates robust data analysis. The steps outlined below provide a comprehensive guide on how to seamlessly insert datetime data into SQLite, enhancing the overall functionality and usefulness of your database.
How to Setup?
To begin, Login to your Robomotion workspace. If you haven't registered yet, you can create your workspace from the provided link. Once you have access to your workspace, you can proceed by using the ‘Execute Non Query' node and ‘Insert table' node from the ‘SQLite' package.
About SQLite Package
You can acquire this package through the 'Packages' menu, as illustrated in Figures 1 and 2.
Configuring 'Execute Non Query' Node: Input Specifications
The name of the table for the 'Execute Non Query' connection ID must be entered in the Connection ID Box.
he name of the table for the 'Execute Non Query' transaction ID must be entered in the Transaction Id Box.
Flow Steps
The 'Inject' node is used to initialize the flow.
Use the 'Function' node to create the SQLite path and connection string.
Use the 'Create Database' node to create a database. The 'Create Database' node has one input value, which is the directory path.
Use the 'Connect' node to connect to the database. The 'Connection' node has one 'Options' value for the connection string. The 'Options' should be filled.
Use the 'Execute Non Query' node to create a table.
CREATE TABLE IF NOT EXISTS 'products'
(
   'productTitle' TEXT, -- Column Type TEXT,
   'orderDate' DATETIME,
   'deliveryDate' DATETIME
);
Use the 'Function' node to create the input values.
Many times, we encounter different types of CAPTCHAs on various websites. You can solve them using the 'capMonster' package. For instance, when you come across the "I'm not a Robot" checkbox CAPTCHA, you can use the "Solve Recaptcha v2" node from the 'capMonster' package. In this blog post, we will explore the ins and outs of using the "Solve Recaptcha v2" node to perform conditional operations in your flow.
How to Setup?
To begin, Login to your Robomotion workspace. If you haven't registered yet, you can create your workspace from the provided link. Once you've gained access to your workspace, ensure that the 'capMonster' package is installed within your workspace.
About the Cap Monster Package
The CapMonster package plays an essential role in assisting developers with automating processes on various websites, helping them overcome CAPTCHA challenges. It enhances the efficiency and effectiveness of their automation projects, especially in scenarios where automation encounters various website flows with different types of CAPTCHAs, including text-based CAPTCHAs, image-based CAPTCHAs, and reCAPTCHAs. The versatility offered by the CapMonster package in solving these diverse CAPTCHA types makes it a suitable choice.
What is the 'Node Name' Node?
To effectively handle various CAPTCHA types while working with CapMonster package nodes, it is essential to download the 'CapMonster' package from the packages menu within your automation or development environment.
This package provides you with the necessary tools and capabilities to address different CAPTCHA challenges during the automation process.
To obtain the 'CapMonster' package, please follow the steps outlined below:
Node Overview
Inject: This node initializes the flow.
Function: In this node, you define variables, objects, and other elements to be used in the flow.
Open Browser: This node assists in opening various web browsers.
Open Link: This node assists in opening a specified 'URL'.
Run Script: If you want to modify a value on a specific website or scrape data from websites, you can use this node.
Click Element: This node is designed for clicking on elements within a website.
Close Browser: This node is designed to close an opened browser.
Create Session: To use the 'Solve Recaptcha v2' nodes, you should first create a session by utilizing the 'Cap Monster' keys.
Solve Recaptcha v2: This node is specifically designed for solving various types of v2 CAPTCHAs.
Get Result: You can confirm the solved CAPTCHA by checking the response using the 'Get Result' node.
Switch: When checking variable values to determine the appropriate course of action, you can use the 'Switch' node.
Sleep: This node is used to wait without performing any action until a specified time is reached.
Goto: To ensure flow continuity, this node provides the connection and routing between the nodes used for process repetition when an error is received. When the flow reaches this node, it continues from wherever it was redirected.
Label: This node manages the redirection of the 'Goto' node and continues the flow from its location.
Stop: This node is used to halt the flow.
Flow Steps
Access to the workspace is granted by following the instructions outlined in the "How to Set Up" section.
The 'Inject' node is used to initialize the flow.
To begin, create a variable named 'website_url' to store your specified website URL. You will utilize this variable when opening the website using the 'Open Link' node.
msg.website_url = "https://www.google.com/recaptcha/api2/demo"; //The website_url variable use to aceess website.
return msg;
You should utilize the 'Open Browser' node to open your preferred web browser. Select the desired browser type from the 'Browser' options.
To open a specified URL that you've created under the 'Function' node, you should use the 'Open Link' node and populate the input options of 'URL' type with the 'msg' object.
To create a session using the 'Cap Monster' package and the 'Create Session' node, you need to acquire a Cap Monster API Key. You can generate this API Key by visiting the website https://capmonster.cloud/en/ .
You can access the 'API KEY' from the flows by initially creating a 'Vault' and then adding an 'API KEY' item.
Click on 'Vaults'.
Set your workspace password and then click on 'Open'.
Create a 'Vault' and save the 'Vault Secret Key'.
Create Item and set your ‘API KEY’ this item.
To fill in the 'Website URL' and 'Website Key' fields in the 'Solve Recaptcha v2' Node, follow these steps:
Go to the website where you want to solve the reCAPTCHA.
Open your web browser's developer tools by pressing 'F12' or by right-clicking on the webpage and selecting "Inspect" or "Inspect Element."
In the developer tools panel that opens, switch to the "Elements" tab.
Use the search function by pressing 'Ctrl + F' (or 'Cmd + F' on Mac) to open the search bar.
In the search bar, type 'sitekey' and press 'Enter' to search for this keyword within the webpage's HTML code.
Locate the 'sitekey' value in the HTML code; it typically appears as an attribute within a reCAPTCHA-related element, like this: data-sitekey="your-sitekey-value-here."
Copy the 'sitekey' contents, which represent your 'Website Key,' and paste it into the appropriate field in the 'Solve Recaptcha v2' Node.
By following these steps, you can extract the 'Website Key' from the website's HTML source code and use it in the 'Solve Recaptcha v2' Node.
You should verify whether the captcha-solving process has completed successfully or is still in progress by using the 'Get Result' node from the 'Cap Monster' package.
Example of a response from the 'Get Result' node:
If the value of the status is 'processing' or if there is a different error, proceed with the 'Sleep' node, wait until the specified time has elapsed, and then proceed to the 'Get Result' node to check the response.
Check the response of the 'Get Result' node by using the 'Switch Node.' If the status value in the response is 'Processing,' you should recheck. If the response contains a solution, it indicates that the captcha has been successfully solved.
If the response has the value 'solution,' you should set the 'gRecaptchaResponse' value to 'textarea.value' using the 'Run Script' node.
var textarea = document.querySelector("#g-recaptcha-response");
textarea.value = msg.response.solution.gRecaptchaResponse;
Next, click the 'Submit' button and then use the 'Close Browser' node to close the browser.
In the fast-paced world of data collection and automation, web scraping has become an invaluable tool. It allows you to extract information from websites and transform it into structured data that can be used for various purposes. If you're looking for an easy and efficient way to scrape lists and tables from websites, Robomotion's Browser Package is here to simplify the process.
In this blog, we'll walk you through the process of setting up and using the Browser Package within Robomotion to scrape lists and tables effortlessly.
How to Setup?
To begin, Login to your Robomotion workspace. If you haven't registered yet, you can create your workspace from the provided link. First, make sure you have the "Browser" package installed for this workflow. Once you are certain that the package is installed, you can proceed with your flow and take advantage of its functionality for your tasks.
About the Browser Package
Using the nodes in the browser package, you can easily open a browser, navigate to desired links, click on specific buttons, and scrape tables and lists.
Exploring Browser Package: Navigating Package, Installing, and Understanding Flow Steps:
Go to your workspace.
For the sample list scraping field, the following instructions are applicable.