How to Easily Scrape Tables from Websites?

· 3 min read
Melisa Durmuş
RPA Developer

Web scraping has evolved into an indispensable technique for extracting valuable data from websites.

This blog will walk you through the process of scraping tables from websites with ease, using Robomotion's Browser Package.

Before we delve into the intricacies of scraping tables, it's crucial to set up your environment. If you're new to Robomotion or haven't yet established a workspace, don't worry—we'll guide you through the process. Ensure that you've installed the "Browser" package for this workflow, and you'll be well-prepared to leverage its capabilities to simplify your web scraping tasks.

The Browser Package, equipped with a set of nodes, provides you with the tools to open a browser, navigate to your target web pages, click on specific elements, and, most importantly, scrape tables effortlessly. By the end of this guide, you'll be well-versed in navigating the Browser Package and extracting valuable data from websites.

How to Setup?

To begin, Login to your Robomotion workspace. If you haven't registered yet, you can create your workspace from the provided link. First, ensure that you have the "Browser" package installed for this workflow. Once you have confirmed that the package is installed, you can proceed with your flow and make the most of its functionality for your tasks.

About the Browser Package

Using the nodes in the browser package, you can easily open a browser, navigate to the desired links, click on specific buttons, and scrape tables and lists.

Exploring Browser Package: Navigating Package, Installing, and Understanding Flow Steps:

  1. Go to your workspace.
  2. For the sample table scraping field, the following instructions are applicable.

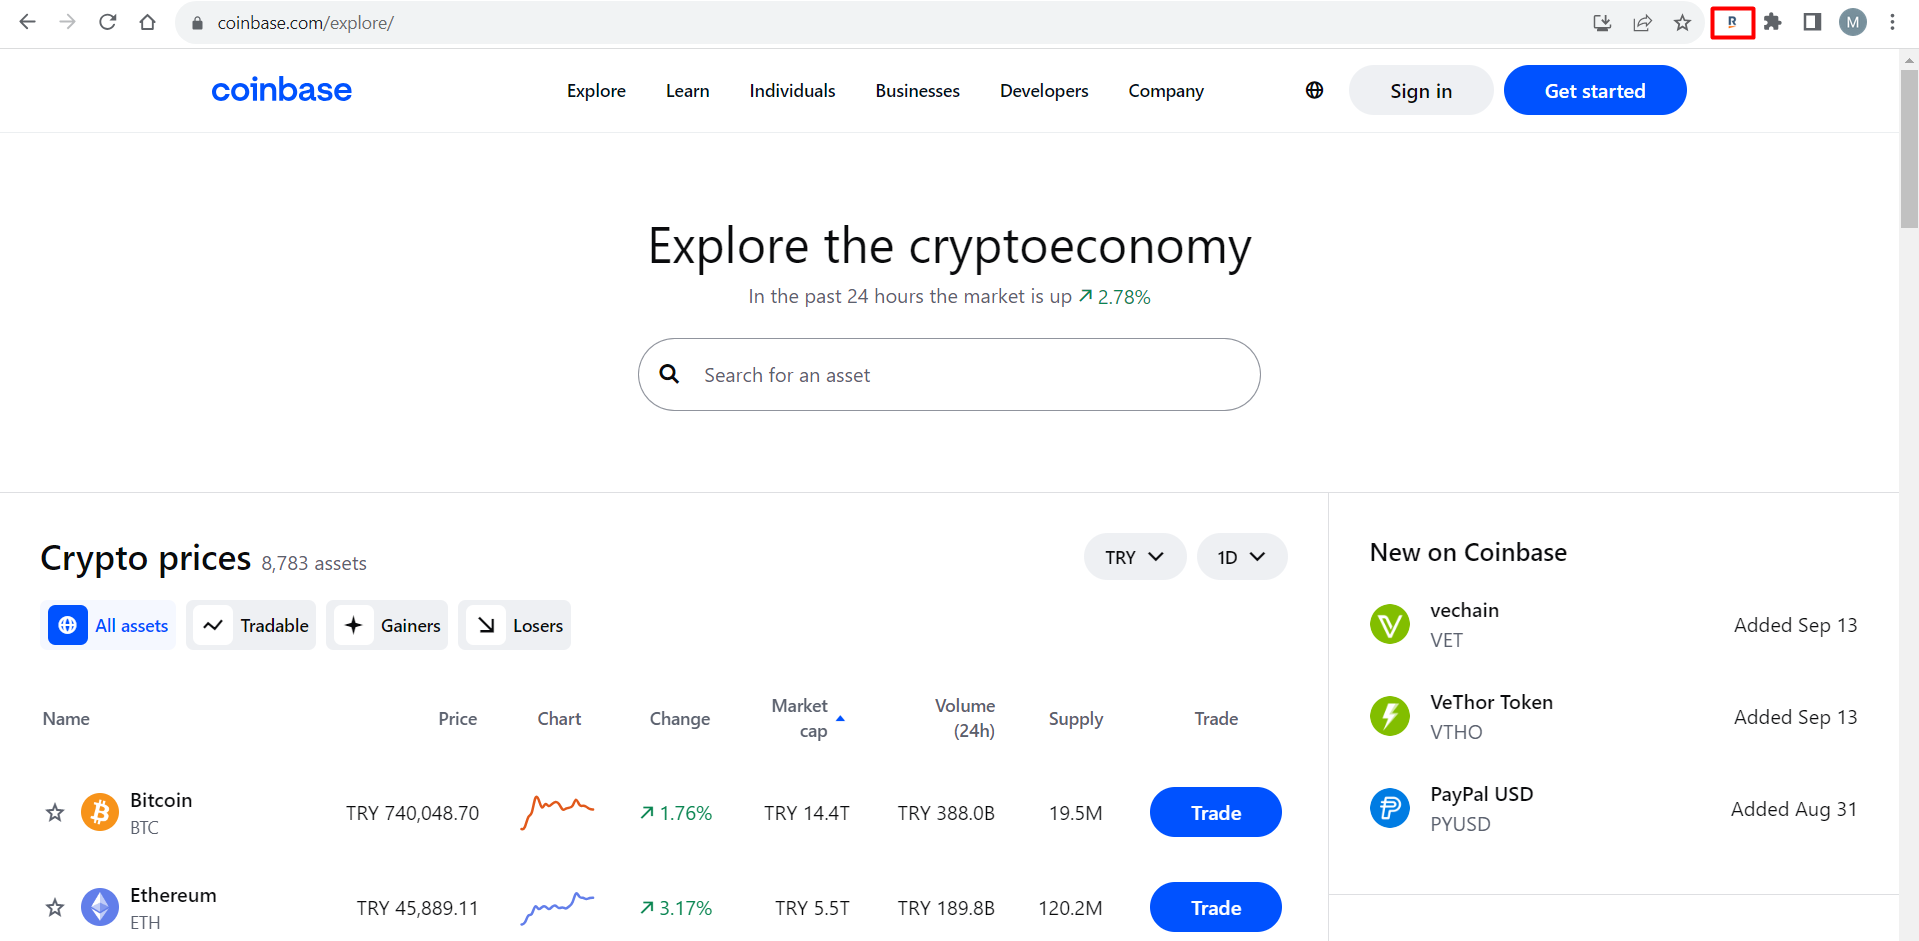
Robomotion Extension

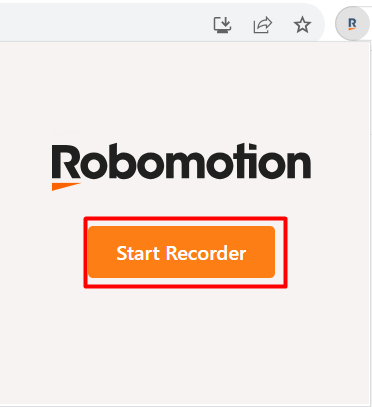
  • Then, click on "Start Recorder."

Start Recorder

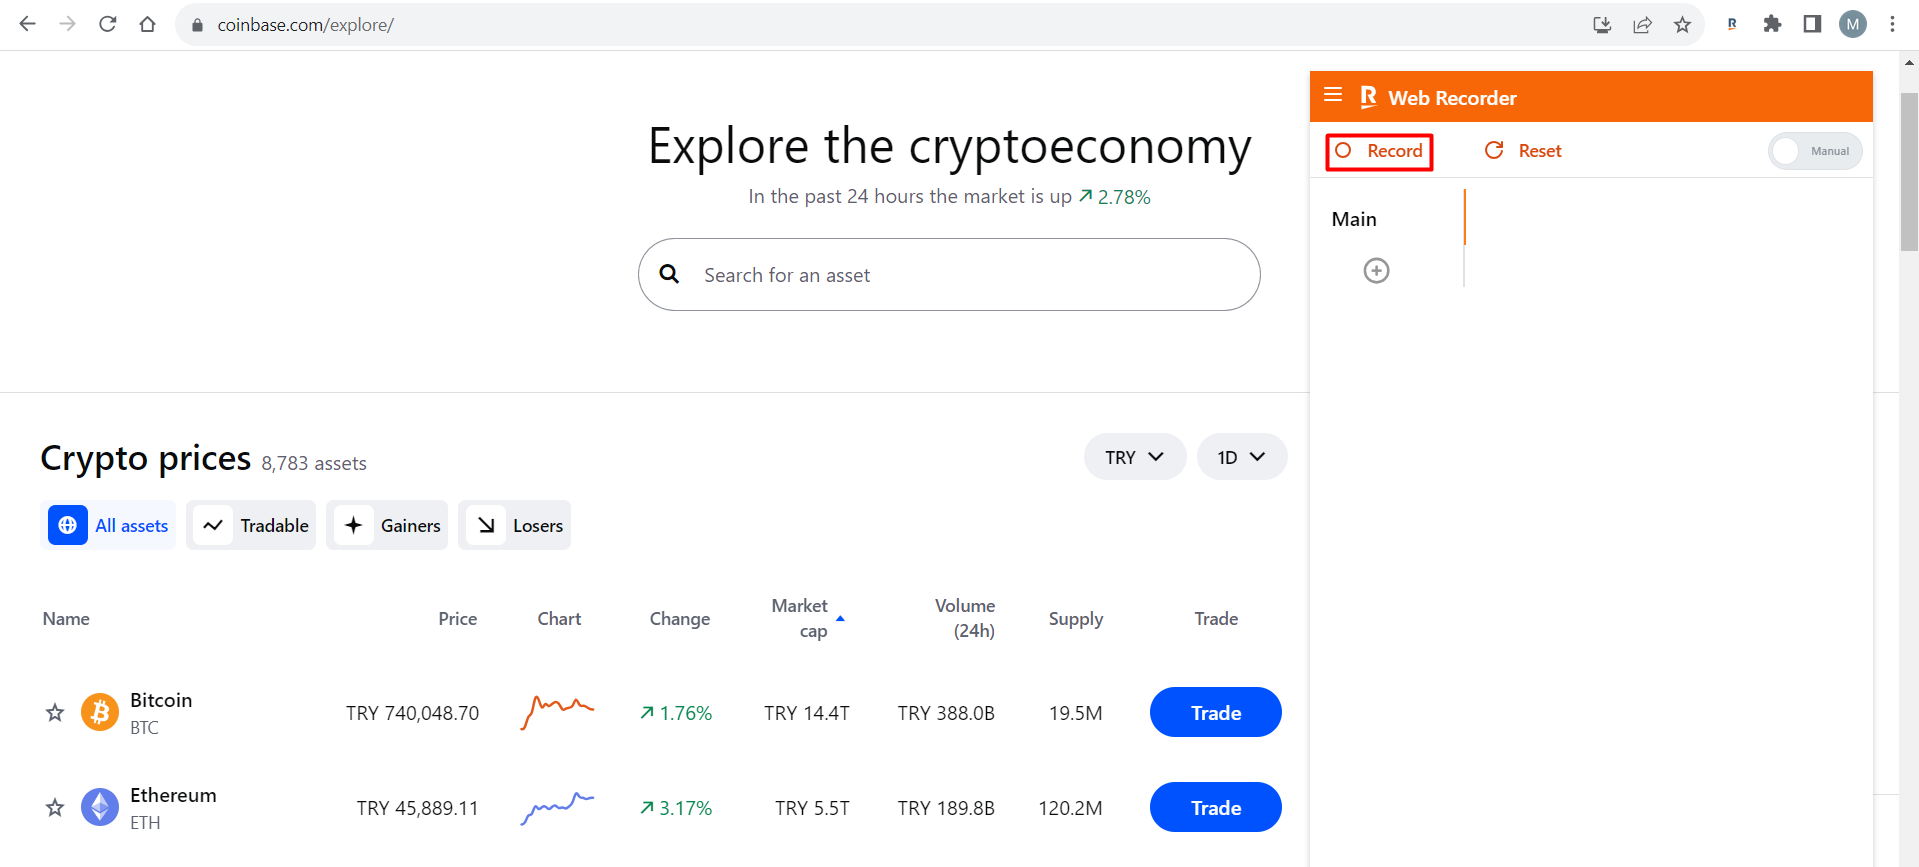
  • Click "Record".

Record

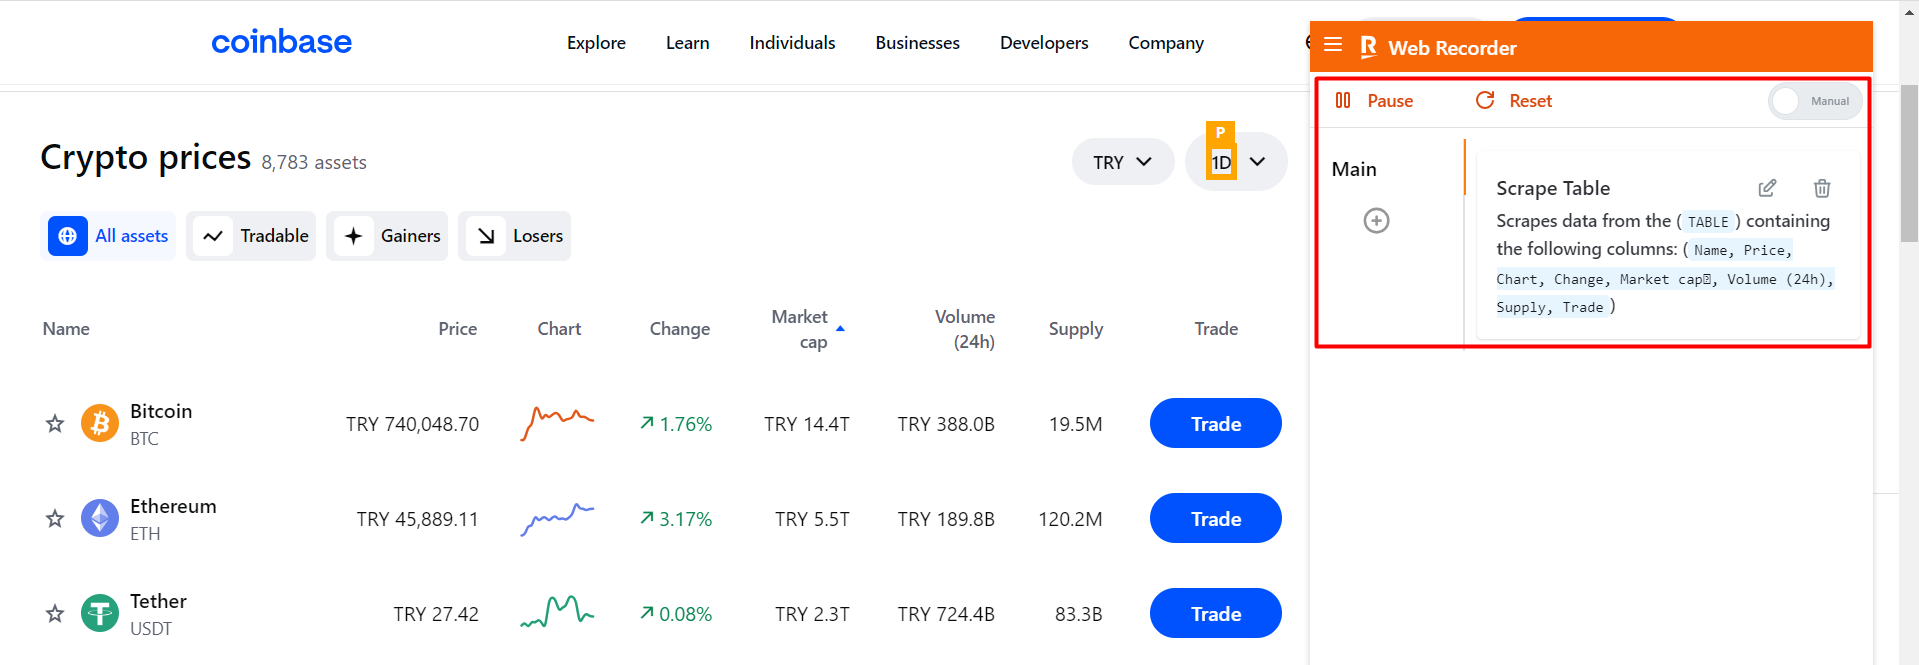
  • To create the table you desire, right-click on its name and choose "Scrape Table."
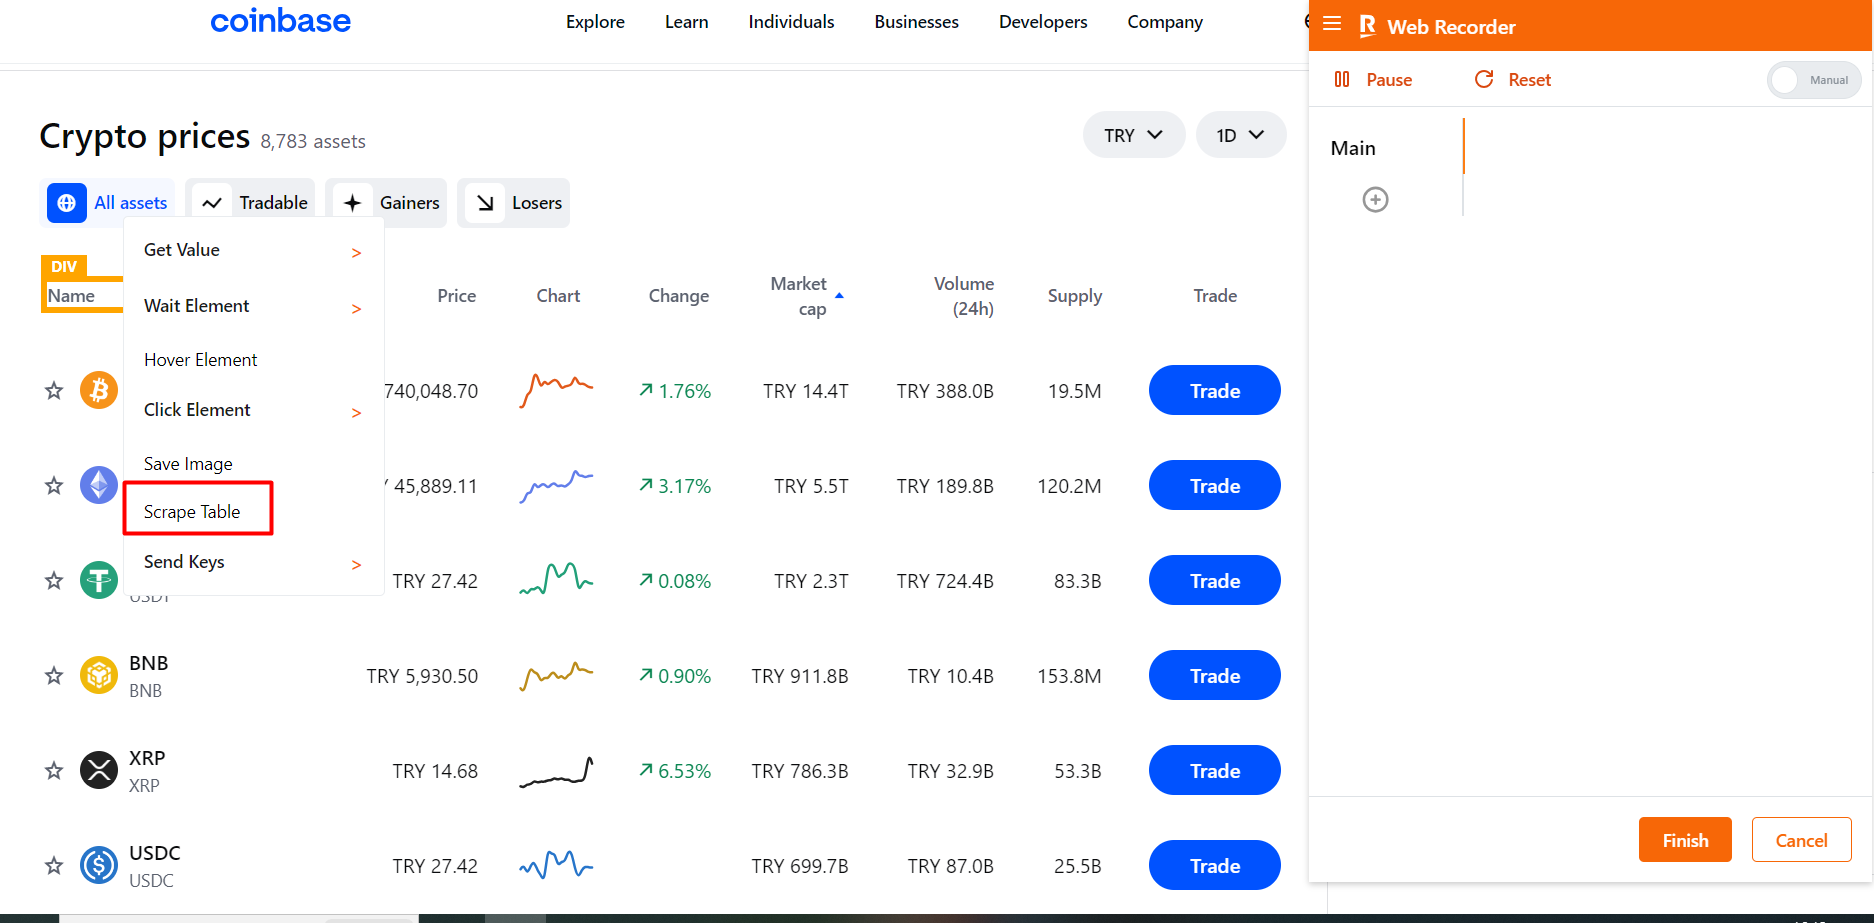
Scrape Table

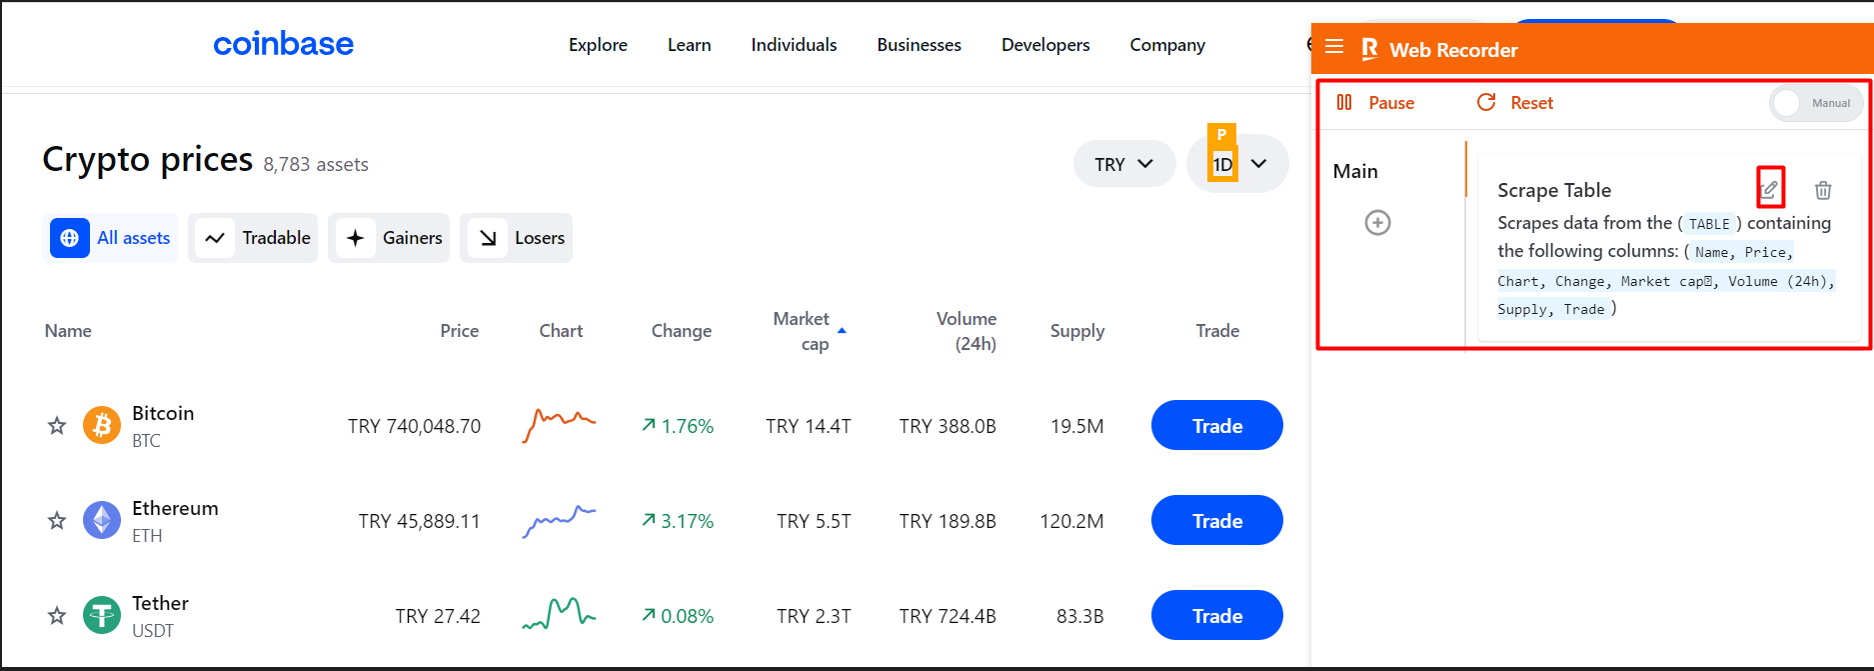
  • Your table has been created.

Scrape Table

  • Click the "Edit" button.

Scrape Table

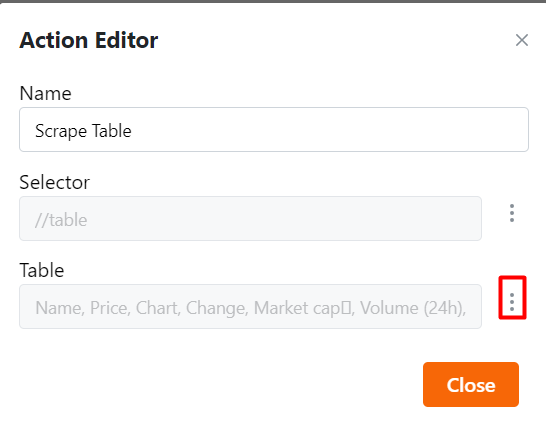
  • Click on the "Three Dots" tab.

Action Editor

  • Your table has been successfully created.
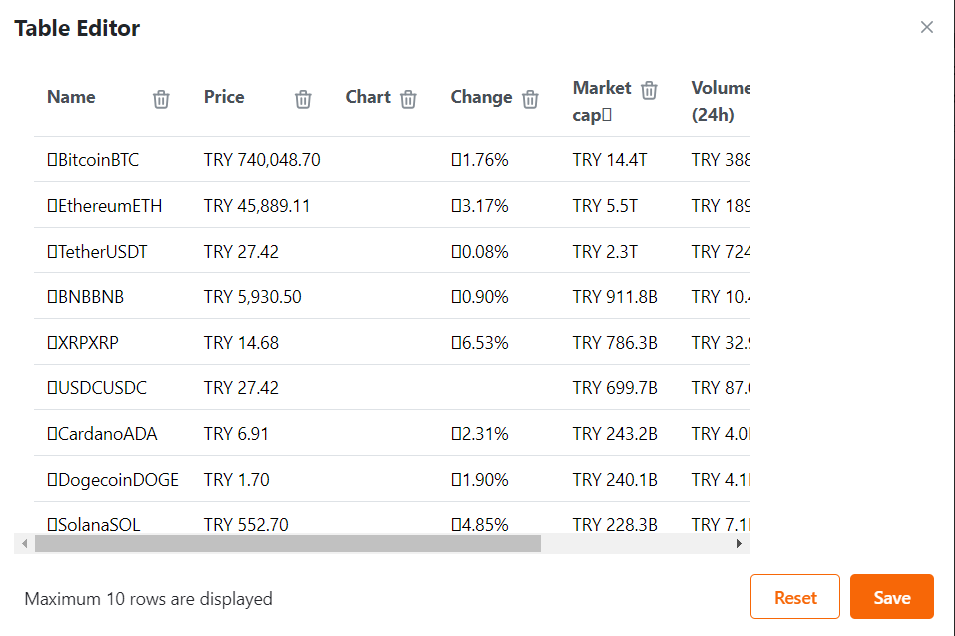
Table Editor

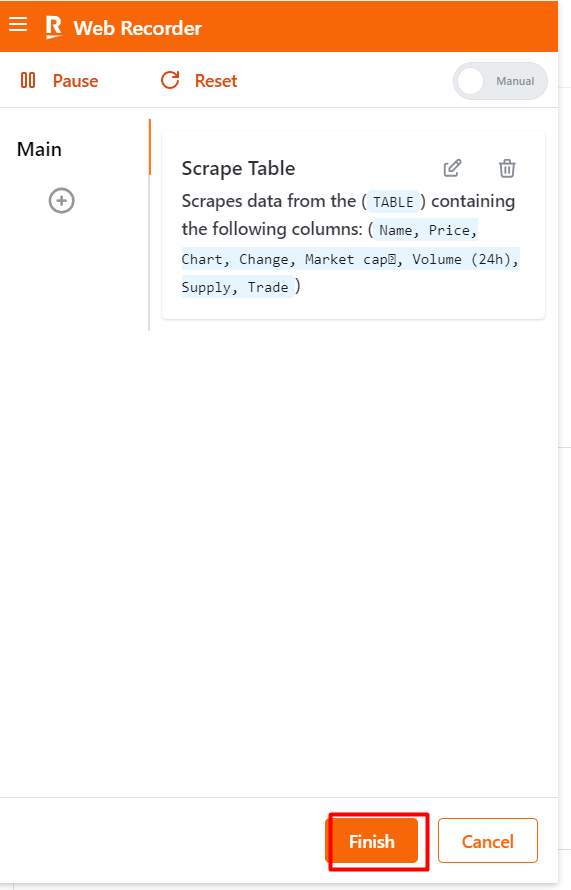
  • Click the "Finish" button.

Finish

  • Go to your workspace.
  • You will find the table you created in your workspace as a subflow.
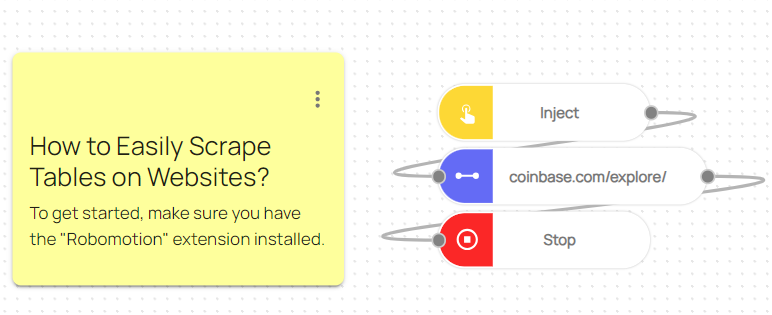
Flow Overview

Here you can access the complete flow by clicking on the following link: https://casestudies.robomotion.io/designer/shared/GiGxbANPtKznteGCD6bArU

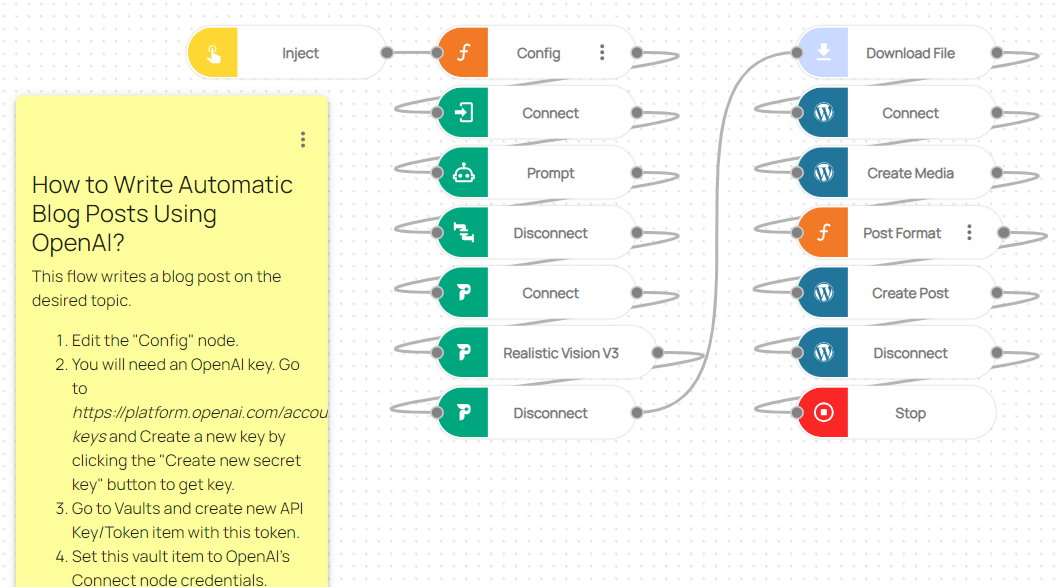
How to Write Automatic Blog Posts Using OpenAI?

· 3 min read
Melisa Durmuş
RPA Developer

In this blog post, we will examine a practical example demonstrating the use of OpenAI, WordPress, and PluggerAI packages in Robomotion. By the end of this guide, you will have a clear understanding of how to use the capabilities of this node to optimize communication workflows and increase productivity within your team.

How to Setup?

To begin, Login to your Robomotion workspace. If you haven't registered yet, you can create your workspace from the provided link.

First, ensure that the "OpenAI," "WordPress," and "PluggerAI" packages are installed for this workflow. Once the packages are installed, you can proceed with the workflow, leveraging their functionalities for your tasks.

About the OpenAl Package

The OpenAI Package provides a simple interface for accessing the OpenAI API, enabling you to integrate cutting-edge natural language processing technology into your workflows.

About the Wordpress Package

Using the WordPress package, you can create your own website, generate your own posts, and perform many more actions.

About the PluggerAl Package

The PluggerAl Package provides a simple interface for accessing the PluggerAI API. By using the PluggerAl package, you can transform the text you write into a realistic picture.

Exploring Slack Package: Navigating Package, Installing, and Understanding Flow Steps:

  1. Go to your workspace.

  2. Click on the cube icon to access the packages page.

Package Icon

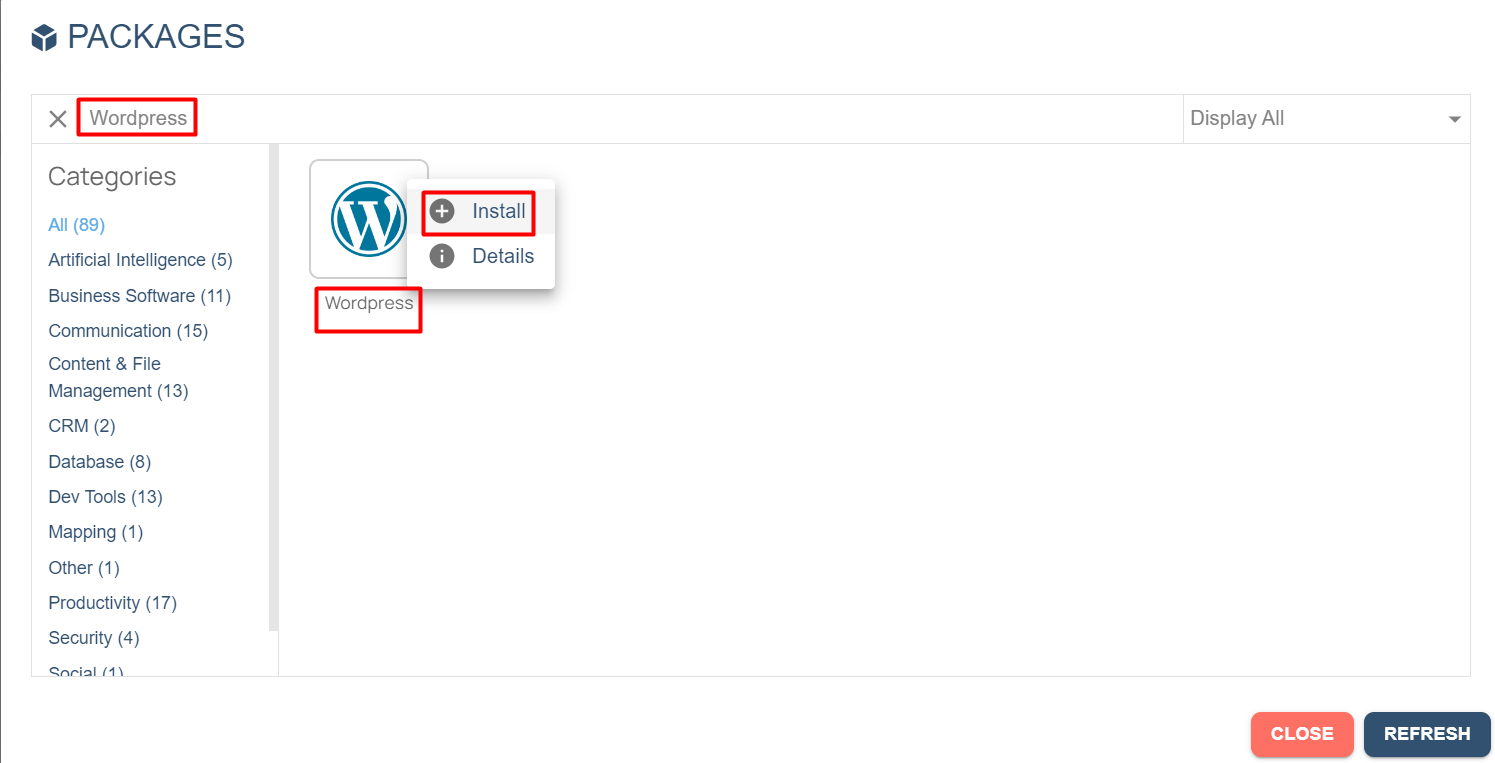
  1. Enter "OpenAI," "WordPress," and "PluggerAI" in the search field, and install the packages by right-clicking on them.

Install Package

  1. The “Inject” node is used to initialize the flow.
  2. The function node named "Config" includes JavaScript code to define variables.
  3. Function node named “Config” Code-Block:
msg.title = "Climate change jeopardizes sustainable development."; //[Required] Topic of the blog post.
msg.prompt = "Write a blog post covering this topic, not exceeding 4 paragraphs: " + msg.title;
msg.prompt_ = "Natural events caused by climate change."; //[Required] Converts typed text into a realistic image.
msg.negative_prompt = "Drought, flood, global warming, thirst."; //[Required] Converts typed text into a realistic image.
msg.image_path = ""; //[Required] File path from which the image was downloaded.
msg.wordpress_url = ""; //[Required] Your WordPress link.
return msg;

  1. The "Connect" node establishes a connection to your account using a provided API Key. To acquire the API Key, you must create a vault and then create a vault item named "API Key/Token."

Click on the links in the specified order to establish a secure environment.

By following these procedures, you can select the required vault from the options section of the "Connect" node.

Connect Properties Flow Overview

Here you can access the complete flow by clicking on the following link:

https://casestudies.robomotion.io/designer/shared/UPpfGXHqnwUDGj98cvWKAx

How to update Data Table rows?

· 5 min read
Burcu Evren
RPA Developer

Data Table nodes are here to make your life easier when it comes to handling data. These nodes have been designed for common operations such as adding/removing columns and rows, merging tables, and efficiently sorting data.

In this guide, we'll show you how to use Data Table nodes to effortlessly replace values in rows and make changes to numeric data.

How to Setup?

To begin, Login to your Robomotion workspace. If you haven't registered yet, you can create your workspace from the provided link. Once you have access to your workspace, you can proceed by utilizing the Data Table package to replace values. For any operations involving numerical data, feel free to employ the Number package.

About the Data Table Package

The DataTable Package is designed to empower automation developers, making data transformations a breeze. It comprises various nodes tailored to different data manipulation tasks, with one particularly significant node being the 'Replace Values' node. This node is dedicated to altering the values you intend to modify.

On the other hand, the Number package serves various purposes, including assigning values, decreasing/increasing values, and generating random values.

Building Blocks for Successful Flow

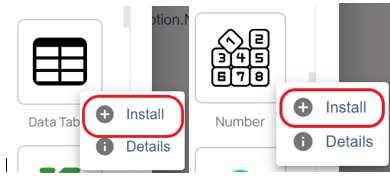
To utilize the 'Replace Values' and 'Data Table to CSV' nodes, you'll need to download the 'Data Table' package. Similarly, if you intend to use the 'Decrement' node, you must download the 'Number' package.

To obtain both the 'Data Table' and 'Number' packages, simply navigate to the 'Packages' menu and follow the download instructions

Packages Icon

Install icons for 'Data Table' and 'Number' Packages

Node Overview

  • Inject: This node initializes the flow.
  • Function: In this node, variables, objects, etc., to be used in the flow are defined.
  • Replace Values: This node replaces the desired value in a table with a new one.
  • For Each: The for-each loop is used to iterate through elements of arrays and collections (like Array). It is also known as the enhanced for loop.
  • Decrement: This node is used to decrease a numeric value. The input must be an integer.
  • Goto: To ensure flow continuity, this node provides the connection and routing between the nodes used to ensure process repetition when an error is received. When the flow reaches this node, it continues from wherever it was redirected.
  • Label: This node holds the redirection of the 'Goto' node and continues the flow from where it is located.
  • Data Table to CSV: This node converts a table to a CSV file. The path to the CSV file and the table must be provided as input.
  • Stop: This node is used to halt the flow.

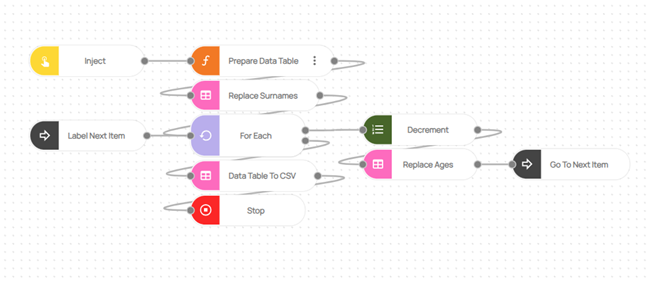
Flow Steps

  1. Access to the workspace is granted through the instructions outlined in the "How to Set Up" section.
  2. ‘Inject’ node is used to initialize the flow.
  3. Within the 'Prepare Data Table' function node, the variables msg.csv_path and msg.table are defined. The msg.csv_path variable is utilized to specify the path for writing the modified table's output to a CSV file. It is essential to define the path for this variable. On the other hand, the msg.table variable is employed to designate the table to be updated.
msg.csv_path = "C:\\Robomotion\\Templates\\myCSV.csv"; //The path to the CSV file where the output will be saved.

msg.table = {
columns: ["Name", "Surname", "Age"],
rows: [{
Name: 'Jack',
Surname: 'Smith',
Age: 21
},
{
Name: 'Harry',
Surname: '',
Age: 30
},
{
Name: 'Charlie',
Surname: '',
Age: 50
}
]
};

return msg;
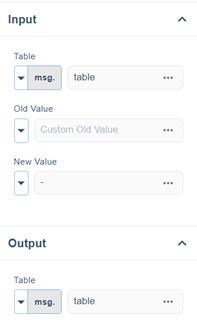
  1. In the 'Replace Surnames' node, the data to be modified is replaced throughout the entire table. In this flow, all values that are defined as empty in the 'Prepare Data Table' function node are substituted with '-'.

Replace Values Node Details

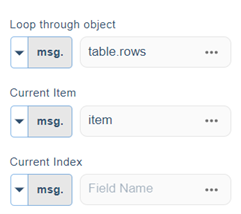
  1. The 'For Each' node iterates through all elements of the msg.table.rows array. The msg.table.rows variable is used to access rows in the table, with each element being defined within the msg.item variable.

‘For Each’ Node Details

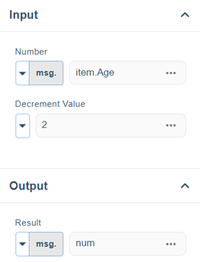
  1. The 'Decrement' node decreases the specified value for the specified element. In this example, it will subtract 2 from the age value that has been defined.

‘Decrement’ Node Details

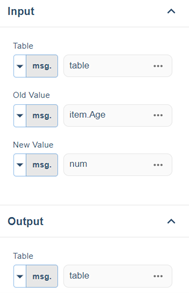
  1. In the 'Replace Ages' node, the reduced value is defined as the new value and then substituted for the old age value.

‘Replace Values’ Node Details

  1. The 'Go To Next Item' node is employed to revisit each element of the array defined in the 'For Each' node. The flow is redirected to the 'Label Next Item' node. This loop persists until all elements have been processed.
  2. Once the loop is concluded, the final table is saved to the previously specified CSV file.

Update Data Table Rows Flow

Here you can access the complete flow by clicking on the following link:

https://casestudies.robomotion.io/designer/shared/BkJTR5cGZ21Y97HgWKohhe

How to use File System nodes?

· 4 min read
Burcu Evren
RPA Developer

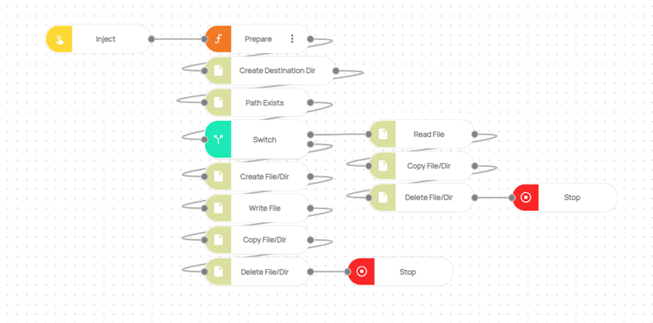
File System nodes are designed to facilitate a wide array of activities within your workflow, including file and folder creation, reading from and writing to files, and checking for file existence. In this specific workflow, the focus is on verifying the existence of a specified file. If the file is found, the system proceeds to read, copy, relocate it to a different location, and finally, delete the original source file. In cases where the file is not found, the system creates the file, adds predefined text to it, copies it to a designated destination folder, and subsequently removes the source file.

How to Setup?

To begin, Login to your Robomotion workspace. If you haven't registered yet, you can create your workspace from the provided link.

What is the 'Node Name' Node?

  • Inject: This node is used to initialize the flow.
  • Function: In this node, variable, object etc. to be used in the flow are defined.
  • Create File/Dir: Used to create a file/folder.
  • Path Exists: Checks if the given Path exists. This node is of boolean type. The output of the node is true or false.
  • Switch: Used for routing the flow according to certain conditions.
  • Read File: This node is used to read a specific text file.
  • Write File: This node is used to write text into a specific text file.
  • Copy File/Dir: Copy a file/folder from the source path to the destination path.
  • Delete File/Dir: Used to delete the file/folder.
  • Stop: This node is used to stop the flow.

Flow Steps:

  1. Access to the workspace is provided through the information provided under "How to set up."
  2. The 'Inject' node is utilized to initialize the flow.
  3. Variables are defined within the 'Prepare' function node.
msg.filePath = "C:\\Robomotion\\Templates\\myText1.txt"; // The directory of the folder to be checked for files should be given
msg.destinationDir = "C:\\Robomotion\\Templates\\Copy\\"; // The directory of the destination folder to be copied must be given
msg.destinationPath = "C:\\Robomotion\\Templates\\Copy\\myText1.txt"; // The directory of the destination file to be copied must be given
msg.text = "This place should be given text."; // The text to be written in the file should be given
return msg;
  1. The 'Create Destination Dir' node generates the destination folder for the copy operation, taking the defined msg.destinationDir variable as input. Since a folder will be created, the 'Options' setting should be set to 'Directory.' Additionally, the 'Continue on Error' option should be selected, as it will trigger an error if a folder already exists.

Create File/Dir Node Options

  1. The 'Path Exists' node checks whether there are files in the defined path. This node is of boolean type, and its output is either true or false.
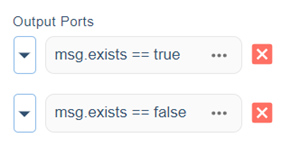
  2. The 'Switch' node controls the output of 'Path Exists'.

Switch Node Options

If the output is true, it indicates that the file exists. The robot reads the file using the 'Read File' node. After reading the file, the 'Copy File/Dir' node is used to copy the file from the source folder to the destination folder. Subsequently, the source file is deleted using the 'Delete File/Dir' node, and the flow comes to an end.

If the output is false, the robot creates the file using the 'Create File/Dir' node and continues its work.

  1. The text defined in the 'Prepare' function node is written to the file using the 'Write File' node.

  2. The 'Copy File/Dir' node is used for copying the file from the source folder to the destination folder.

  3. The source file is subsequently deleted using the 'Delete File/Dir' node.

File System Nodes Flow

Here you can access the complete flow by clicking on the following link:

https://casestudies.robomotion.io/designer/shared/CYBLrZXLs7nDQURQidZ9zw

How to make a simple interface with Assistant nodes?

· 3 min read
Melisa Durmuş
RPA Developer

In this blog post, we will walk you through an example of utilizing the Assistant node in Robomotion.

How to Setup?

To begin, Login to your Robomotion workspace. If you haven't registered yet, you can create your workspace from the provided link. First, make sure the "Assistant" package is installed for this workflow. Once the package is installed, you can proceed with the workflow, leveraging its functionalities for your tasks.

About the Assistant Package

With the Assistant package, you can do many things, such as sending messages to the Assistant application, uploading files, and uploading pictures.

Exploring Assistant Package: Navigating Package, Installing, and Understanding Flow Steps:

  1. Go to your workspace.

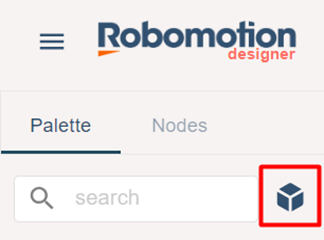
  2. To open the packages page, simply click on the cube icon.

Packages page

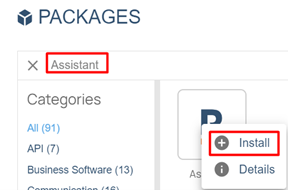
  1. Enter "Assistant" in the package search field, and then right-click on the package and select the option to download it.

Assistant Package

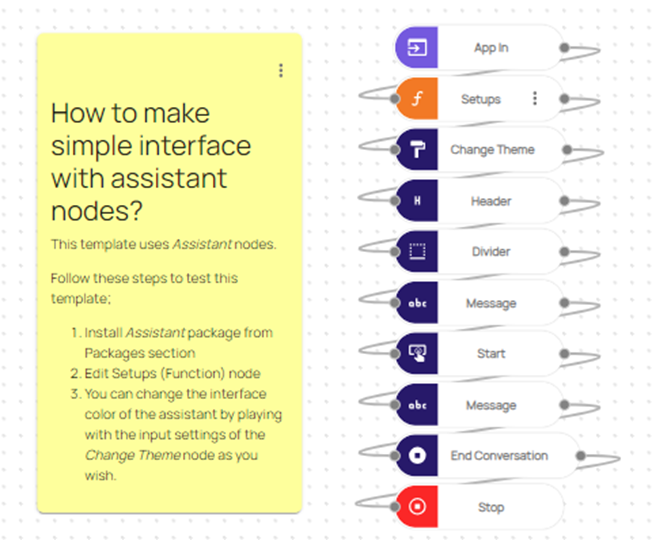
  1. The “App In” node is used to initialize the flow.

  2. The function node named "Setups" contains JavaScript code for defining variables.

  3. Function node named “Setups” Code-Block:

msg.header = "Robomotion Assistant"; // Enter a name for your assistant.
msg.message = "How can I help you ?"; // Enter the message your assistant wants to send.

msg.labels = ["Start"]; // The message you want to send to the assistant.

msg.message_ = ""; // Enter the message your assistant wants to send.

return msg;
  1. Feel free to adjust the interface color of the assistant as per your preference by using the "Change Theme" node.

  2. “Stop” node is used to stop the flow.

Adding an app to the "Robomotion Apps"

  1. Click the "Master" button located at the top of your workspace.

Master Branch

  1. Select the "Create Version" button on the screen that appears.

Create Version

  1. Once the version has been added, proceed to click the "Publish" button.

Publish

  1. Click on the menu

Menu

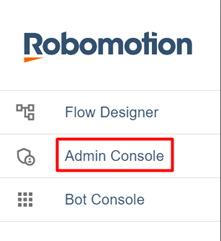
  1. Click on "Admin Console”.

Admin Console

  1. Select the "Bots" button located at the bottom of the Robomotion admin section.

Bots

  1. On the page that appears, click the "ADD BOT" button.

ADD BOT

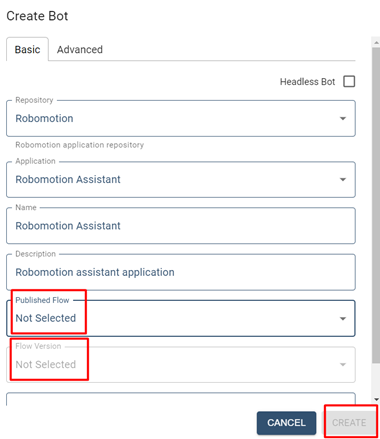
  1. Configure the necessary settings, with "Published Flow" as the name of your flow and "Flow Version" representing the added version. Finally, click the "CREATE" button.

CREATE

  1. Click on "Robomotion Apps”.

Robomotion Apps

  1. On the page that opens, locate your bot and double-click on it.

MyBots

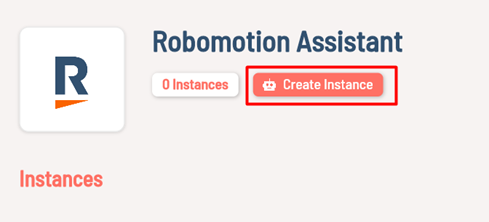
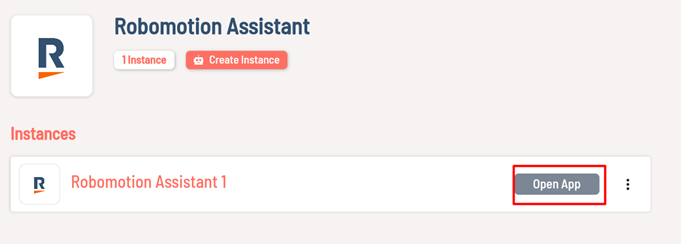
  1. Click on the "Create Instance" button.

Create Instance

  1. Click on the "Open App" button.

Open App

  1. Click on the “Run” button.

Run

  1. Your assistant interface is now prepared.

Flow Chart:

Flow

Here you can access the complete flow by clicking on the following link: https://casestudies.robomotion.io/designer/shared/Lbsd4WwwY6AV6PtnHru66X

How to master email automation with Core Mail Package?

· 3 min read
Selin Gizem Özkan
RPA Developer

Efficient email management is essential for businesses and individuals alike. The Core.Mail package of Robomotion provides a powerful set of tools to simplify and automate various email-related tasks, from sending important messages to searching for specific emails in your inbox.

In this comprehensive guide, we will delve into the 'send mail' and 'search mail' nodes within the Core.Mail package, enabling you to run your email processes easily.

How to Setup?

To begin, Login to your Robomotion workspace. If you haven't registered yet, you can create your workspace from the provided link. You can use the Core Mail package for email operations. You don't need to install this package; it comes pre-installed by default.

About Core Mail Package

The Core Mail Package comprises 11 nodes that empower you to perform various email-related operations. These capabilities range from connecting to email accounts to sending, searching, and moving emails, among others. This package simplifies the automation of email-related tasks, allowing you to streamline and enhance your email processes effortlessly.

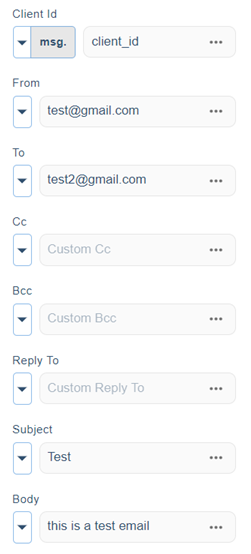
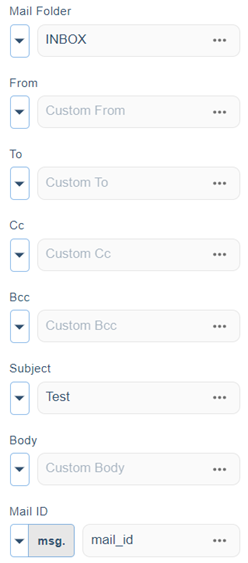
Send Mail node input

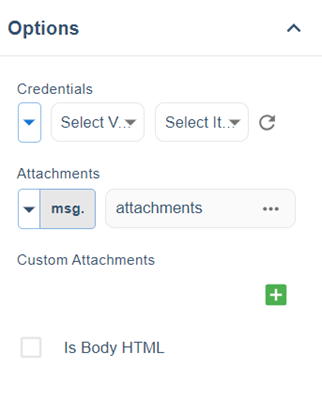
Send Mail node input

Flow Steps:

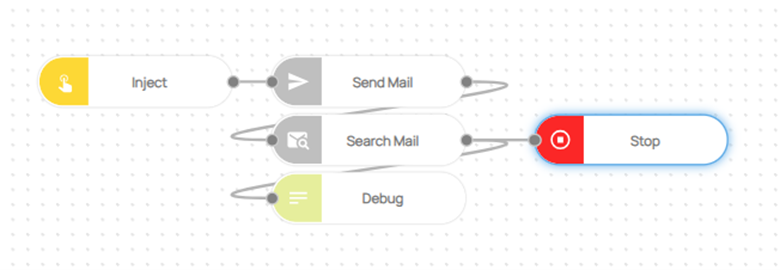
  1. The Inject node is used to initialize the flow

  2. The input values in the 'send mail' node are entered as follows:

  • From: Enter the sender's email address.
  • To: Enter the email address to which the mail will be sent.
  • Subject: Write the subject of the email to be sent.
  • Body: Write the content of the email to be sent.
  • Cc: Enter the email address you want to add to Cc (optional).
  • Bcc: Enter the email address you want to add to Bcc (optional).
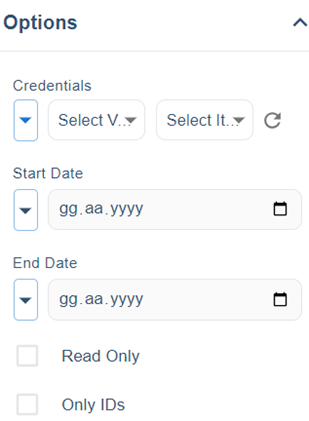
  1. Select the credentials information found in Options.

Search Mail node input

Search Mail node options

  1. The input values in the 'search mail' node are entered as follows:
  • Mail Folder: Enter the folder you want to search in. 'INBOX' is the default option, but you can change this field (e.g., Starred, snoozed, sent, etc.).
  • Subject: Enter the email subject you want to search for.
  1. Select the credentials information in the Options.
  2. Enter the date range you want to search for in Options. Date information should be entered in the day/month/year format.
  3. To view the results, use the debug node.

Flow

Here you can access the complete flow by clicking on the following link: https://casestudies.robomotion.io/designer/shared/QSK5RUHdbW9Fh9njmJArgi

How to use the Try - Catch Structure?

· 4 min read
Burcu Evren
RPA Developer

When an error occurs during the operation of the flow, it is managed using both the Catch node and the Try Catch structure. Errors are an inherent aspect of many processes and can vary from simple typos to intricate issues that demand hours of debugging to rectify.

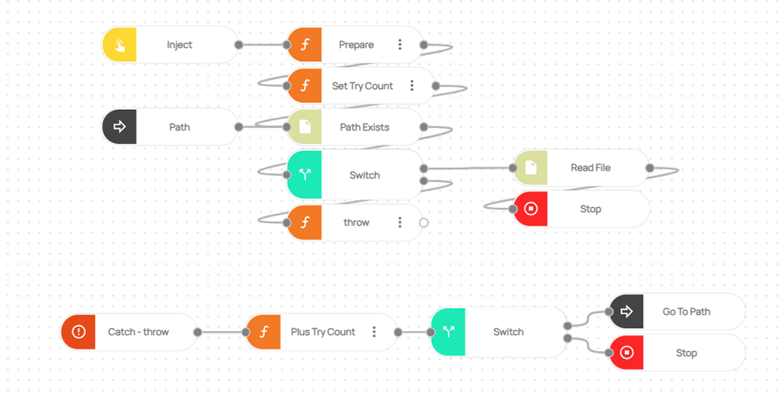
An example of the error-handling structure is provided below. This example functions by verifying the existence of a specified file path. If the file does not exist within the folder directory, it is checked three times before the flow is halted. However, if the file does exist within the folder directory, it is read, and the flow is terminated

How to Setup?

To begin, Login to your Robomotion workspace. If you haven't registered yet, you can create your workspace from the provided link.

Node Overview

  • Inject: This node initializes the flow.
  • Function: In this node, variables, objects, etc., to be used in the flow are defined.
  • Path Exists: This node checks if the given path exists. It is of boolean type, and its output is either true or false.
  • Read File: This node is used to read a specific text file.
  • Catch: It is used to catch an error if one occurs during the execution of the flow.
  • Switch: This node is used for routing the flow based on specific conditions.
  • Goto: To ensure flow continuity, this node establishes connections and routing between nodes to guarantee process repetition when an error is encountered. When the flow reaches this node, it continues from wherever it was redirected.
  • Label: This node holds the redirection point for the 'Goto' node, allowing the flow to continue from its location.
  • Stop: This node is used to halt the flow.

Flow Steps

  1. Access to the workspace is granted through the instructions provided in the "How to Set Up" section.
  2. The 'Inject' node is utilized to initiate the flow.
  3. Inside the 'Prepare' function node, the variable 'msg.filePath' is defined. This variable will serve as the input for the 'Path Exists' node, and the file path to be checked for existence should be specified.
msg.filePath = "C:\\Robomotion\\Templates\\myText.txt"; // The directory of the folder to be checked for files should be given
return msg;
  1. The 'msg.try_count' variable is defined within the 'Set Try Count' function node. This variable stores the initial count of how many times the try-catch structure will be invoked when an error occurs in the flow.
msg.try_count = 0;
return msg;
  1. The 'Path Exists' node verifies whether files exist in the specified path. This node is of boolean type, and its output can be either true or false.

  2. The 'Switch' node controls the output of 'Path Exist' node.

Switch Node Options

If the output is true, it signifies that the file exists. In such cases, the robot reads the file using the 'Read File' node, and then the flow comes to a halt. This represents the error-free scenario, and the Try Catch structure remains inactive. However, if the output is false, the flow continues with the 'throw' function node.

  1. The robot triggers an error during the 'throw' function node phase because it is unable to locate the file in the designated path.
throw "The file you defined in msg.sourcePath was not found."
return msg;
  1. The 'Catch' node contains the function node that encountered an error.

  2. In the 'Plus Try Count' node, the previously defined 'msg.try_count' index is incremented by 1.

msg.try_count += 1;
return msg;
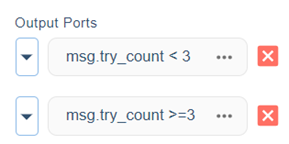
  1. The 'Switch' node examines the value of this index. If it is less than 3, the flow is rerouted to the 'Path' using the 'Go To Path' node. The 'Path Exists' node verifies whether the file exists. In the 'Go To' node, select the appropriate 'Label' node from the options section.

Goto Node Options

If the index is greater than 3, the flow is terminated. This means that the file has been checked three times and has not been found. The Try Catch structure also operates based on the value of the index.

The index value is optional and can be modified as needed.

Switch Node Options Try Catch Structure Flow

Here you can access the complete flow by clicking on the following link: https://casestudies.robomotion.io/designer/flows/HEwetqz9vGMuawiCy4efdY

How to download a file from the Web?

· 2 min read
Melisa Durmuş
RPA Developer

Downloading files from the internet is a fundamental task that many of us encounter in our digital lives. Whether it's grabbing a software update, acquiring research documents, or saving media files, the ability to efficiently download files is essential.

By the end of this blog post, you will have a clear understanding of how to automate and streamline the file download process, making it easier and more efficient for your specific needs.

Let's dive in!

How to Setup?

To begin, Login to your Robomotion workspace. If you haven't registered yet, you can create your workspace from the provided link.

Flow Steps

  1. Go to your workspace.
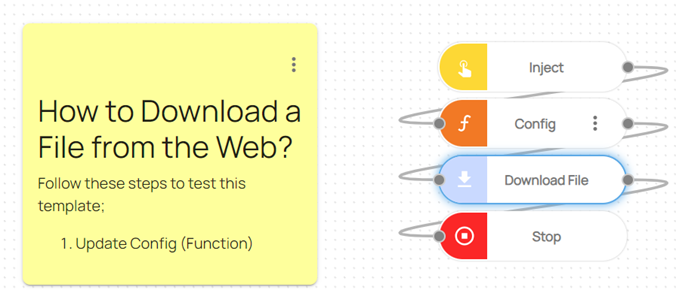
  2. The ‘Inject’ node is used to initialize the flow.
  3. The function node named "Config" contains JavaScript code to define variables.

Function node named “Config” Code-Block:

msg.FilePath = ""; // [Required] Path to the file you want to download
msg.FileDownloadPath = ""; // [Required] The path to will save the document you want to download

return msg;
  1. The "Download File" node is responsible for downloading the file
  2. The "Stop" node is used to stop the flow.

Flow Overview

How can I send a message to a channel from the Slack app?

· 3 min read
Melisa Durmuş
RPA Developer

Slack, a popular instant messaging application, has transformed the landscape of business communication. It serves as a catalyst for improving teamwork and connectivity among professionals.

In this blog post, we will delve into a practical example, showcasing the utilization of the Slack node within Robomotion. By the end of this guide, you will have a clear understanding of how to use the capabilities of this node to optimize communication workflows and enhance productivity within your team.

How to Setup?

To begin, Login to your Robomotion workspace. If you haven't registered yet, you can create your workspace from the provided link. First, make sure the "Slack" package is installed for this workflow. Once the package is installed, you can proceed with the workflow, leveraging its functionalities for your tasks.

About the Slack Package

The Slack package provides a straightforward interface for accessing the Slack app. With this package, you can perform various tasks, including sending messages to Slack channels, uploading images, and more.

Exploring Slack Package: Navigating Package, Installing, and Understanding Flow Steps:

  1. Go to your workspace.
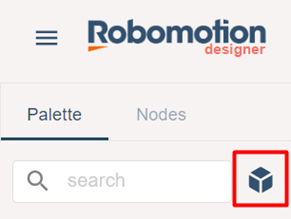
  2. Click the cube icon to access the packages page.

Menu of Packages

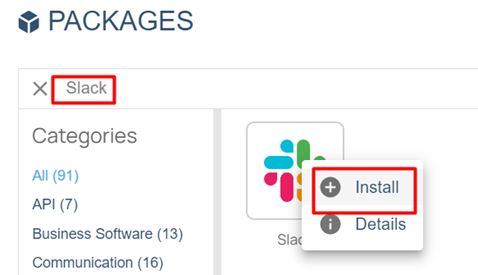
  1. Enter "Slack" into the package search field, then right-click on the package and select "Download."

Install Package

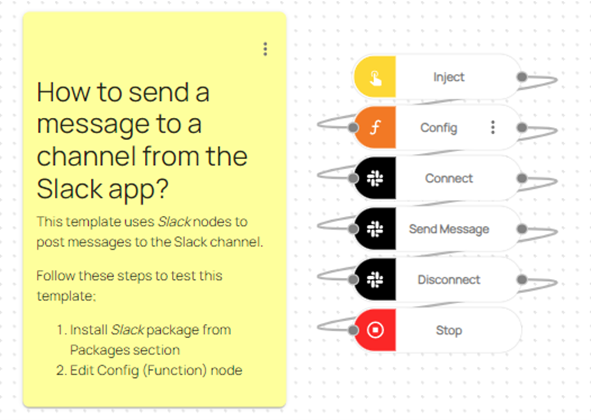
  1. The “Inject” node is used to initialize the flow.
  2. The function node named “Config” includes some javascript code to define variables.
  3. Function node named “Config” Code-Block:
msg.SendMessage = "Hello"; //[Required] Type the message you want to send.
msg.TextMessage = msg.SendMessage;
msg.ChannelName = ""; //[Required] Type the channel name.
msg.webhook = ""; //[Required] Enter your Slack channel webhook.

msg.req = {
"payload": "{\"text\":\"" + msg.TextMessage + "\"}",
};

return msg;
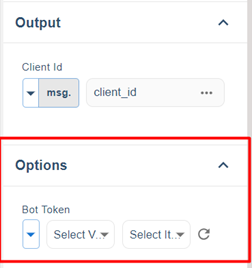
  1. The "Connect" node establishes a connection to your account using a provided Bot Token. To acquire the Bot Token, you must create a vault and then create a vault item named "API Key/Token.

Click on the links in the specified order to create the secure environment.

Following these procedures, you can choose the necessary vault from the options section of the "connect" node.

Connect Properties

  1. The "Send Message" node is employed to send messages to the Slack channel.

  2. The Slack Disconnect node is utilized to disconnect a specific account. It requires only one input: the connection_id.

  3. The "Stop" node is used to stop the flow.

Flow Overview

How to auto PDF download in chrome browser?

· 4 min read
Süeda Gül
RPA Developer

In a world where PDF documents reign supreme for sharing and preserving content, the need to download them efficiently is a common task. Whether it's research papers, user manuals, or reports, we all find ourselves needing to gather PDFs from the vast expanse of the internet. However, manually downloading each PDF file can quickly become a tedious and time-consuming process.

One such remarkable feature in our RPA tool is the browser package—a comprehensive suite comprising 23 meticulously designed nodes. From opening browsers to capturing screenshots, these nodes offer a versatile set of capabilities that can revolutionize the way we interact with web content.

In this blog post, we will explain how to automate the process of downloading PDFs using Browser Automation with Robomotion.

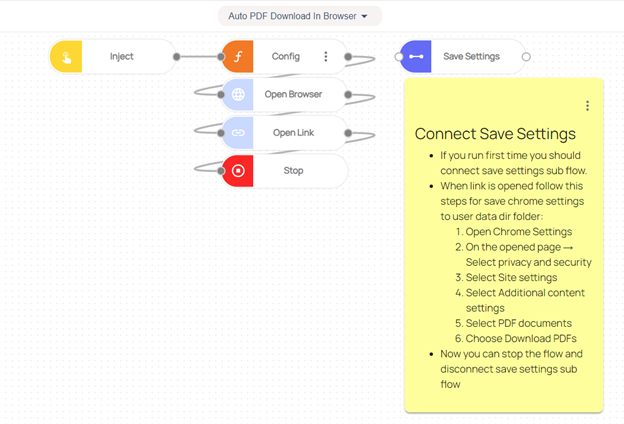
Visual Snapshot

Flow Overview

How to Setup?

To begin, Log in to your Robomotion workspace. If you haven't registered yet, you can create your workspace from the provided link.

About Browser Package

The browser package refers to a collection of nodes that are specifically designed to interact with web browsers. These nodes enable automation of web-based tasks and processes by providing a set of actions that mimic human interactions with a browser.

The browser package consists of 23 nodes, each representing a specific action that can be performed within a web browser. These actions range from basic functions like opening and closing browsers, clicking on elements, and navigating forward or backward, to more advanced operations like capturing screenshots, handling alerts, and even executing custom scripts within the browser environment.

Flow Steps

  1. ‘Inject’ node is used to initialize the flow.
  2. The "Config" function node contains JavaScript code designed to define variables.

Function Node Named “Config” Code-Block:

//User Directory Path to save Chrome settings 
msg.user_directory_path = "YourUserDataDirFolderPath";
//Download Path to save PDF files
msg.download_path = "YourDownloadFolderPath";
//Give a url for the pdf file to download
msg.url = "https://www.fedex.com/content/dam/fedex/us-united-states/services/Fees_Shipping_Information.pdf";
return msg;
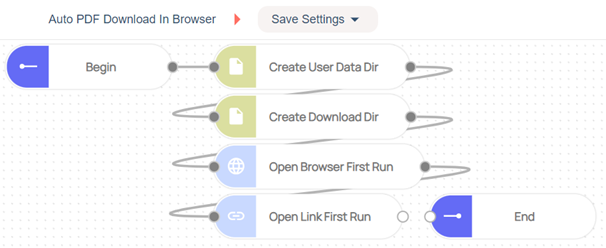
  1. During the initial run, you should establish a connection to the "Save Settings" sub-flow node, which comprises four individual nodes:

Save Settings Sub Flow Overview

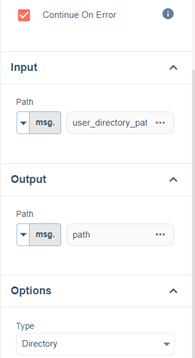
    1. The "Create User Data Dir" node within the "File Create" category is used to generate the "User Data Dir" folder at the specified path.

Create User Data Dir Properties

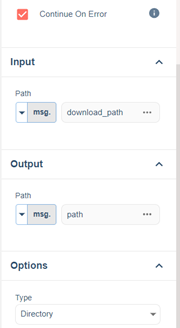
    1. The node called "Create Download Dir" under the "File Create" category is used to establish the "Download Folder" at the provided path.

Create Download Dir Properties

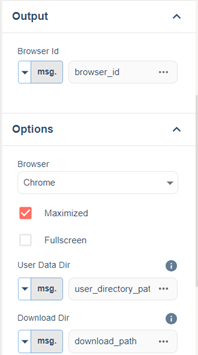
    1. The node labeled "Open Browser First Run" is used to select the browser type and initiate the browser driver on the machine.

Open Browser Properties

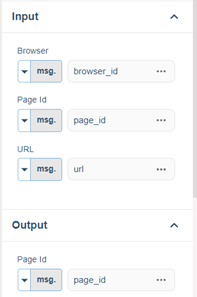
    1. The 'Open Link First Run' node is used to navigate, directing you to the specified URL.

Open Link Properties

    1. Once the page loads, follow these steps to save your settings:
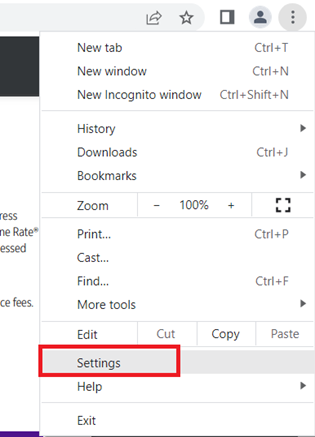
  • Open Chrome Settings.

Choose Settings

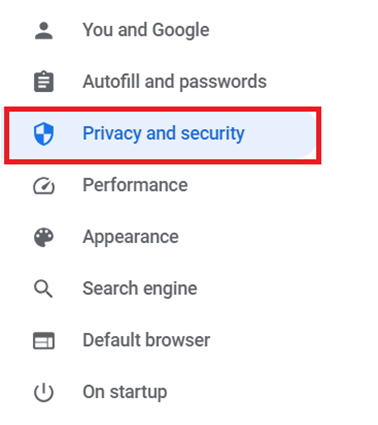
  • On the currently displayed page, navigate to "Privacy and Security".

Select Privacy and security settings

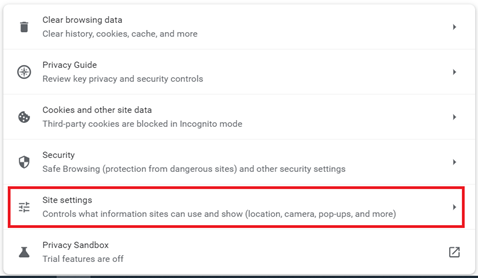
  • Choose "Site Settings".

Select Site Settings

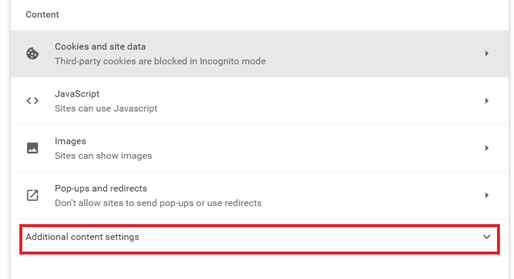
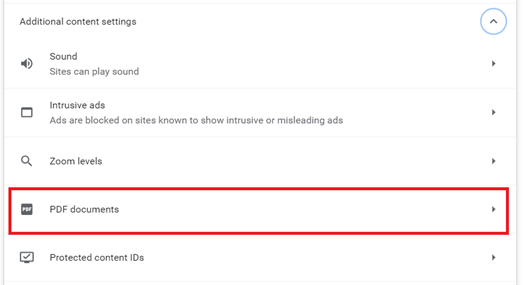
  • Choose the "Additional Content Settings".

Select Additional Content Settings

  • Choose the PDF documents.

Select PDF Documents

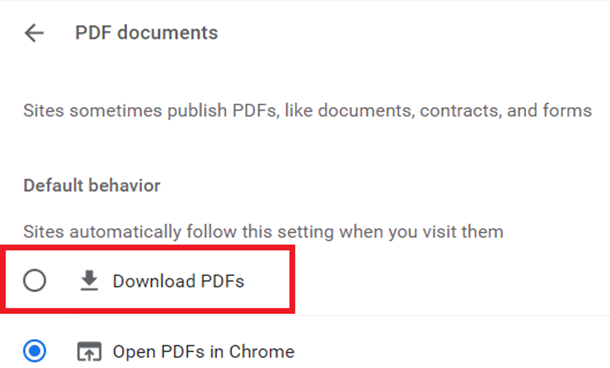
  • Select "Download PDFs".

Choose Download PDFs

    1. You can now stop the flow and disconnect the "Save Settings" sub-flow.
  1. Once the main flow has stopped and disconnected from the "Save Settings" sub-flow, you can proceed by establishing a connection to the "Open Browser" node. Subsequently, you can initiate the flow once more.

Open Browser Properties

  1. The "Open Link" node is utilized to access the provided PDF download URL. This action will trigger the opening of the webpage and initiate the immediate download of the PDF documents. The downloaded document will be saved to the designated "Download Folder" path, which is specified within the "Config" function node.

  2. The “Stop” node is used to stop the flow.

Here you can access the complete flow by clicking on the following link: https://casestudies.robomotion.io/designer/shared/RxwBFxvjVC3A4jqjF9LYZf