How to push array for table row values?

· 4 min read
Süeda Gül
RPA Developer

As we automate tasks and processes to save time and reduce errors, handling data seamlessly becomes a top priority. This is where the "Array" package steps in, offering a way to effortlessly manage and manipulate arrays within your RPA workflows.

In this blog post, we'll dive into a specific use case: pushing array values to table row entries. This task may sound complex, but with the right package and nodes, it becomes a running process that enhances your automation projects.

The "Array" package provides a wealth of functionalities that empower RPA developers to work with arrays in an intuitive way. One of the standout operations is the "Push" operation, which proves invaluable when it comes to appending data to table rows.

Imagine you have a dataset that you want to efficiently incorporate into your automation workflow. To make this happen, you'll first need to structure your data. One of the most versatile ways to organize data is by using an Excel spreadsheet. Excel not only allows you to input and arrange information neatly but also serves as an excellent source for RPA data manipulation.

So, the first step is to create an Excel spreadsheet that houses the data you want to work with. This could range from customer information to product details or any other dataset relevant to your specific RPA use case. The key is to organize your data into columns, making it easier to push these values into table rows later on.

Visual Snapshot
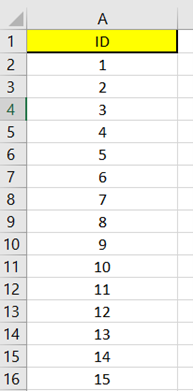
Unpushed Table Rows

How to Setup?

To begin, Log in to your Robomotion workspace. If you haven't registered yet, you can create your workspace from the provided link.

First, ensure that the OpenAI package is installed for this flow. Once the package is installed, you can proceed with the flow by utilizing its functionalities for your tasks.

About the Array Package

This package offers a collection of 12 nodes, each tailored to perform specific array operations effortlessly. From creating and accessing arrays to advanced tasks like filtering, mapping, and aggregation, these nodes enable you to efficiently manage and transform array data.

Building Blocks for Flow Success

This flow utilizes the Core Excel package. If you attempt the identical operations using the MS Excel Package, the flow will result in an error. The success of this flow hinges on the Array package, which must be installed before you execute the flow.

How to install a package?

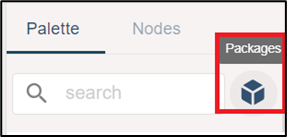
  1. Click the cube icon to access the packages page

Package Icon

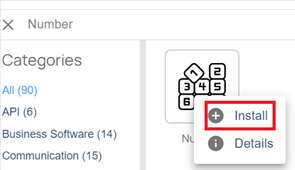
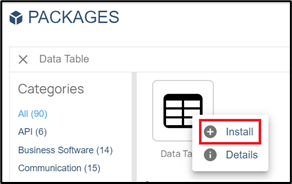
  1. Right-click on a package and then select "Install."

Install Package

Flow Steps

  1. ‘Inject’ node is used to initialize the flow.

  2. Function node named “Config” includes some javascript code to define variables.

Function Node Named “Config” Code-Block:

//Excel Path of Data Table
msg.excel_path = "YourDataTableExcelPath";
//Defining Array
msg.array = [];
return msg;
  1. The "Open Excel" node is used to initiate the opening process for the provided Excel file path. It requires a file path with the ".xlsx" extension as input and produces an output termed as the "Excel File Descriptor."
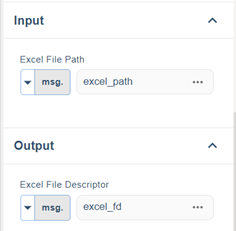
Open Excel Properties

  1. The "Get Range" node is utilized for data retrieval. It requires an Excel File Descriptor as input, and in this case, we're using the default msg.excel_fd variable. The output is an object that encompasses arrays of rows and columns. In the options tab, we've selected "All Range" as the target and opted to include "Headers" for column identification.
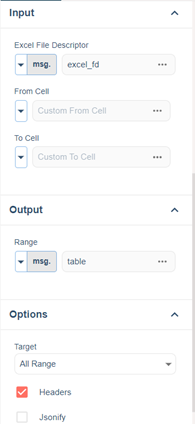
Get Range Properties

  1. The "For Each Row" For Each node is employed to iterate through and process each row of data. It requires an array variable as input. In this flow, we are processing each row within the msg.table.rows array.
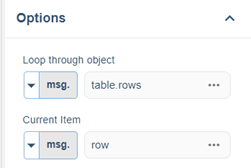
For Each Row Properties

  1. The "Array Push" node is used to append a value to a row within an array.
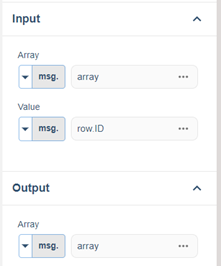
Push Properties

  1. The "Go To Next Row" Go To node is used to navigate to a specific label. In this scenario, it is used to transition to the next row.

Go To Next Row Properties

  1. The "Next Row" label node serves as a reference point for navigation within the process.

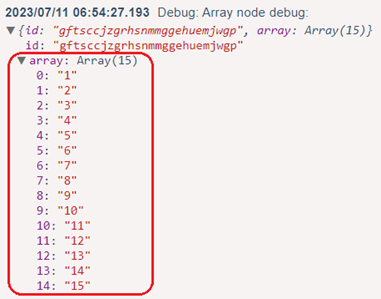
  2. The "Debug: Array" node is utilized for displaying variable values within the flow. If a particular variable is provided, the node will exhibit only the value of the specified variable. In this instance, we utilize the msg.array variable to showcase the values of the array.

Debug: Array Properties

  1. “The Stop" node is used to stop the flow.
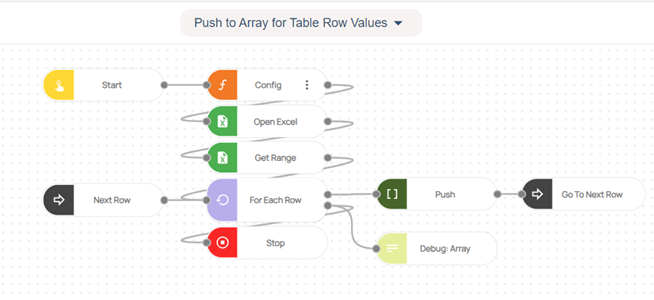
Flow Overview

Debug: Array’s Values

Here you can access the complete flow by clicking on the following link: https://casestudies.robomotion.io/designer/shared/NkJQd64Nxtd4jvsEhCbZRV

Converting number to string?

· 2 min read
Cansel Kahraman
RPA Developer

If you have a variable type of number in your flow, but you need to convert this number to string; You can convert number to string by using 'To String' node of ‘Number’ packages.

To begin, Log in to your Robomotion workspace. If you haven't registered yet, you can create your workspace from the provided link.

About the Number Package

The number package consists of 5 nodes. In this package, you will find five essential nodes: 'Assign', 'To String', 'Decrement', 'Increment', and 'Random'. The Number package is a powerful toolset designed to run and simplify basic number operations in your programming workflow. As its name suggests, this package focuses on fundamental numeric tasks, providing a collection of nodes that enable efficient handling and manipulation of numerical data.

Building Blocks for Successful Flow

  • To use the 'Assign' node and the 'To String' node, it is necessary to install the 'Number' package.

  • You can obtain the 'Number' package by accessing the 'Packages' menu and initiating the download from there.

Menu of Packages

Packages download page

About 'Assign' Node Inputs

  • The value must be entered in the Value data box
  • The output of ''Assign” node is variable type of number.

 Details of ‘Assign’ Node Inputs

About 'To String' Node Inputs

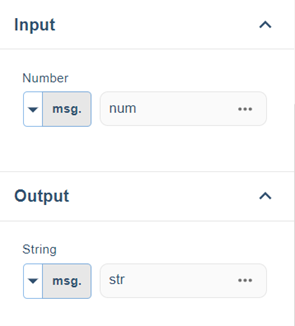
  • Make sure to enter the output value of the 'Assign' node into the Number data field.

  • The output of the 'To String' node is of the string variable type.

Details of ‘To String’ Node Inputs

Flow Steps

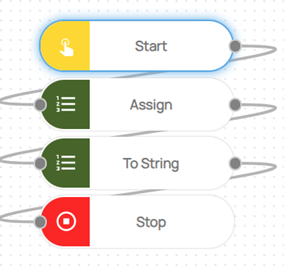
  1. ‘Inject’ node is used to initialize the flow.
  2. Use the 'Assign' node to assign a numerical value.
  3. Use the 'To String' node to convert a number into a string.‘To String’ node is used to convert number to string.
  4. Stop the flow using the 'Stop' node.

Convert Number To String  Flow

Here you can access the complete flow by clicking on the following link: https://casestudies.robomotion.io/designer/shared/9VuYCycAnU1yZDdf5aRbB4

How to add two columns in Excel?

· 3 min read
Burcu Evren
RPA Developer

In the realm of data manipulation and analysis, Microsoft Excel stands as a cornerstone, offering a vast array of functions to run tasks and unearth insights from raw information. One of the fundamental operations that professionals frequently encounter is adding columns to Excel spreadsheets, a seemingly simple yet crucial task that can significantly enhance data organization and analysis.

In this blog post, we’ll dive focusing on the process of adding two columns within a spreadsheet.

To begin, Log in to your Robomotion workspace. If you haven't registered yet, you can create your workspace from the provided link. This flow utilizes Excel. If you attempt the same operations with the MS Excel Package, the flow will result in an error.

To add columns, follow these steps:

  1. Use the 'Insert Column' node.
  2. Begin by defining the column names.
  3. Next, specify the particular column within the input of each 'Insert Column' node and add the desired data.
  4. Lastly, employ the 'Save Excel' node to save the changes.

Flow Steps

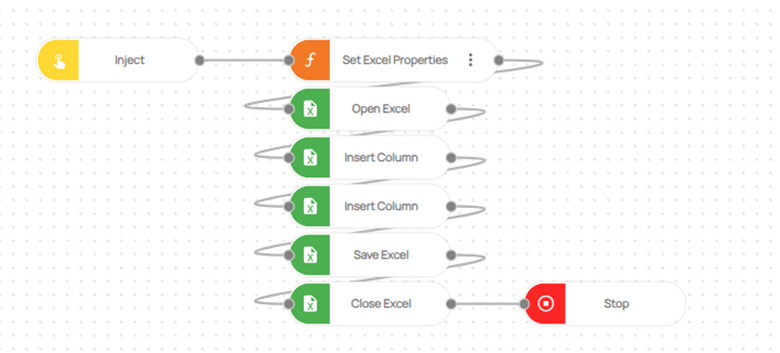
  1. The 'Inject' node is used to initialize the flow.
  2. Three variables are defined using a "function" node. One of these variables is 'msg.excel_path', which specifies the path of the Excel file to be used. The other two variables are 'msg.ColumnName1' and 'msg.ColumnName2', both of which define column names

Code for Set Excel Properties Function Node:

msg.excel_path = ""; // Give the excel path here
msg.ColumnName1 = [""]; // Give the column name here
msg.ColumnName2 = [""]; // Give the column name here
/*
Note!!
Each insert column node is used to insert a column.
The variables msg.ColumnData1 and msg.ColumnData2 are the column names to be added.
*/
return msg;

  1. 'Open Excel' node is used to open the defined Excel file. The input for the 'Open Excel' node is the variable 'msg.excel_path'.

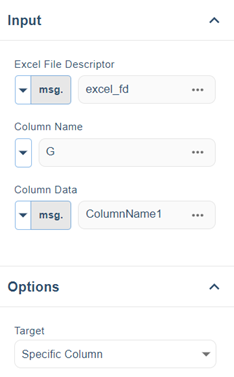
  2. The first column name that you've defined is included using the 'Insert Column' node. In this process, the 'msg.ColumnName1' variable serves as the input for the 'Insert Column' node, and this variable is then written into the Column Data field. Simultaneously, within the Column Name field, you specify the particular column where you wish to add this column name within the Excel file.

Insert Column Node Options for First Column

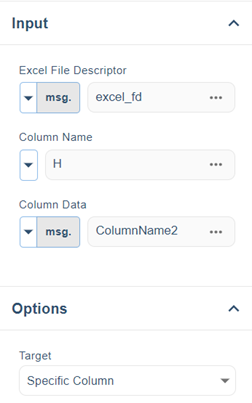
  1. The second column name that has been defined is added using the 'Insert Column' node. The input of the 'Insert Column' node is the variable 'msg.ColumnName2'. This variable is written into the Column Data field. Moreover, in the Column Name field, you define the specific column in which you want the column name to be included in the Excel file.

Insert Column Node Options for Second Column

  1. The Excel file is saved at the designated Excel path. The 'Save Excel' node takes the variable 'msg.excel_path' as its input.
  2. The Excel file that has been saved is closed by using the 'Close Excel' node
  3. The 'Stop' node is used to stop the flow.

Add Two Columns Flow

Here you can access the complete flow by clicking on the following link: https://casestudies.robomotion.io/designer/shared/9Qiu4RfRmKiS1wiY7c5z95

How to find last row with data in Excel?

· 2 min read
Selin Gizem Özkan
RPA Developer

When working with large datasets, one common task is to locate the last row with data. Knowing how to find the last row with data can save you a lot of time. Robomotion offers a handy shortcut to quickly navigate to the last cell within a range that contains data.

How to Setup?

To begin, Log in to your Robomotion workspace. If you haven't registered yet, you can create your workspace from the provided link.

About the Excel Package

The Excel Package comprises 26 nodes that simplify Excel tasks. It covers tasks like opening, creating, saving files, sheet management, styling, data manipulation, and more. This package runs Excel-related automation, enhancing efficiency in data manipulation and analysis.

How to find last row with data?

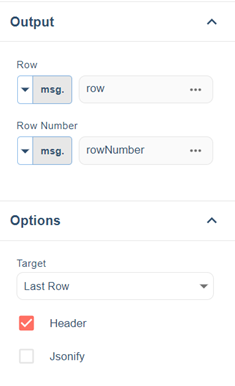
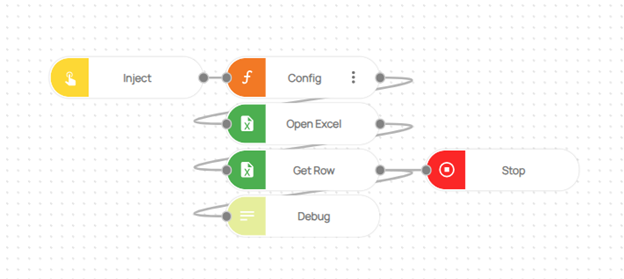
To find the final value within a table from an Excel file, you should use the "Get Row" node from the Excel package. Within this node, you select the desired operation from various options.To locate the last value, the "Last Row" option is selected.

Get Row node options

Flow Steps

  1. Inject node is used to initialize the flow.

  2. The directory path of the Excel file to be used is defined as a variable within the function node.

Function Node Named “Config”:

Code-Block

msg.excel_path = "C:\\excel_name.xlsx";
return msg
  1. The Excel file is accessed through the "Open Excel" node.

  2. Inside the "Get Row" node, you choose the "Last Row" option.

  3. A Debug node is employed to visualize the received last row.

Find last row data in excel Flow

How to convert JSON to Data table?

· 3 min read
Cansel Kahraman
RPA Developer

Managing data formats effectively within your workflow is a common challenge. Often, you might find yourself with data stored in the JSON object format, yet requiring it to be transformed into a more structured data table format. This is where the transformative power of the 'JSON to Data Table' node from our 'Data Table' package comes into play.

In this blog post, we'll delve into how the 'JSON to Data Table' node can be your solution to effortlessly bridge the gap between JSON and data table data within your automation processes.

How to Setup?

To begin, Log in to your Robomotion workspace. If you haven't registered yet, you can create your workspace from the provided link. Once you have access to your workspace, you can proceed by using Data Table package to convert JSON to Data table.

About the Data Table Package

DataTable Package is designed to empower automation developers to handle data transformations with ease. It consists of various nodes that cater to different data manipulation tasks, and one such important node is the JSON to Table node. This node acts as a bridge between JSON data and DataTable, allowing for efficient conversion and manipulation.

Building Blocks for Successful Flow

  • To use the 'JSON To Data Table' node, it's necessary to download the 'Data Table' package.
  • To acquire the 'Data Table' package, navigate to the 'Packages' menu and proceed with the download.

Menu of Packages

Packages download page

About 'JSON to Data Table' Node Inputs

  • The name of the 'JSON' data object must be entered into the JSON Data Box.
  • The output of the 'JSON To Data Table' node is the resulting DataTable object.

Details of ‘JSON to Data Table’ Node Inputs

Flow Steps

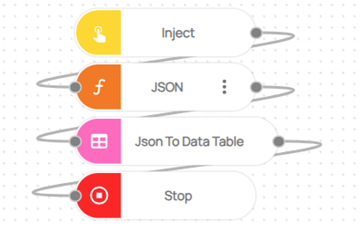
  1. ‘Inject’ node is used to initialize the flow.

  2. Use the 'Function' node to create the JSON object.

Code-Block

msg.data = [{
'productID': "123456",
'productSize': "S",
'productColor': "Green",
'productPrice': 25.50,
'productProperties': "Viscon"
},
{
'productID': "123457",
'productSize': "M",
'productColor': "Blue",
'productPrice': 30.00,
'productProperties': "Cotton"
},
{
'productID': "123458",
'productSize': "M",
'productColor': "Red",
'productPrice': 50.00,
'productProperties': "Cotton"
}
]
return msg;

  1. The 'JSON to Data Table' node is employed to transform a JSON object into a DataTable object.

  2. Stop the flow by using the 'Stop' node

JSON to Data Table Flow

Here you can access the complete flow by clicking on the following link: https://casestudies.robomotion.io/designer/shared/Wdsvbt9Wy6wopnK5p7ZbcF

Converting Strings to Numbers

· 3 min read
Cansel Kahraman
RPA Developer

Data manipulation often requires converting data from one type to another. Among these conversions, converting strings to numbers is a common task that programmers encounter in various projects.

In this blog post, we will walk you through the process of converting strings to numbers in a simple and effective way. We'll be using the powerful Number package, specifically the 'To String' node, to perform this conversion easily.

How to Setup?

To begin, Log in to your Robomotion workspace. If you haven't registered yet, you can create your workspace from the provided link. Once you have access to your workspace, you can proceed by using Number package to unlock powerful functionalities for numerical data manipulation and conversions.

About the Number Package

The number package consists of 5 nodes. In this package, you will find five essential nodes: 'Assign', 'To String', 'Decrement', 'Increment', and 'Random'. The Number package is a powerful toolset designed to run and simplify basic number operations in your programming workflow. As its name suggests, this package focuses on fundamental numeric tasks, providing a collection of nodes that enable efficient handling and manipulation of numerical data.

What is 'To String' node?

If you have a variable of number type in your workflow and need to convert it to a string, the 'To String' node from the 'Number' package comes to the rescue. This handy node allows you to effortlessly perform the conversion, transforming your numerical data into a string representation.

How to use the 'Assign' node and 'To Number' node?

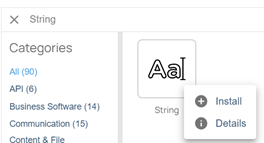
  • In order to use the 'Assign' node and 'To Number' node, it is necessary to download the 'String' package.

  • To acquire the 'String' package, navigate to the 'Packages' menu and proceed with the download.

Menu of Packages

Packages download page

About 'Assign' Node Inputs

  • The value must be entered in the Value data box.

  • The output of ''Assign” node is variable type of string.

Details of ‘Assign’ Node Inputs

About 'To Number' Node Inputs

  • The output value of the 'Assign' node must be entered in the 'String' data box.

  • The output of the 'To Number' node is of variable type: number.

Details of ‘To Number’ Node Inputs

Flow Steps

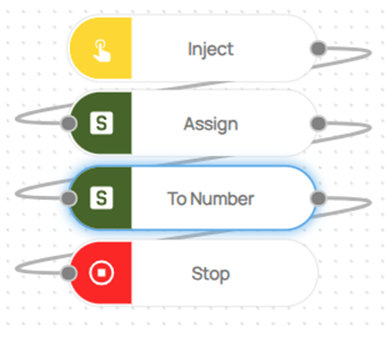
  1. The 'Inject' node is used to initialize the flow.
  2. The 'Assign' node is used to assign the string.
  3. The 'To Number' node is used to convert the string to a number.
  4. Stop the flow by using the 'Stop' node.

Convert String To Number  Flow

Here you can access the complete flow by clicking on the following link: https://casestudies.robomotion.io/designer/shared/1KSv1KJf9yYgC2VMHg2kjA

How to scroll up and down to the bottom of a page?

· 3 min read
Selin Gizem Özkan
RPA Developer

Unlocking the full potential of web browsing often involves mastering various navigation techniques that can save time and run our online experience. One fundamental skill every internet user should possess is the ability to efficiently scroll up and down a webpage, effortlessly exploring its entire content. While most people rely on traditional mouse scrolling or keyboard shortcuts, there exists a more advanced approach to achieve this.

In this blog post, we will delve into the intricacies of using the Mouse package to navigate a webpage effortlessly.

By the end of this tutorial, you'll be equipped with the knowledge to perform smooth and precise scroll operations, allowing you to traverse even the lengthiest pages with ease.

How to Setup?

To begin, Log in to your Robomotion workspace. If you haven't registered yet, you can create your workspace from the provided link. Once you have access to your workspace, you can proceed by using Mouse package to scroll down to bottom of a page with infinite scroll.

About the Mouse Package

The Mouse package offers a convenient solution for executing scroll operations on a webpage. This package comprises four essential nodes: Mouse Click, Mouse Drag, Mouse Hover, and Mouse Scroll. Each node serves a specific purpose to cater to various scrolling needs. By utilizing the 'mouse scroll node' within this package, you can easily scroll up and down the page. To achieve this, simply set the 'line count' as the input parameter. Once this configuration is complete, you can effortlessly perform the scroll operation using the provided down/up options. This guide will walk you through the step-by-step process of leveraging the Mouse package to navigate through web content seamlessly, making your browsing experience more efficient and enjoyable

What is the Mouse Scroll Node?

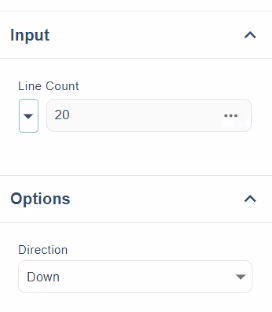
The Mouse Scroll node, the focus of this post, empowers you to perform precise scroll operations. By setting the "Line count" as input, you can effortlessly scroll up and down the page.

Mouse Scroll node options

Flow Steps

  1. The Inject node is used to initialize the flow.
  2. To open the browser, use the 'Open Browser' node and choose from options like Chrome, Firefox, Edge, or Safari.
  3. The 'Open Link' node is utilized to navigate to the page where the scroll operation will be performed.
  4. The flow includes the 'Mouse Scroll' node from the 'Mouse' package, with the parameters set to scroll a specified number of 'Line Count' units.
  5. Select the scroll direction from the available options: 'down' or 'up'

Mouse Scroll Flow

How to merge two data table?

· 2 min read
Selin Gizem Özkan
RPA Developer

Data analysis often involves working with multiple datasets and the need to merge them into a cohesive and comprehensive structure. Merging data tables is a fundamental operation that allows us to combine information from two separate tables based on common attributes.

In this guide, we will explore how to merge two data tables using the powerful 'Merge Table' node available in the Data Table package.

The 'Merge Table' node acts as the key component in this process, taking two distinct objects as input and returning a unified, combined object as output.

How to Setup?

To begin, Log in to your Robomotion workspace. If you haven't registered yet, you can create your workspace from the provided link.

About Data Table Package

DataTable package uses Pandas DataFrame library for performing table operations. It consists of 19 nodes that offer a wide range of powerful functionalities, enabling you to efficiently manipulate and analyze data.

What is the Merge Table node?

This node is designed to combine two data tables based on specified columns, facilitating the integration of information from different datasets.

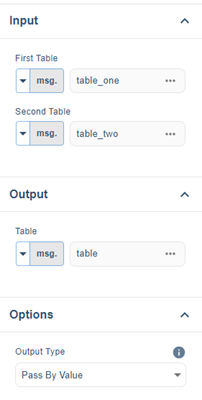
You can use the 'Merge Table' node in the Data Table package to perform this operation. This node takes 2 objects as input. Returns the combined object as output. As options are passed are by reference or by value.

Merge Table node options

Flow Steps

  1. The Inject node is used to initialize the flow.
  2. Install the data table package.
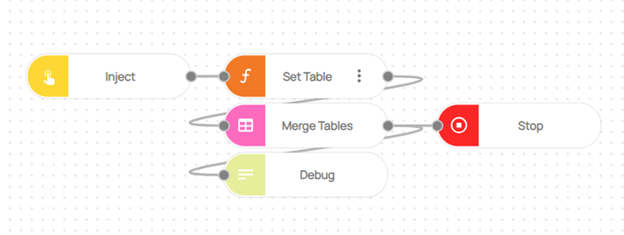
  3. Two objects are defined using a 'function' node

Function Node Named 'Set Table':

Code-Block:

msg.table_one = {
columns: ["Name", "Surname", "Age"],
rows: [{
Name: 'Jack',
Surname: 'Smith',
Age: 21
},
{
Name: 'Harry',
Surname: 'Brown',
Age: 30
},
{
Name: 'Charlie',
Surname: 'Wilson',
Age: 50
}
]
};

msg.table_two = {
columns: ["City"],
rows: [{
City: 'Brighton'
},
{
City: 'Oxford'
},
{
City: 'Liverpool'
}
]
};

return msg;

  1. Two tables are provided as input to the 'Merge Table' operation, resulting in a combined table as the output
  2. See the output of the created table using the debug node..

Merge table Flow

Learn How to Add a Column at the End in Excel

· 4 min read
Burcu Evren
RPA Developer

Adding a column at the end of an Excel spreadsheet is a common need that arises from various practical scenarios. Whether it's for better data organization, appending new information, performing calculations, conducting data analysis, or enhancing visualization and reporting, the ability to seamlessly add a column at the end proves to be invaluable.

In this blog, we will explore an efficient method to accomplish this task using Excel's 'insert column' node.

How to Setup?

To begin, Log in to your Robomotion workspace. If you haven't registered yet, you can create your workspace from the provided link.

About Core Excel Package

The Excel package offers a range of features and functionalities to work with spreadsheets, such as create and copy sheets, setting formulas, delete or add columns and more.

Note: This flow specifically utilizes Core Excel. It is important to note that if you attempt to perform the same operations using the MS Excel Package, it may result in errors. Therefore, it is recommended to stick with Core Excel to ensure the smooth execution of the flow.

How to add a column at the end in Excel?

To add a column at the end in Excel, you can follow these steps:

  1. Utilize the 'insert column' node: Use the 'insert column' node, which allows you to seamlessly add a new column to your Excel file.

  2. Locate the last column: Start by using the 'get row' node to find the last column in the current Excel file. This can be achieved by extracting the length of the msg.row object, which is the output of the 'get row' node.

  3. Add the column: Once you have determined the position of the last column, use the 'insert column' node to add the new column to the Excel file. This operation ensures that the column is placed at the end of the spreadsheet.

  4. Save your changes: Remember to save the Excel file after adding the column to preserve your modifications and ensure that they are retained for future use.

Flow Steps

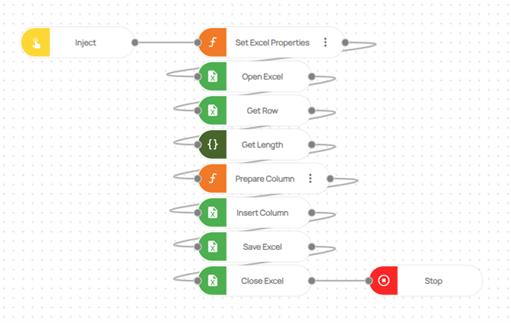
  1. ‘Inject’ node is used to initialize the flow.

  2. Additionally, two crucial variables are defined using a "function" node. The first variable, 'msg.excel_path,' allows you to specify the path of the Excel file to be used within the flow. The second variable, 'msg.lastColumnData,' is where you define the name of the column you wish to add.

Code for Set Excel Properties Function Node:

msg.excel_path = ""; // Give the excel path here
msg.lastColumnData = [""]; // Give the column name here

/*
Note!!
Each insert column node is used to insert a column.
The variable msg.lastColumnData is the column name to be added.
*/
return msg;
  1. 'The 'Open Excel' node is utilized to open the designated Excel file, with the 'msg.excel_path' variable serving as its input.

  2. The 'Get Row' node is utilized to determine the last column in an Excel file, with the row number being the input for the 'Get Row' node.

  3. The 'Get Length' node is used to obtain the length of the 'msg.row' object, which is the output of the 'Get Row' node, in order to determine the last column.

Note: To utilize the 'Get Length' node, you will need to download the 'Robomotion.Object' package. The images below demonstrate the steps to download the package.

Package Icon

Install Icon

  1. In the 'Prepare Column' function node, Excel columns are defined. The last column is determined using the 'msg.len' variable, which represents the output of the 'Get Length' node, along with the following code.

Code

var array = ["A", "B", "C", "D", "E", "F", "G", "H", "I", "J", "K", "L", "M", "N", "O", "P", "Q", "R", "S", "T", "U", "V", "W", "X", "Y", "Z"];
var len = msg.len;
msg.lastColumn = array[len]
return msg;

NOTE: The array variable defined in the 'Prepare Column' node is in the range of A-Z. If the column you are adding exceeds this range, you will need to define additional Excel columns to this variable, such as 'AA', 'AB', and so on.

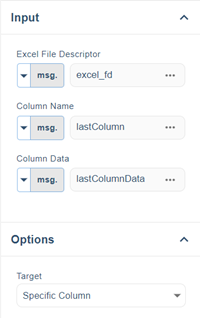
  1. The column name defined is appended to the last column found using the 'Insert Column' node.

Insert Column Node Options

  1. The Excel file is saved to the designated Excel path using the 'Save Excel' node, with the 'msg.excel_path' variable serving as the input.

  2. The saved Excel file is closed using the 'Close Excel' node.

  3. The 'Stop' node is utilized to halt the flow of execution.

Add Column in Last Flow

Here you can access the complete flow by clicking on the following link: https://casestudies.robomotion.io/designer/shared/Y8JFddYmk6qTsbCE5HDHT8

How to Use ChatGPT node in Robomotion?

· 3 min read
Süeda Gül
RPA Developer

ChatGPT is an advanced AI model developed by OpenAI. It's designed for conversational interactions and can understand and generate human-like text. With access to a wide range of knowledge sources, it can help with various tasks, provide information, and engage in meaningful conversations.

In this blog, we will guide you through an example of how to utilize the ChatGPT node in Robomotion.

How to Setup?

To begin, Log in to your Robomotion workspace. If you haven't registered yet, you can create your workspace from the provided link.

First, ensure that the OpenAI package is installed for this flow. Once the package is installed, you can proceed with the flow by utilizing its functionalities for your tasks.

About OpenAI Package

The OpenAI Package provides a simple interface to access the OpenAI API, which allows you to integrate cutting-edge natural language processing technology into your flows.

Exploring OpenAI Package: Navigating Package, Installing, and Understanding Flow Steps

  1. Click the cube icon to open the packages page.

Package Icon

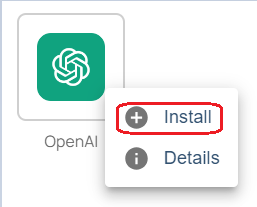
  1. Right click to a package and then click the Install.

Install Package

Flow Steps

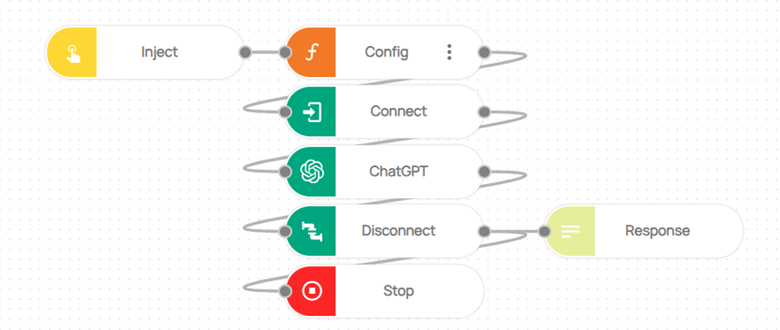
  1. ‘Inject’ node is used to initialize the flow.
  2. Function node named “Config” includes some javascript code to define variables.

Function Node Named “Config” Code-Block:

msg.askGPT = "How to identify SSL Certificate in a specific domain";
return msg;
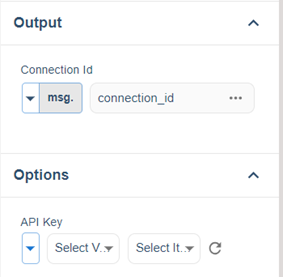
  1. The "OpenAI Connect" node facilitates the connection to your account using a provided api_key. To supply the API key, you need to generate a vault and create a vault item named API Key / Token. To generate a vault, please follow the instructions available at this link. Once the connection is established, the node provides a connection_id that can be used in other nodes within the OpenAI package.

Connect Properties

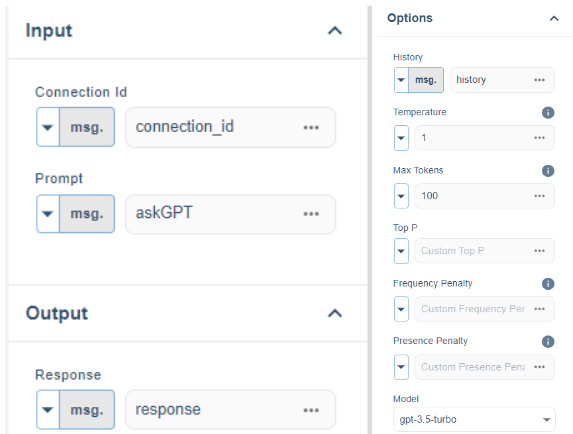
  1. The OpenAI ChatGPT API is used to obtain a response from ChatGPT for a given prompt. To modify the properties, you can make changes in the "Options" tab. For instance, the "Temperature" property affects the quality of the response. It accepts values ranging from 0 to 1. A higher value, such as 0.9, tends to produce more creative answers. On the other hand, the "Max Tokens" property constrains the lenght of the response

ChatGPT Properties

  1. OpenAI Disconnect node is used to disconnect a given account. It takes only one input: connection_id.

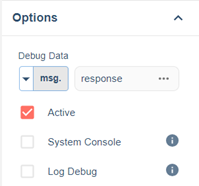
  2. The "Debug" node, labeled as "Response," is utilized to display the values of variables. By providing a particular variable as input, it will only show the value of that specific variable. In this case, we have assigned the variable "msg.response" to showcase the value of the response.

Response Properties

  1. “Stop” node is used to stop the flow

Flow Overview