Learn How to Add a Column at the End in Excel
Adding a column at the end of an Excel spreadsheet is a common need that arises from various practical scenarios. Whether it's for better data organization, appending new information, performing calculations, conducting data analysis, or enhancing visualization and reporting, the ability to seamlessly add a column at the end proves to be invaluable.
In this blog, we will explore an efficient method to accomplish this task using Excel's 'insert column' node.
How to Setup?
To begin, Log in to your Robomotion workspace. If you haven't registered yet, you can create your workspace from the provided link.
About Core Excel Package
The Excel package offers a range of features and functionalities to work with spreadsheets, such as create and copy sheets, setting formulas, delete or add columns and more.
Note: This flow specifically utilizes Core Excel. It is important to note that if you attempt to perform the same operations using the MS Excel Package, it may result in errors. Therefore, it is recommended to stick with Core Excel to ensure the smooth execution of the flow.
How to add a column at the end in Excel?
To add a column at the end in Excel, you can follow these steps:
-
Utilize the 'insert column' node: Use the 'insert column' node, which allows you to seamlessly add a new column to your Excel file.
-
Locate the last column: Start by using the 'get row' node to find the last column in the current Excel file. This can be achieved by extracting the length of the msg.row object, which is the output of the 'get row' node.
-
Add the column: Once you have determined the position of the last column, use the 'insert column' node to add the new column to the Excel file. This operation ensures that the column is placed at the end of the spreadsheet.
-
Save your changes: Remember to save the Excel file after adding the column to preserve your modifications and ensure that they are retained for future use.
Flow Steps
-
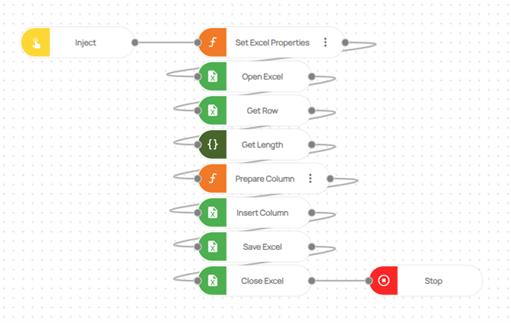
‘Inject’ node is used to initialize the flow.
-
Additionally, two crucial variables are defined using a "function" node. The first variable, 'msg.excel_path,' allows you to specify the path of the Excel file to be used within the flow. The second variable, 'msg.lastColumnData,' is where you define the name of the column you wish to add.
Code for Set Excel Properties Function Node:
msg.excel_path = ""; // Give the excel path here
msg.lastColumnData = [""]; // Give the column name here

/*
Note!!
Each insert column node is used to insert a column.
The variable msg.lastColumnData is the column name to be added.
*/
return msg;
-
'The 'Open Excel' node is utilized to open the designated Excel file, with the 'msg.excel_path' variable serving as its input.
-
The 'Get Row' node is utilized to determine the last column in an Excel file, with the row number being the input for the 'Get Row' node.
-
The 'Get Length' node is used to obtain the length of the 'msg.row' object, which is the output of the 'Get Row' node, in order to determine the last column.
Note: To utilize the 'Get Length' node, you will need to download the 'Robomotion.Object' package. The images below demonstrate the steps to download the package.
- In the 'Prepare Column' function node, Excel columns are defined. The last column is determined using the 'msg.len' variable, which represents the output of the 'Get Length' node, along with the following code.
Code
var array = ["A", "B", "C", "D", "E", "F", "G", "H", "I", "J", "K", "L", "M", "N", "O", "P", "Q", "R", "S", "T", "U", "V", "W", "X", "Y", "Z"];
var len = msg.len;
msg.lastColumn = array[len]
return msg;
NOTE: The array variable defined in the 'Prepare Column' node is in the range of A-Z. If the column you are adding exceeds this range, you will need to define additional Excel columns to this variable, such as 'AA', 'AB', and so on.
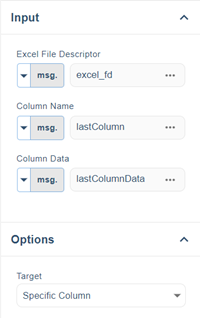
- The column name defined is appended to the last column found using the 'Insert Column' node.

-
The Excel file is saved to the designated Excel path using the 'Save Excel' node, with the 'msg.excel_path' variable serving as the input.
-
The saved Excel file is closed using the 'Close Excel' node.
-
The 'Stop' node is utilized to halt the flow of execution.

Here you can access the complete flow by clicking on the following link: https://casestudies.robomotion.io/designer/shared/Y8JFddYmk6qTsbCE5HDHT8
